 Mailu is a simple yet full-featured mail server as a set of Docker images. It is easy to deploy and manage, making it an ideal choice for those looking to set up a mail server with minimal hassle.
It’s also an email server that uses Docker like Docker Mailserver and mailcow. What’s best is this is a free and open-source mail server stack.
Today, I will guide you on how to setup a mail server on Debian using Mailu, covering everything from prerequisites to troubleshooting.
Prerequisites
Before you begin, ensure you have the following:
- A VPS or Dedicated Server: A machine with a clean installation of a Linux-based operating system (Debian, Ubuntu, or CentOS recommended). I recommend RackNerd or UltaHost.
- A Domain Name: You will need a registered domain name on Namecheap or other domain registrars.
- Docker and Docker Compose: Installed on your server. You can follow the official Docker documentation for installation instructions.
- Basic Knowledge of Linux Command Line: Familiarity with basic commands and file editing in Linux.
How to Setup a Mail Server on Debian Using Mailu
Step 1. Get a VPS
Buy a VPS on RackNerd or UltaHost. We’ll use a VPS that doesn’t block port 25.
If you want to use RackNerd, choose LA or France locations. We will be using Debian 12 to install Mailu.

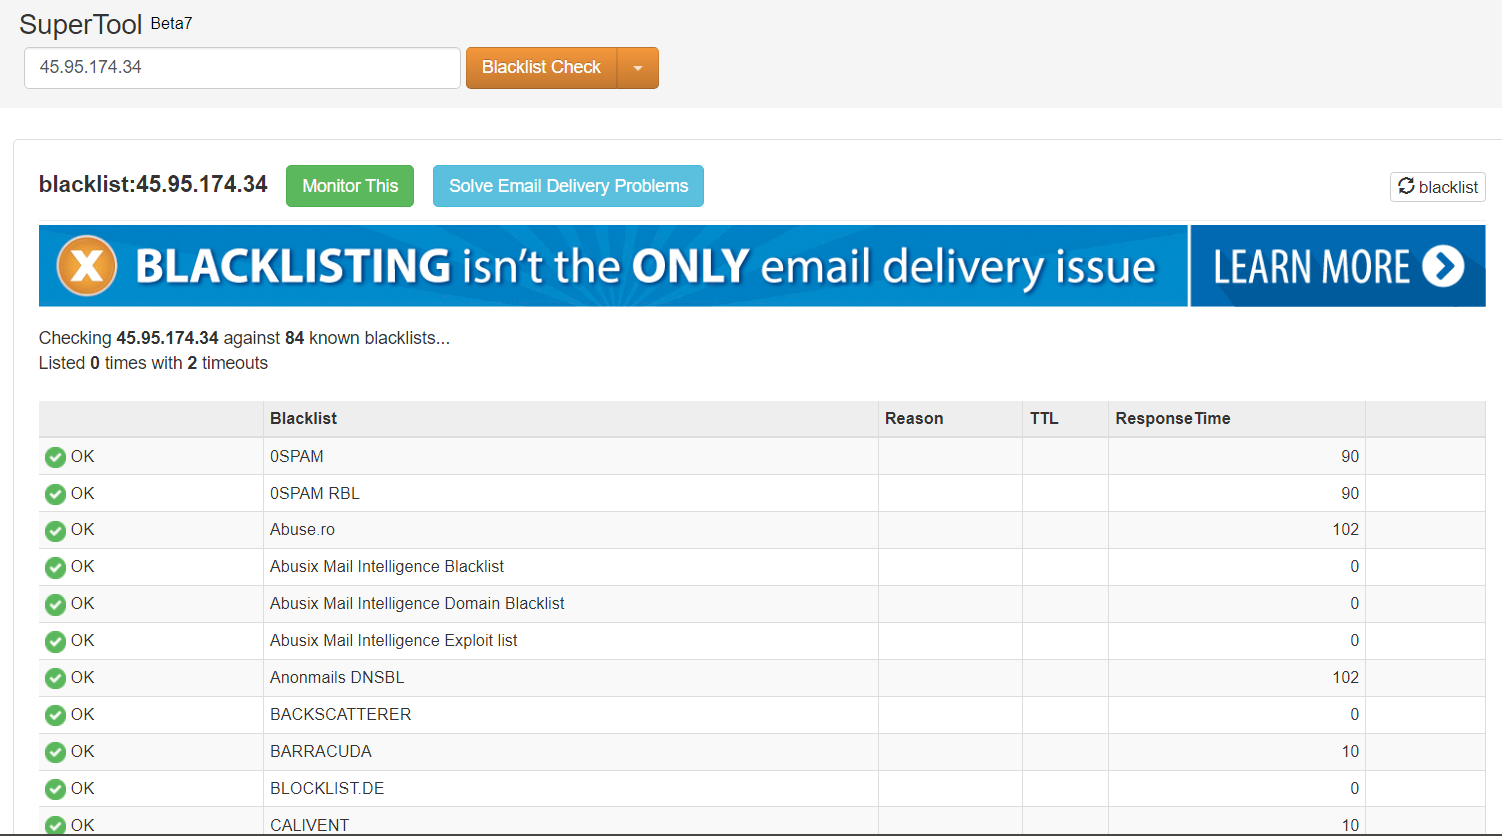
Once your VPS is activated, check your IP on MXToolBox.
After that, get a free IPv6 by contacting their support.
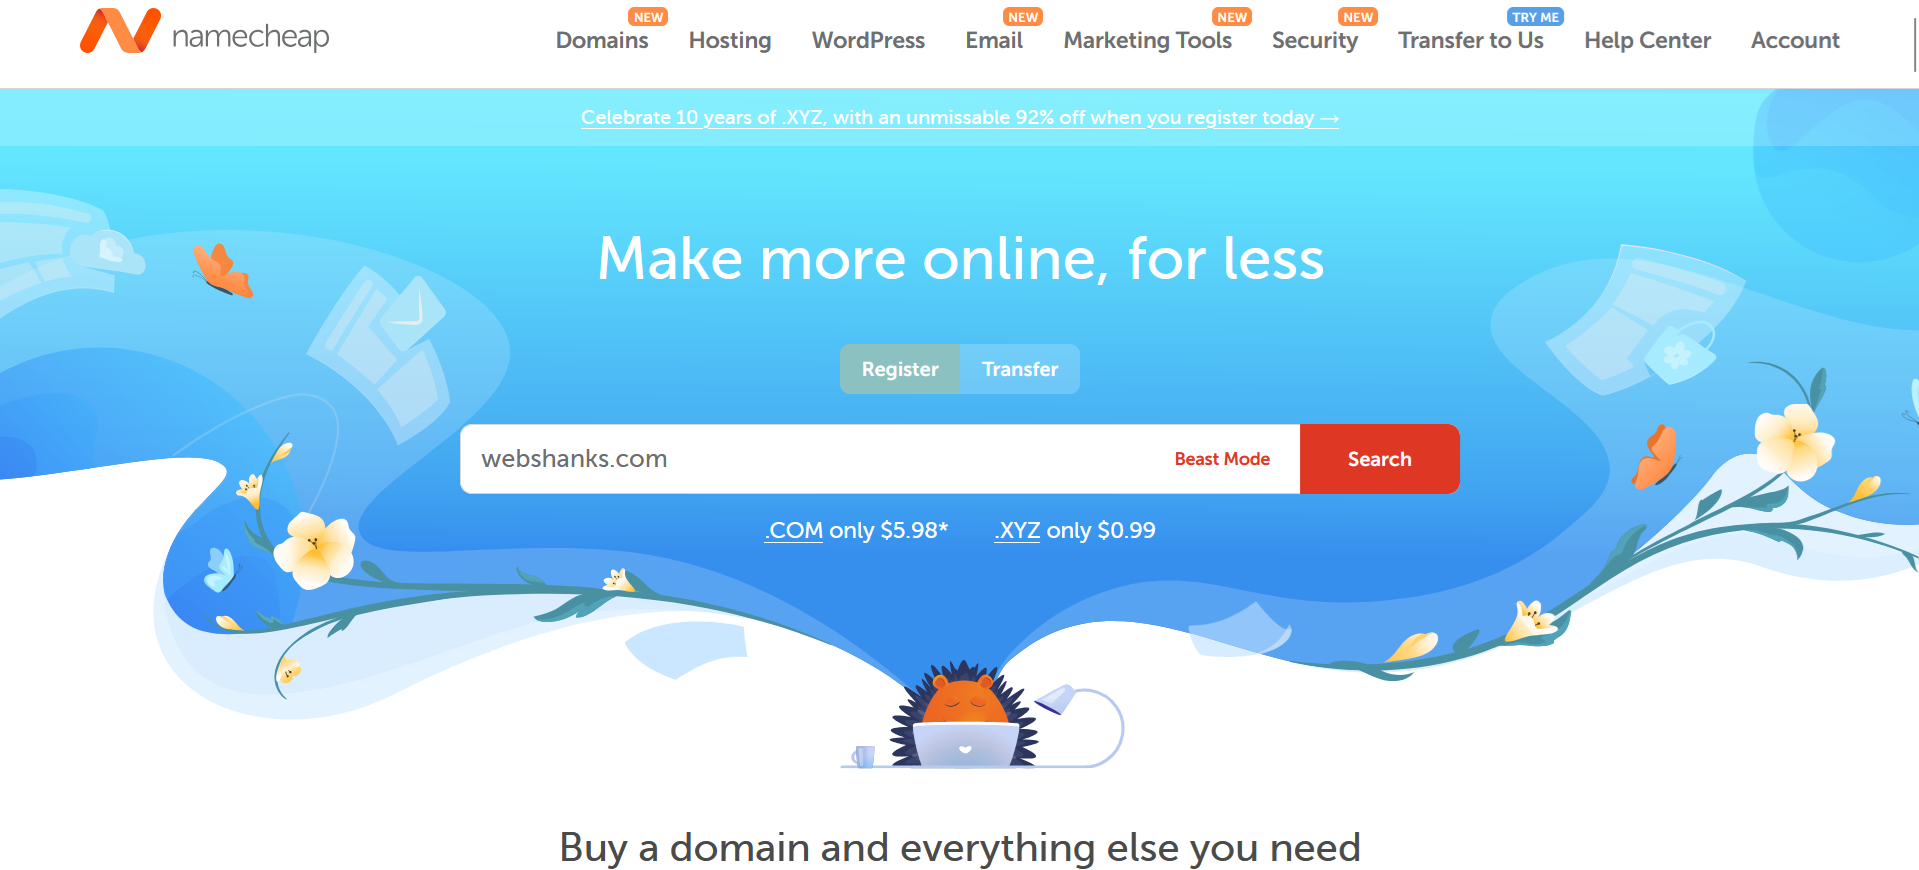
Step 2: Get a Domain Name
Go to Namecheap and register your domain there.
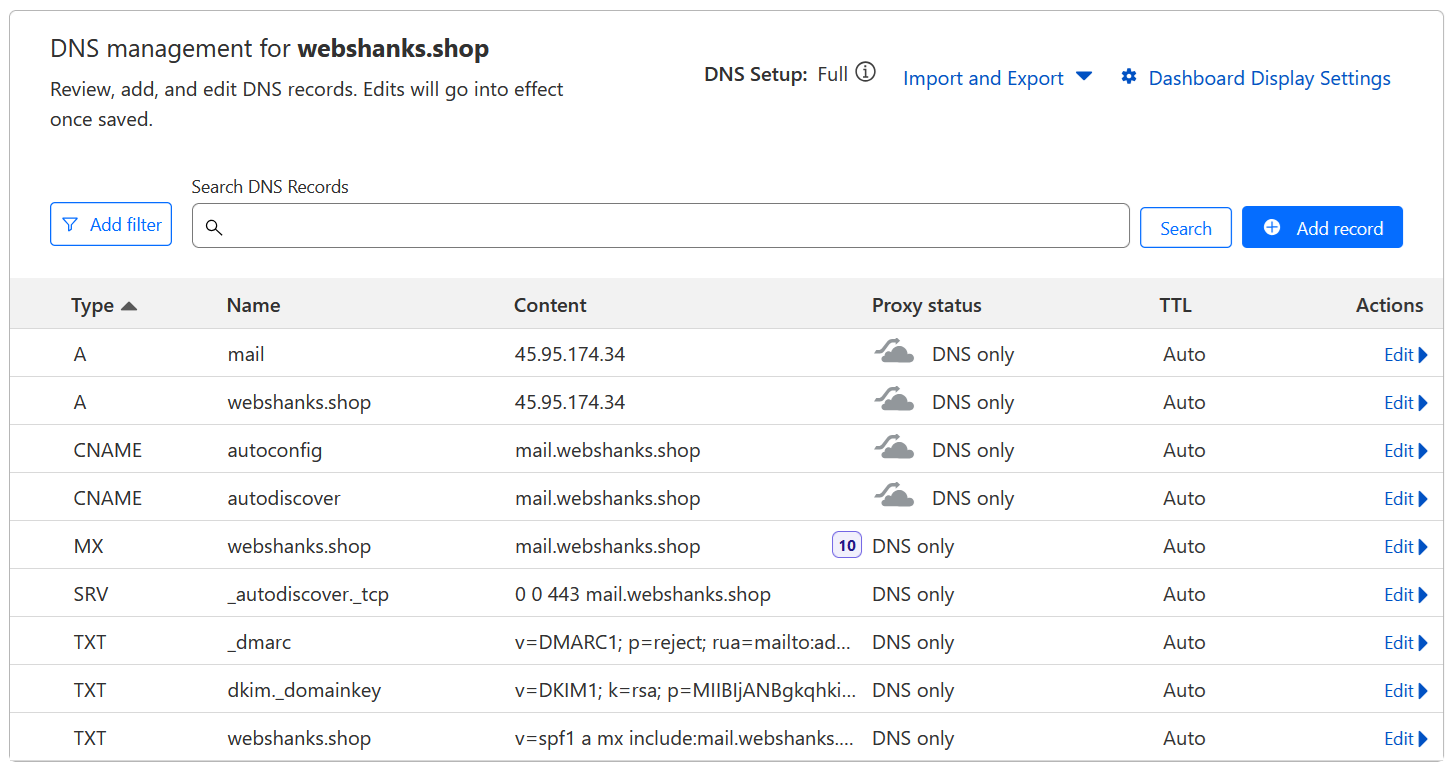
Step 3: Setup Initial DNS, rDNS and Hostname
Go to your control panel and set your hostname. I’ll set it to mail.webshanks.shop.

Then open a ticket on RackNerd and let them know that you want to set rDNS for both IPv4 and IPv6 to mail.webshanks.shop. Be sure to put your own domain.
Finally, you will need to add two A records:

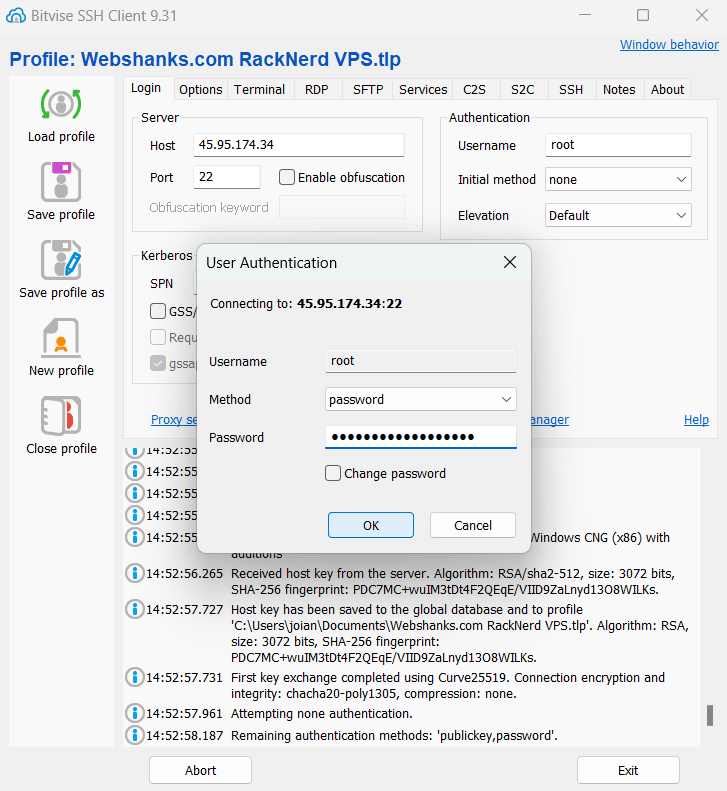
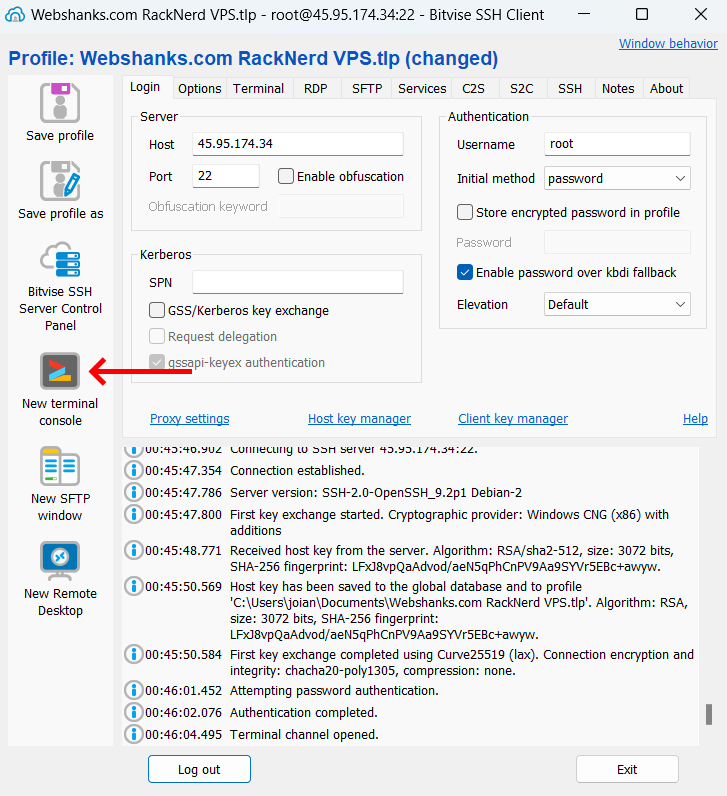
Step 4: Connect to Your Server
Download and run a free SSH client like Bitvise.
For advanced users, instead of using password-based authentication, you might want to switch to SSH keys authentication.
This enhances your server security.
Start by updating your server to ensure all packages are up-to-date:
For root:
apt update && apt upgrade -y && apt -y install curl wget sudo
For non-root with sudo privileges:
sudo apt update && sudo apt upgrade -y
If you haven’t installed Docker and Docker Compose yet, you can do so by running:
# Install Docker
curl -fsSL https://get.docker.com -o get-docker.sh
sudo sh get-docker.sh

# Install Docker Compose
sudo curl -L "https://github.com/docker/compose/releases/download/$(curl -s https://api.github.com/repos/docker/compose/releases/latest | grep tag_name | cut -d '"' -f 4)/docker-compose-$(uname -s)-$(uname -m)" -o /usr/local/bin/docker-compose
sudo chmod +x /usr/local/bin/docker-compose
You can also find a detailed guide to installing Docker here.
Step 5: Install Mailu
Create a directory for Mailu configuration files:
mkdir -p /mailu && cd /mailu
Now let’s use this super handy setup utility by Mailu.
Let’s break down this part step by step.
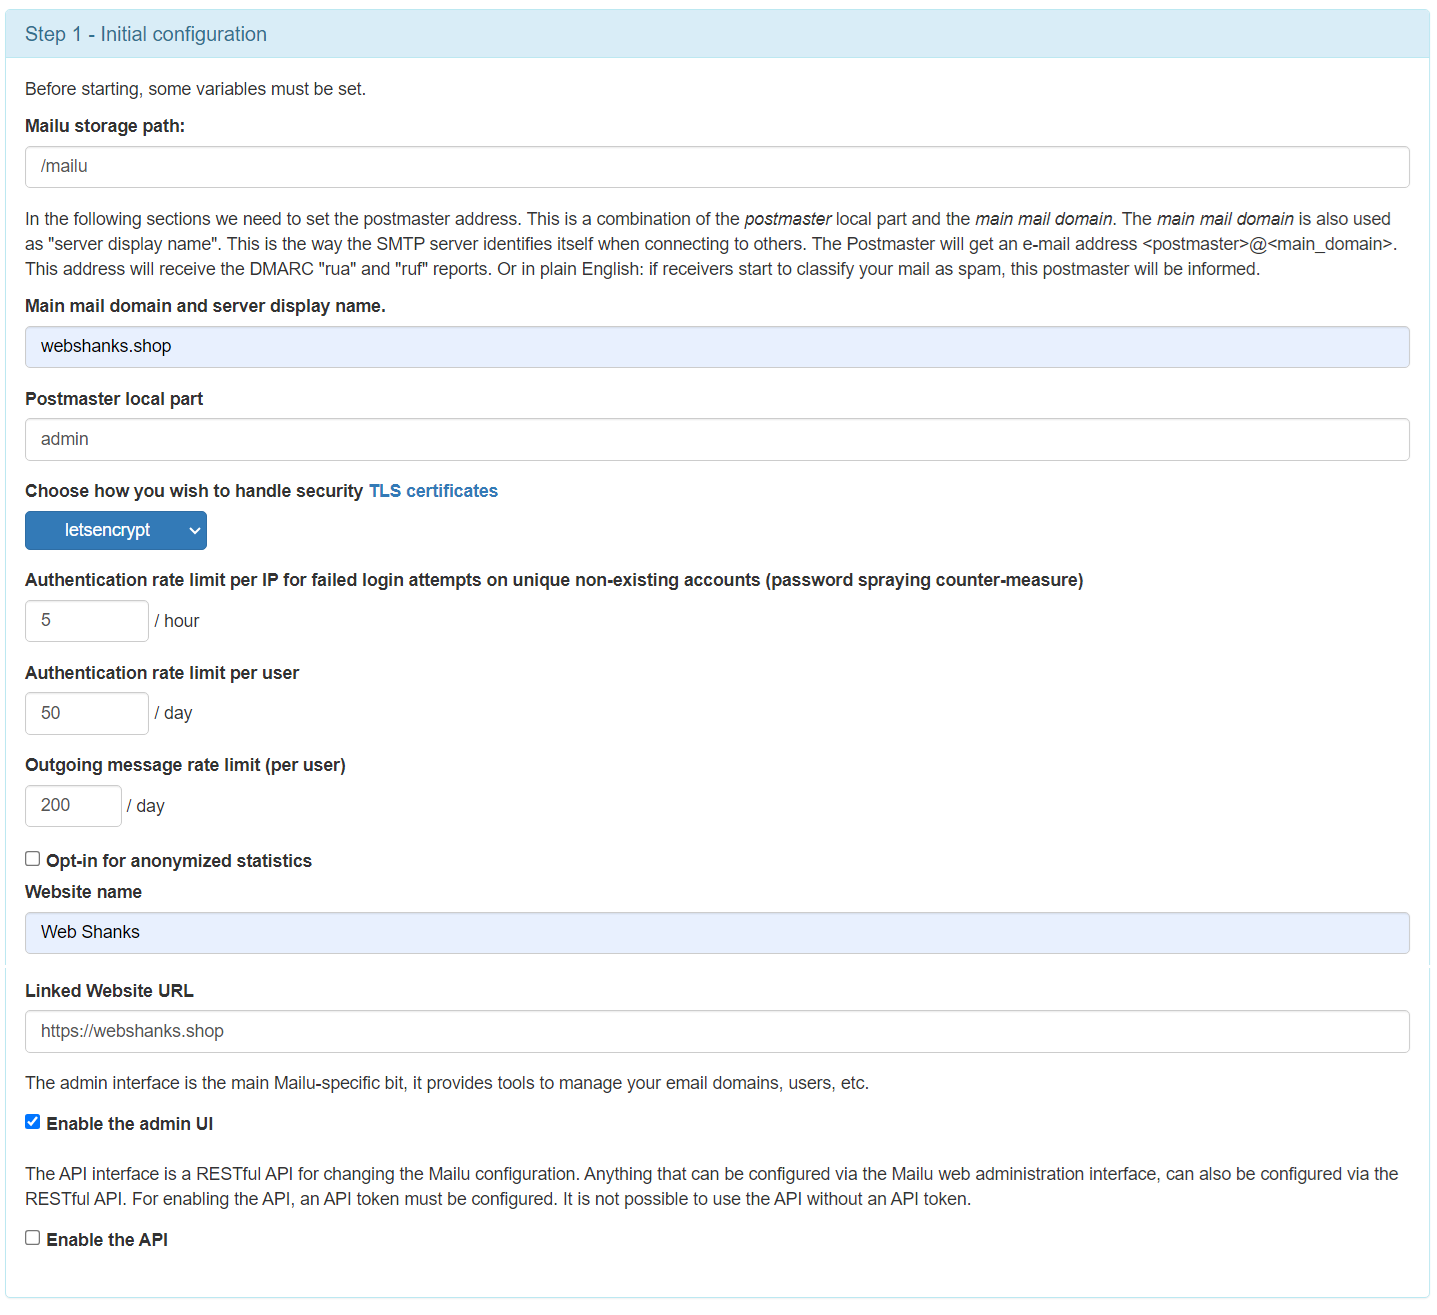
Step 1 – Initial configuration:
- Mailu storage path: /mailu
- Main mail domain and server display name: webshanks.shop (your domain).
- Postmaster local part: admin
- Choose how you wish to handle security TLS certificates: letsencrypt
- Website name: Web Shanks (your preferred name).
- Linked Website URL: https://webshanks.shop
- Enable the admin UI: yes
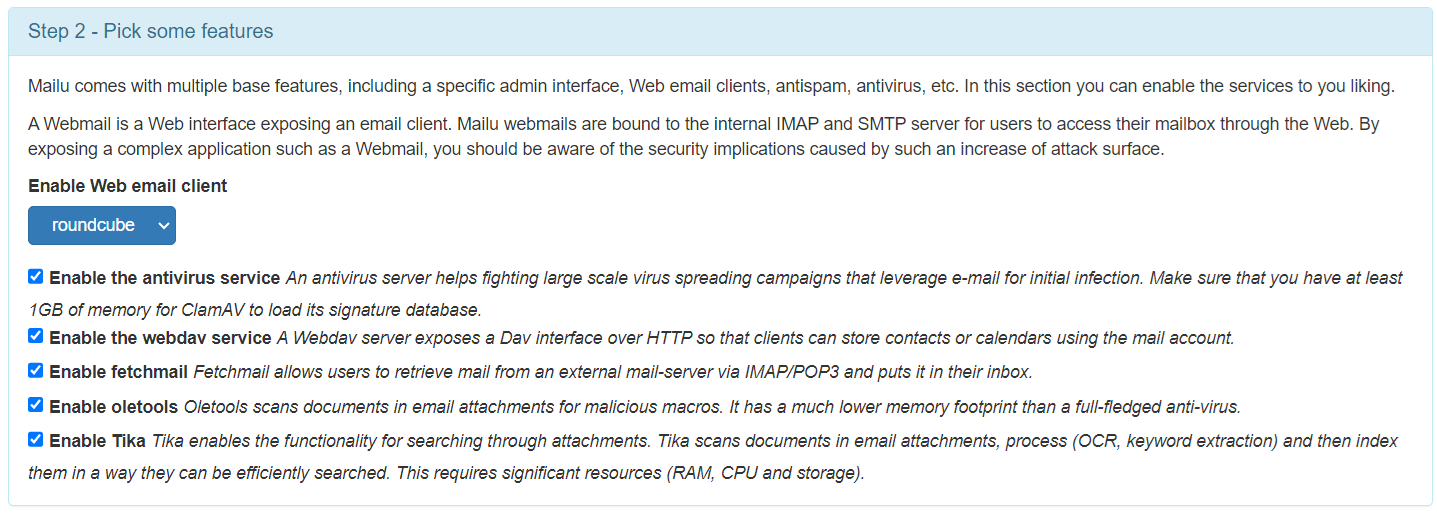
Step 2 – Pick some features:
- Enable Web email client: roundcube
- Enable the antivirus service: yes
- Enable the webdav service: yes
- Enable fetchmail: yes
- Enable oletools: yes
- Enable Tika: yes
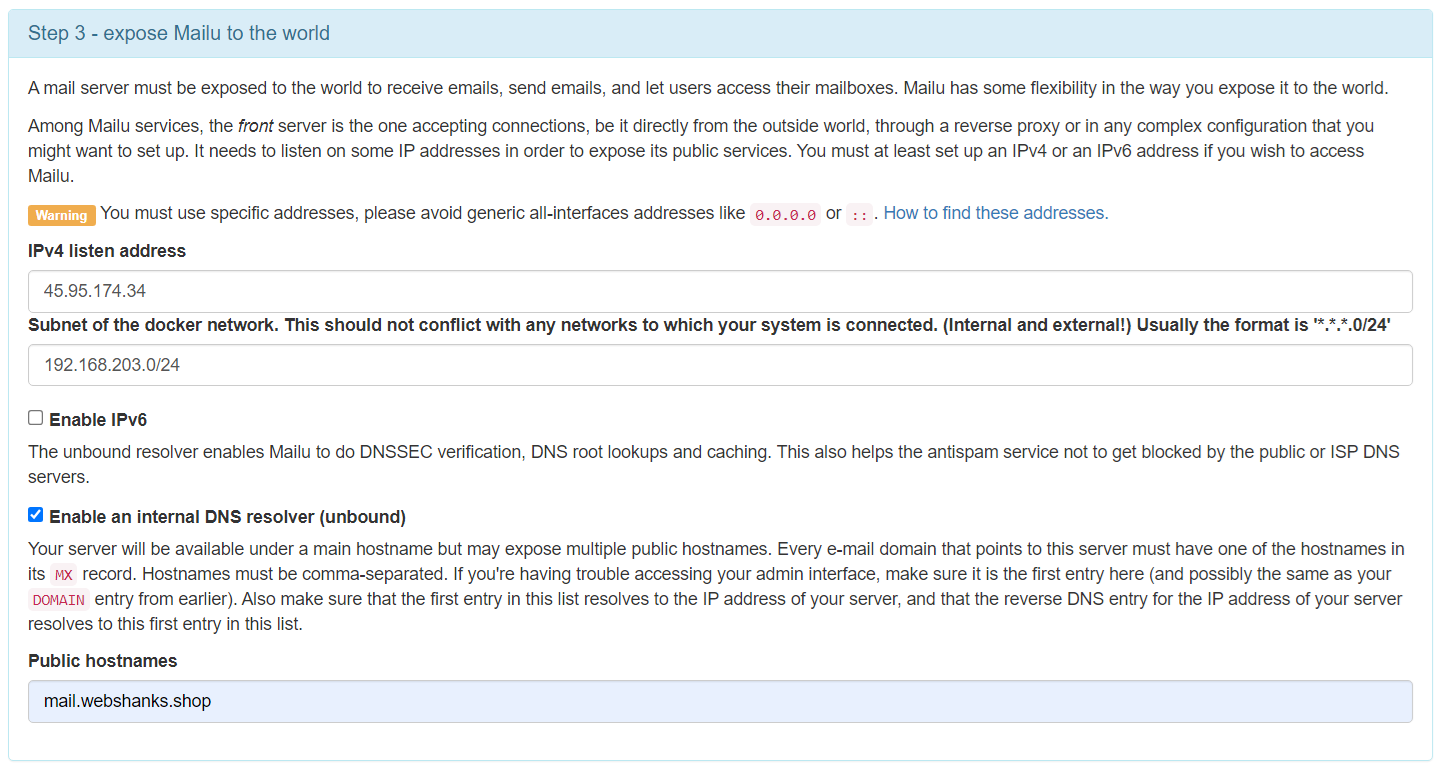
Step 3 – expose Mailu to the world:
- IPv4 listen address: your IPv4
- Enable an internal DNS resolver (unbound): yes
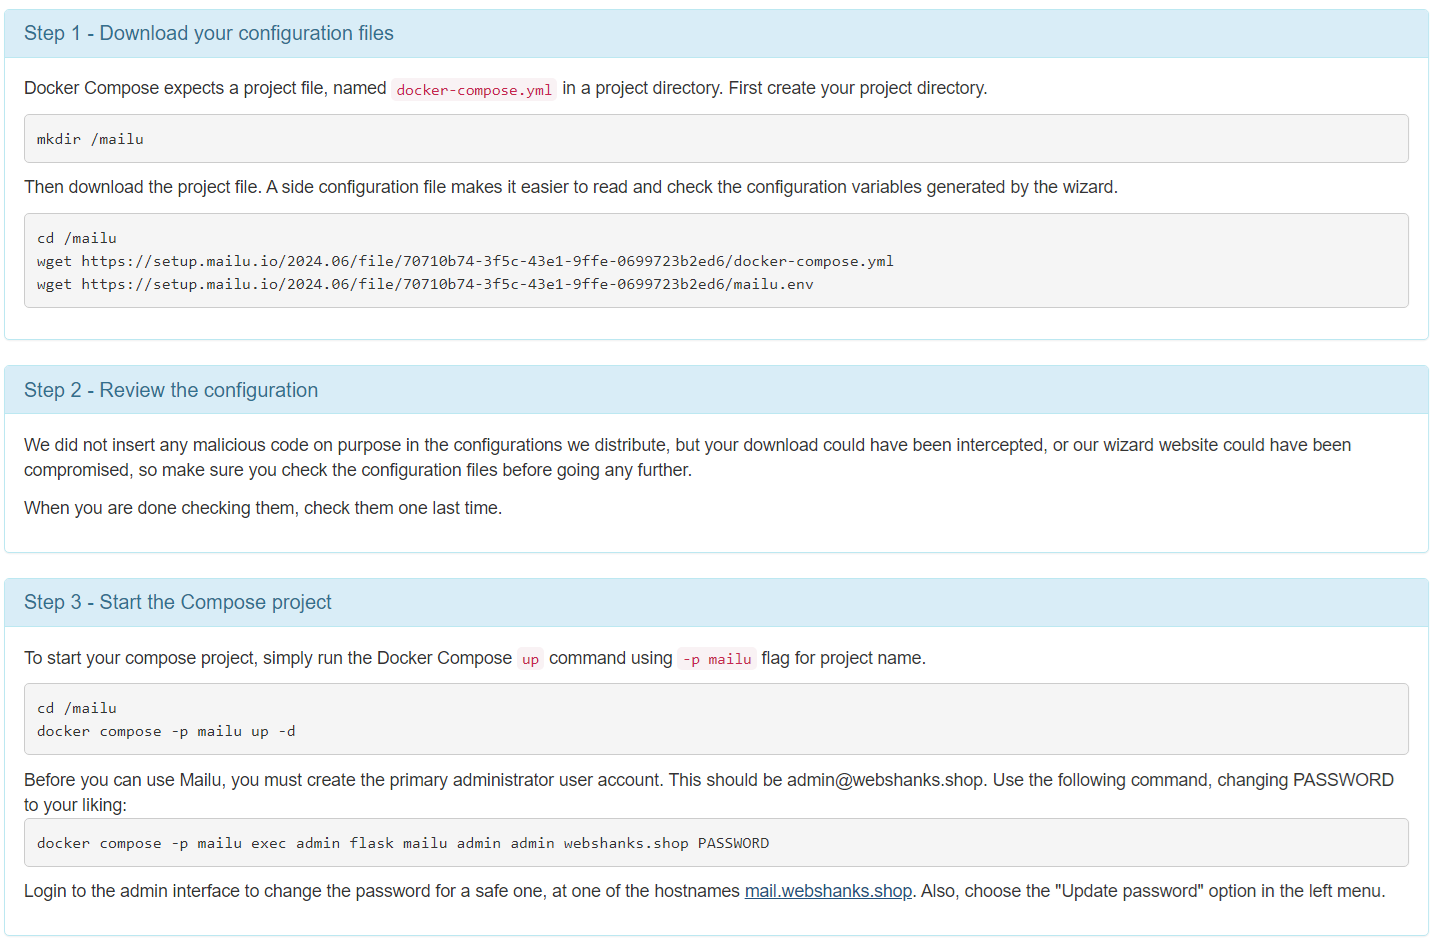
Mailu configuration – Your configuration was generated
Finally, you will use this configuration in installing Mailu.
Step 6: Access the Admin Interface
Once Mailu is running, you can access the admin interface to manage your mail server: http://mail.yourdomain.com/admin
Log in with the default admin credentials you set. From here, you can create email accounts, aliases, and manage your server.

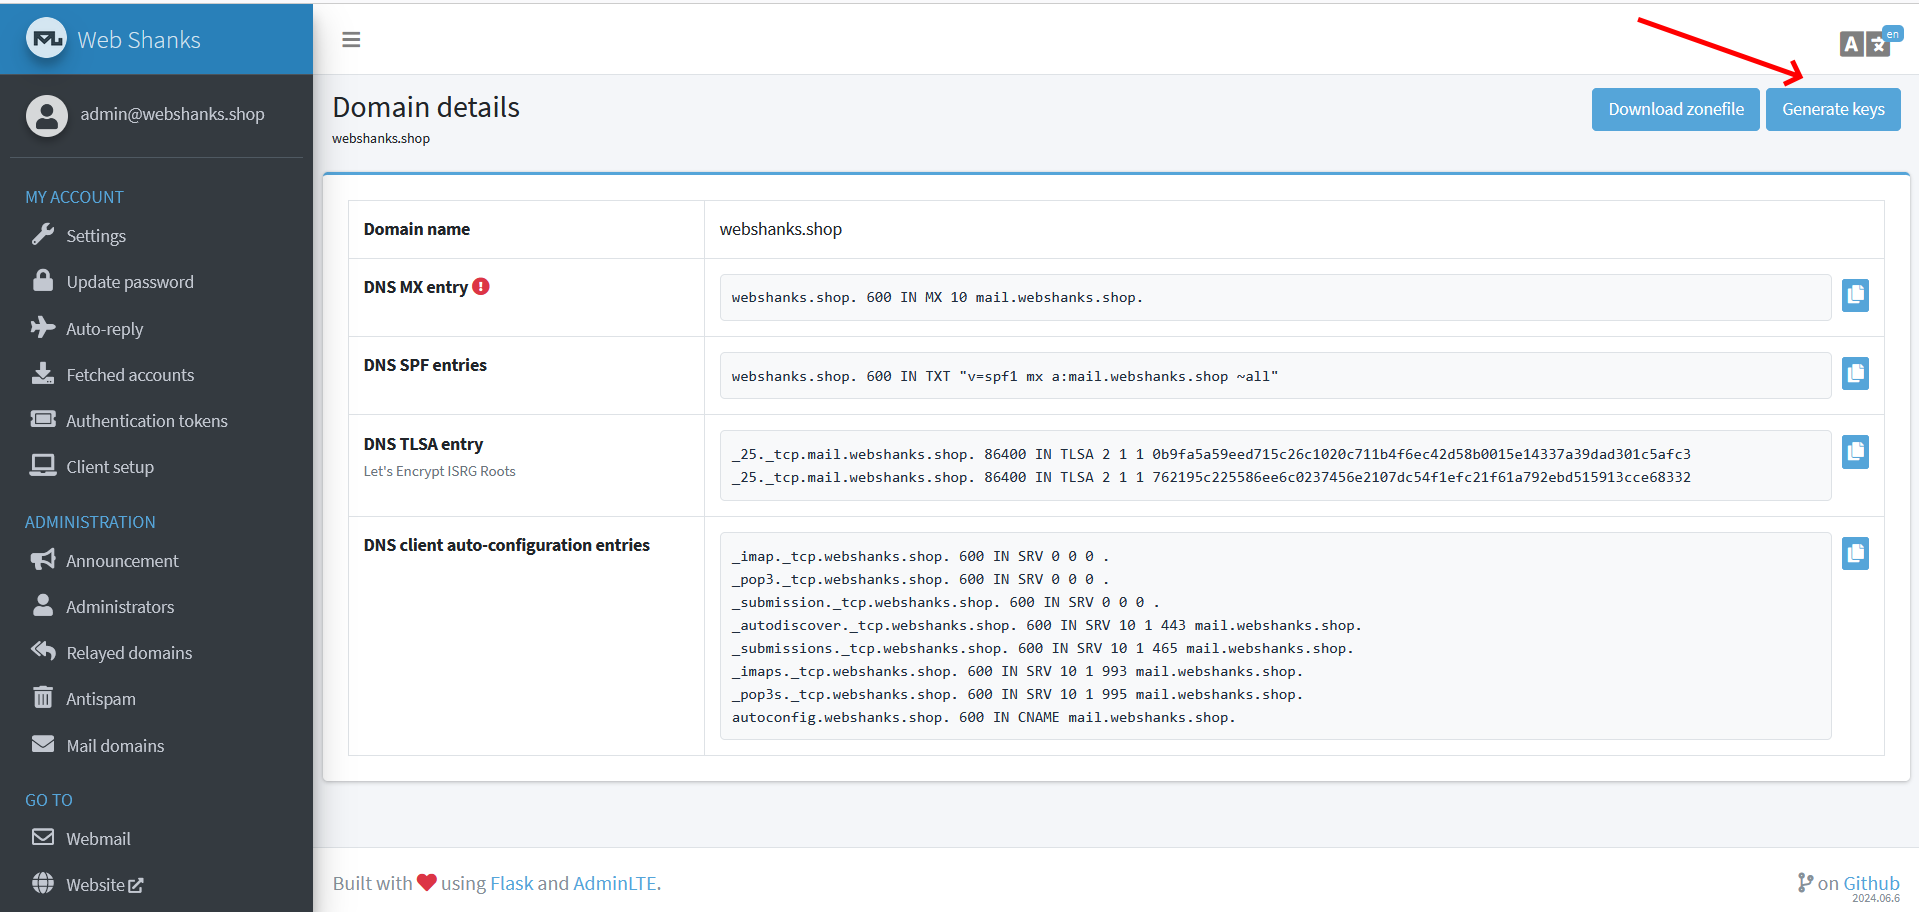
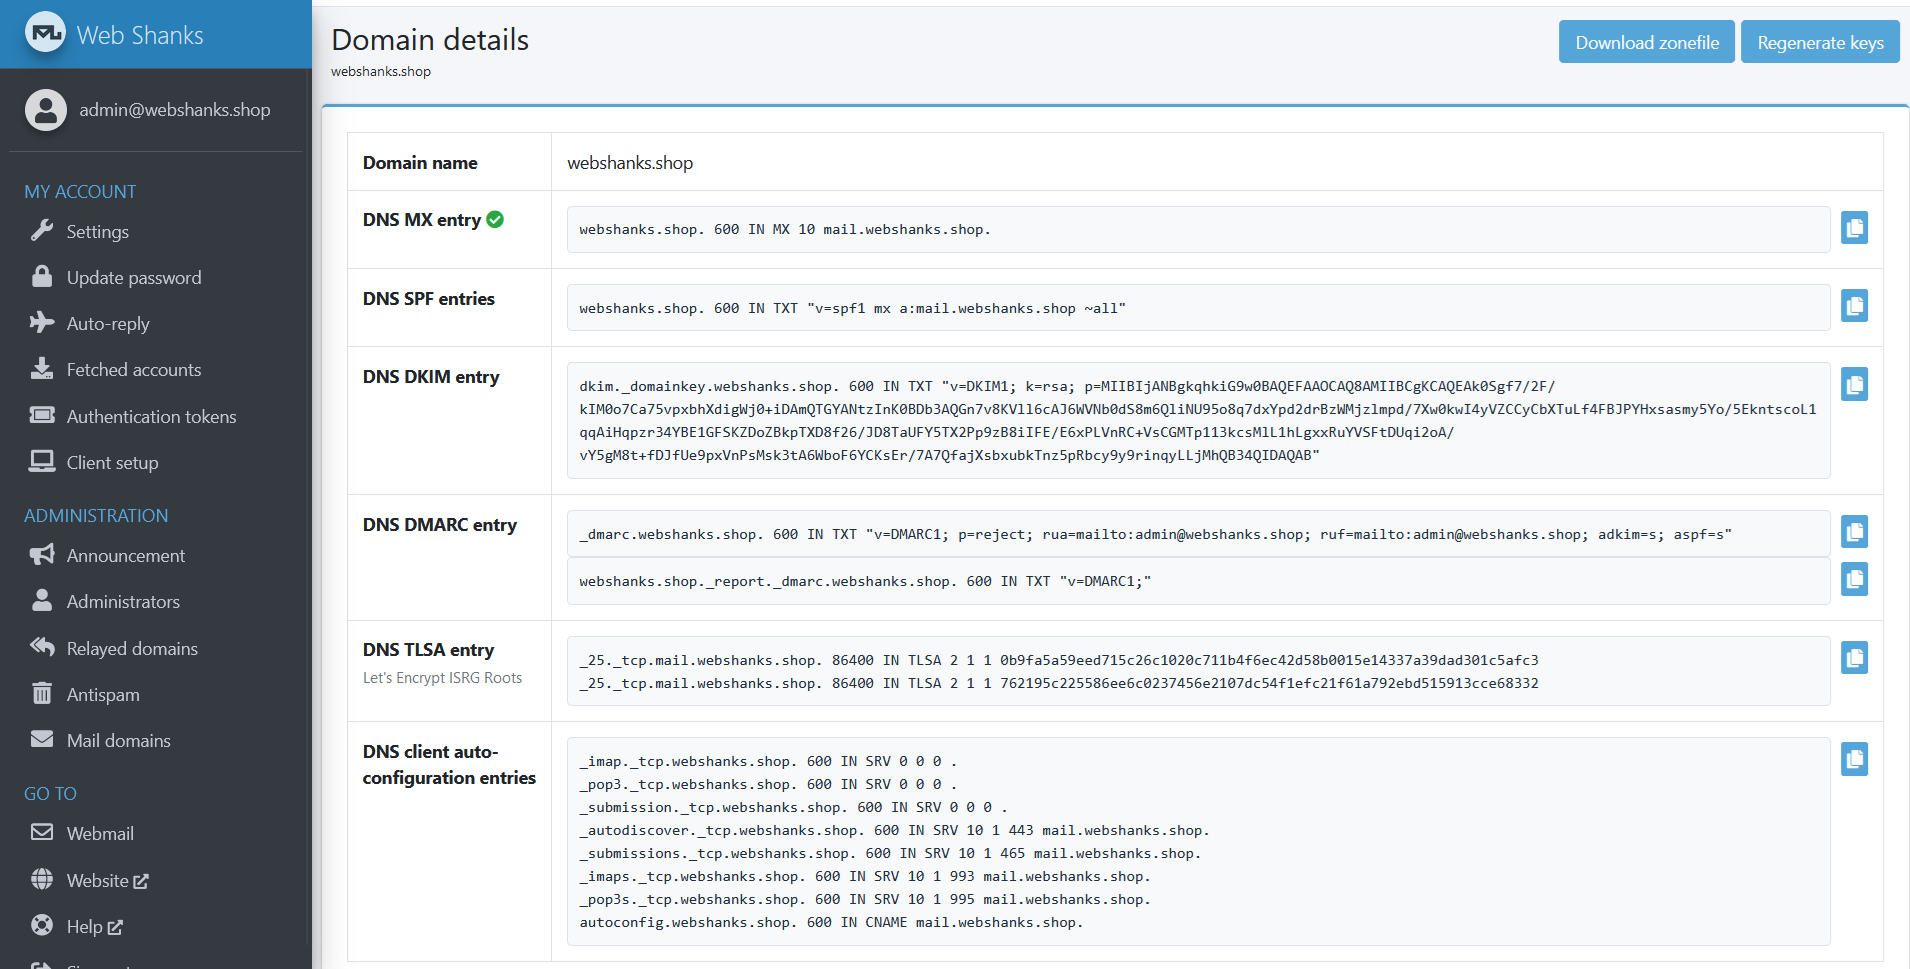
Step 7: Setup DNS Records
Now, let’s setup our DNS records.
Go to Mail Domains and choose the domain you want to set DNS records with.
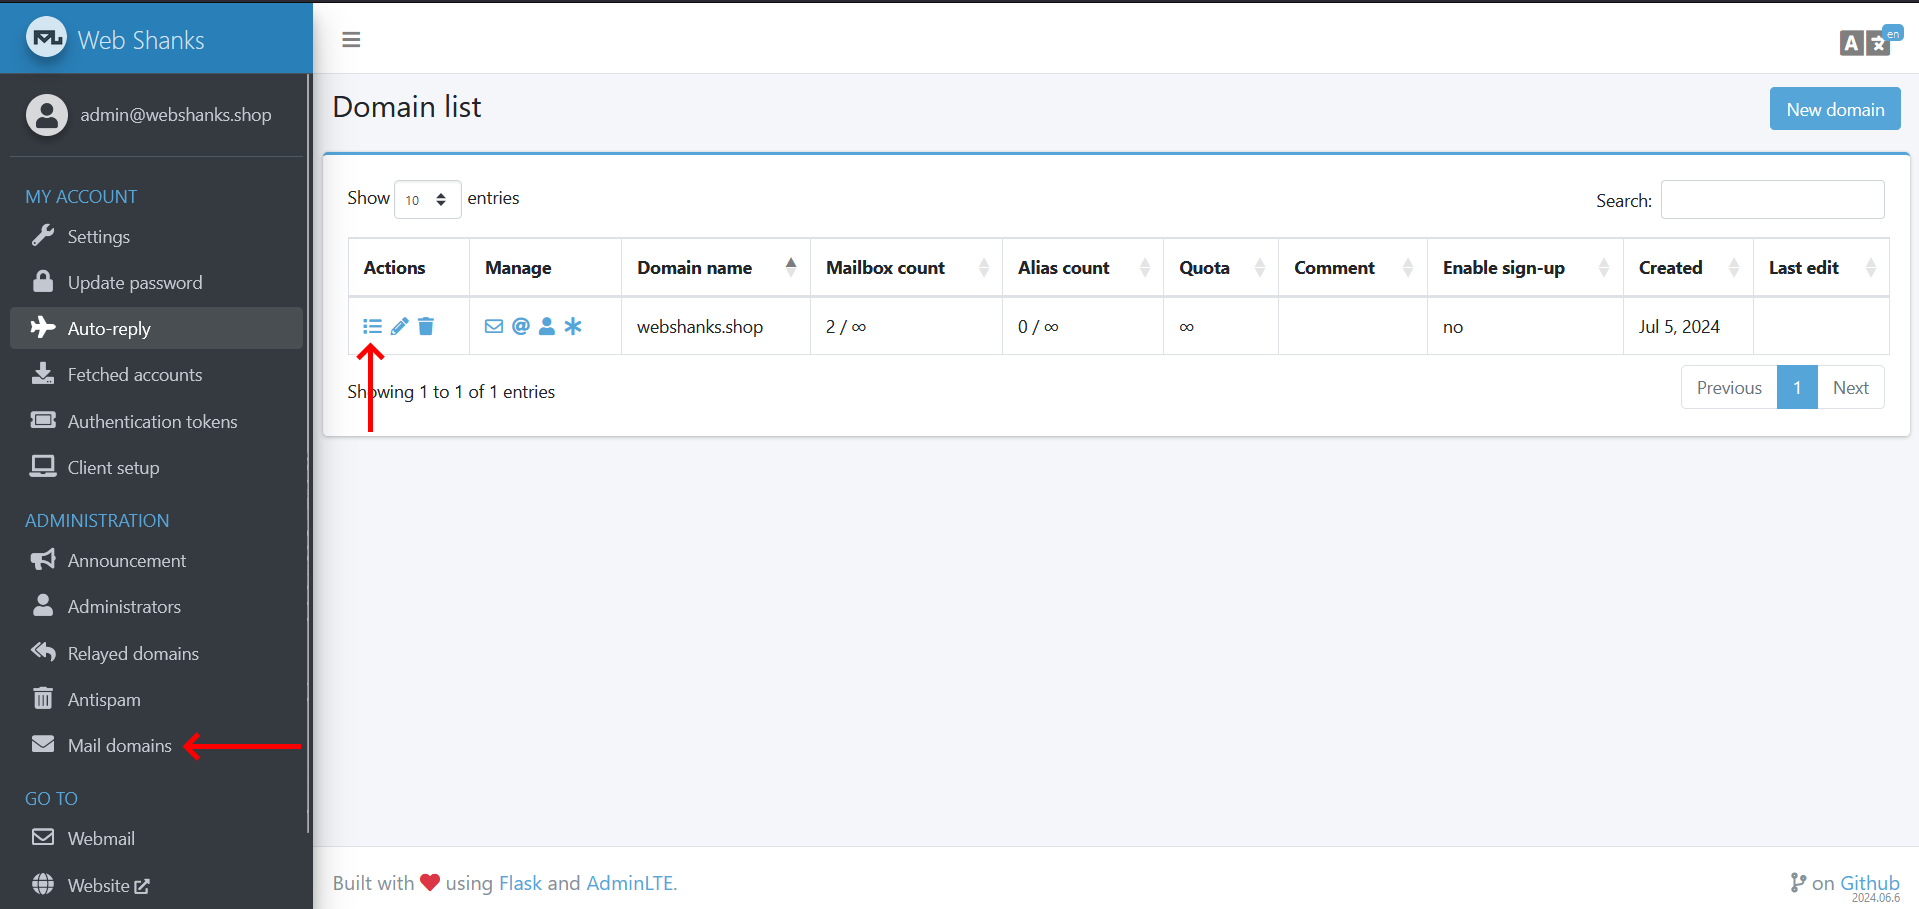
We will need to set this to our DNS provider.
For DMARC and DKIM, we will need to generate keys.
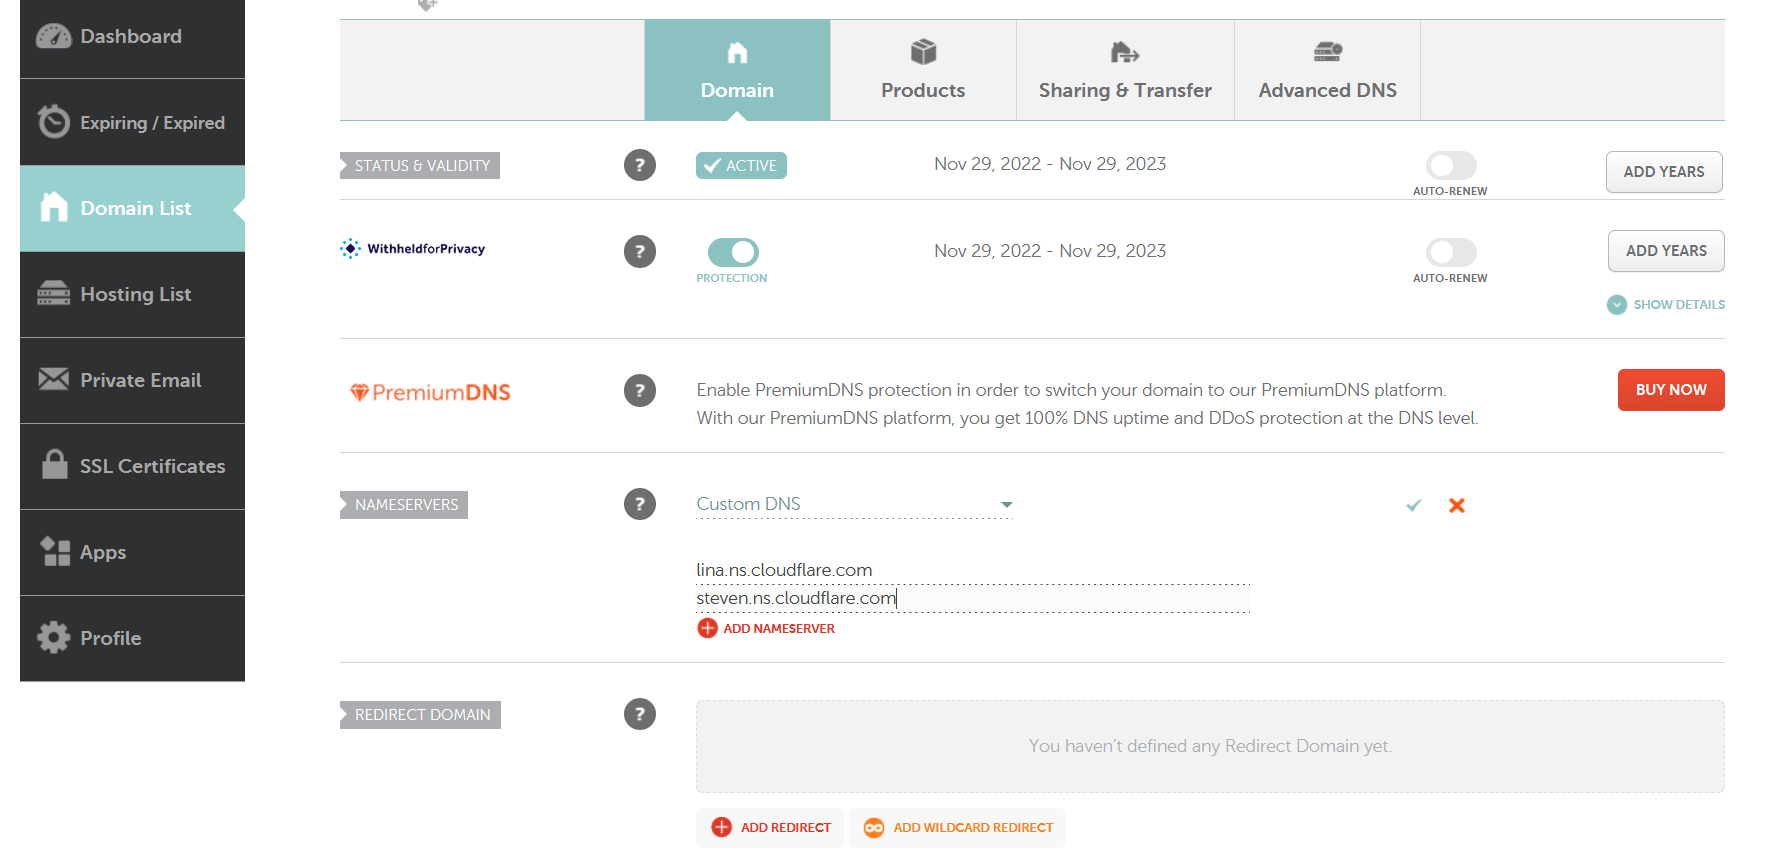
I’ll be using a free Cloudflare account.
We will add Cloudflare’s nameservers to Namecheap.
We will map Mailu DNS records to our Cloudflare.
Step 8: Test Email Deliverability
Finally, we can test our email deliverability.
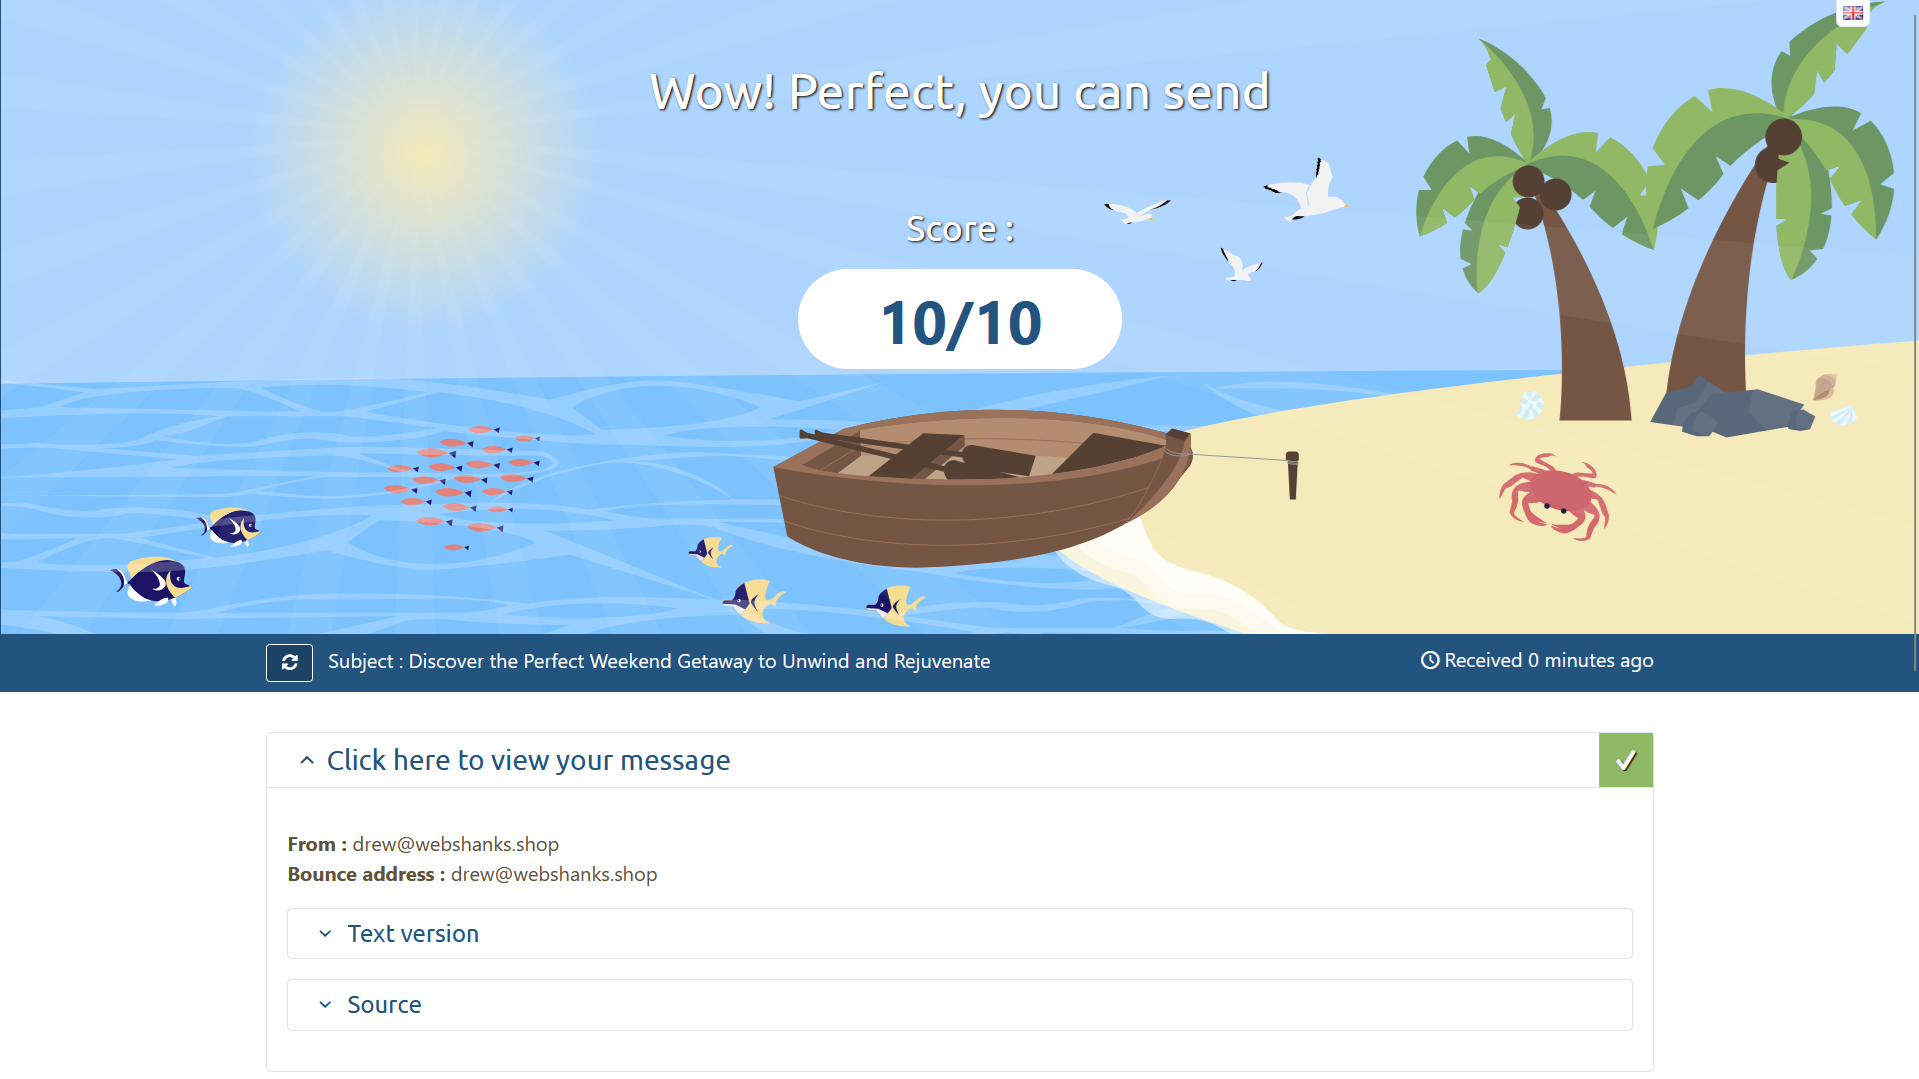
Let’s send a test email to Mail-Tester.
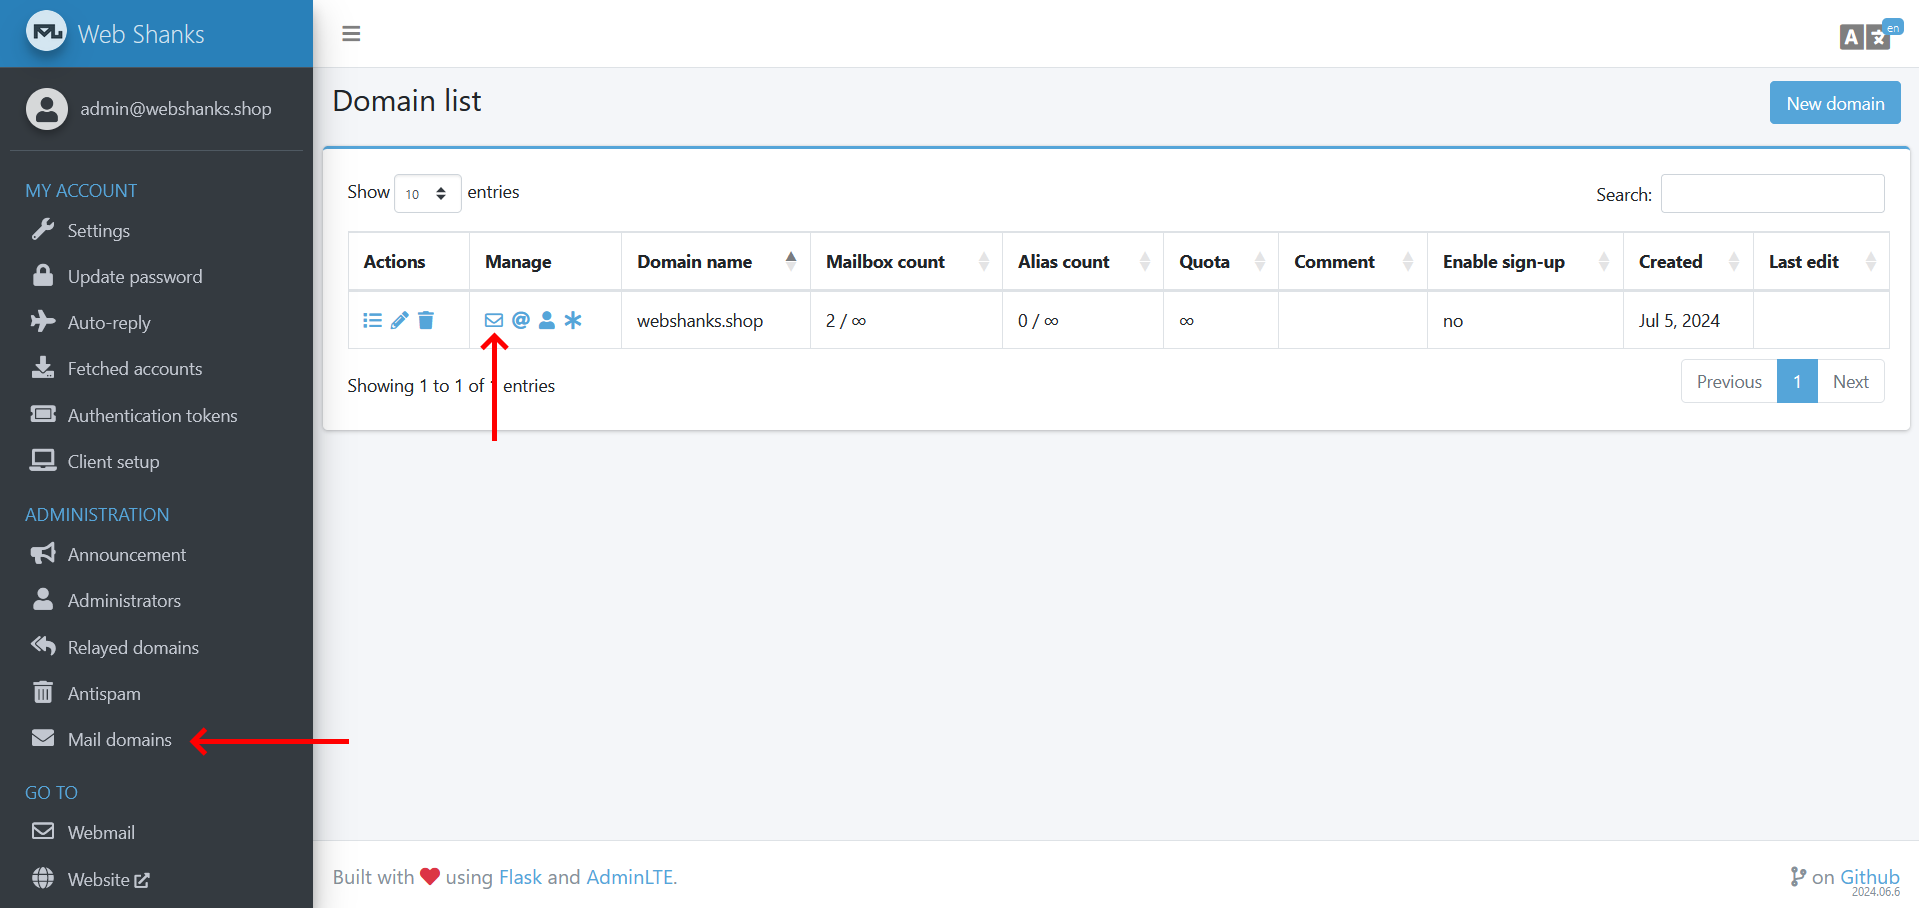
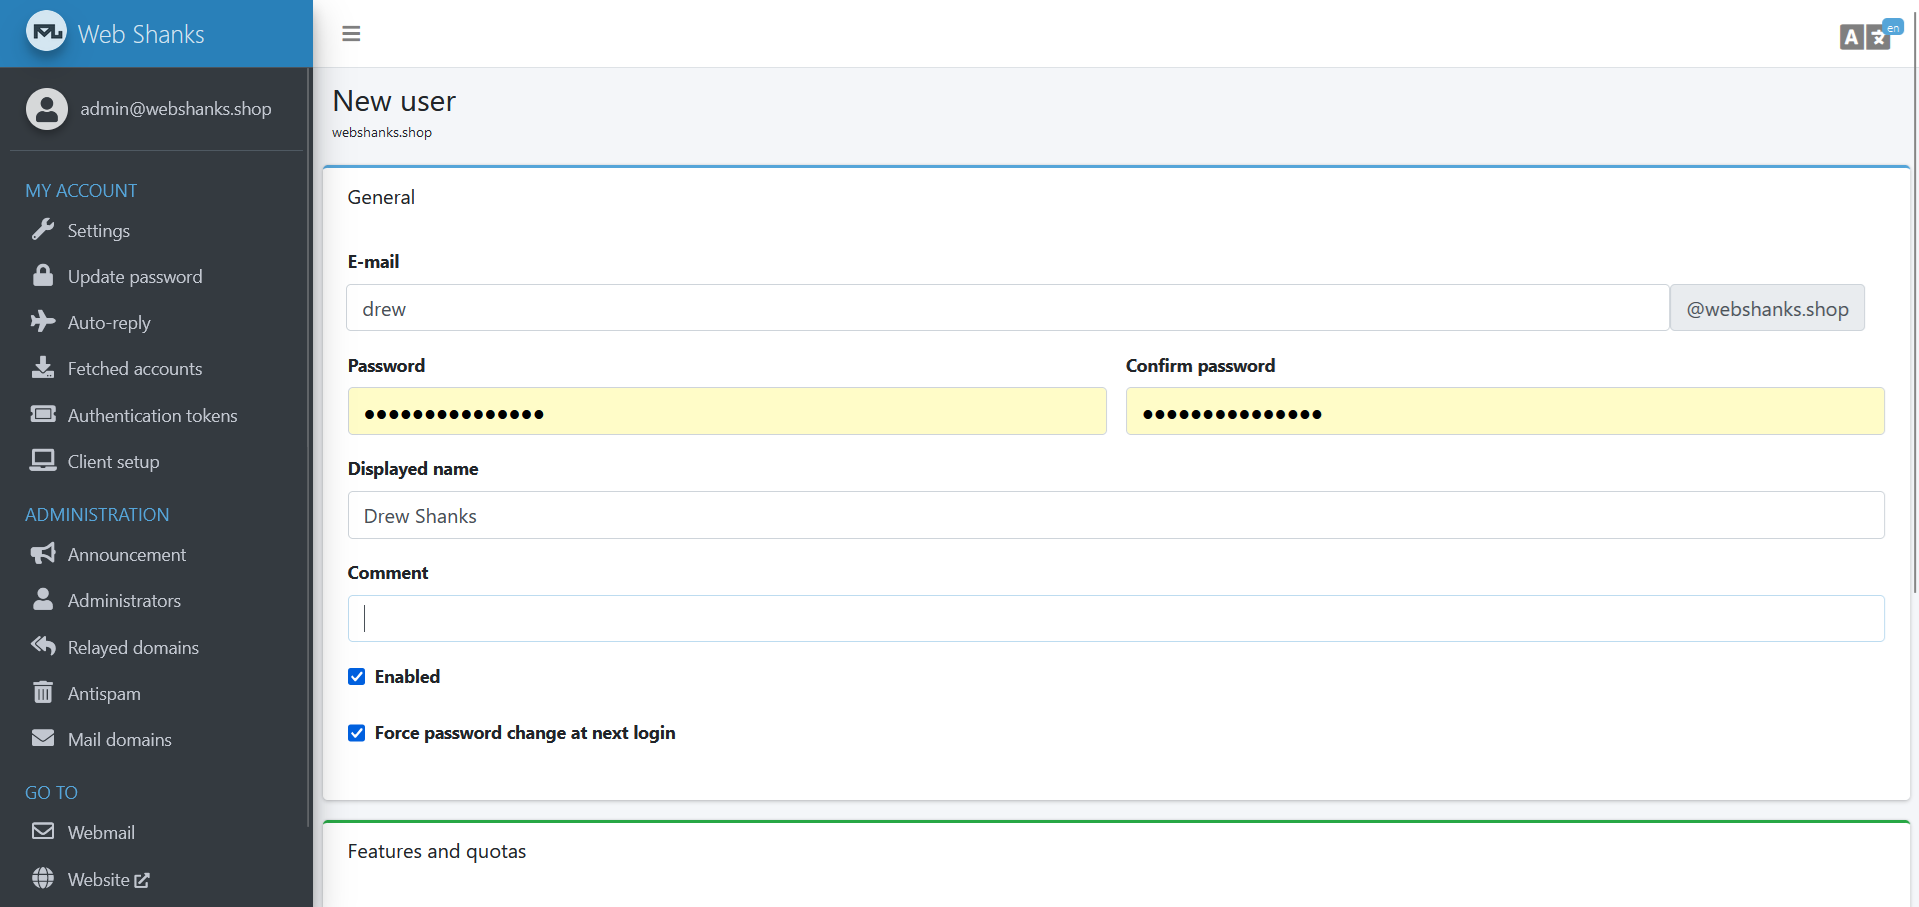
But first, we will add a user.
Go to Mail Domains > Click the Envelop Icon.
Login using the newly created account.
Let’s send a test email to Mail-Tester.

We got a perfect score!
Now let’s try to send an email to Gmail.
We received it directly in our inbox!
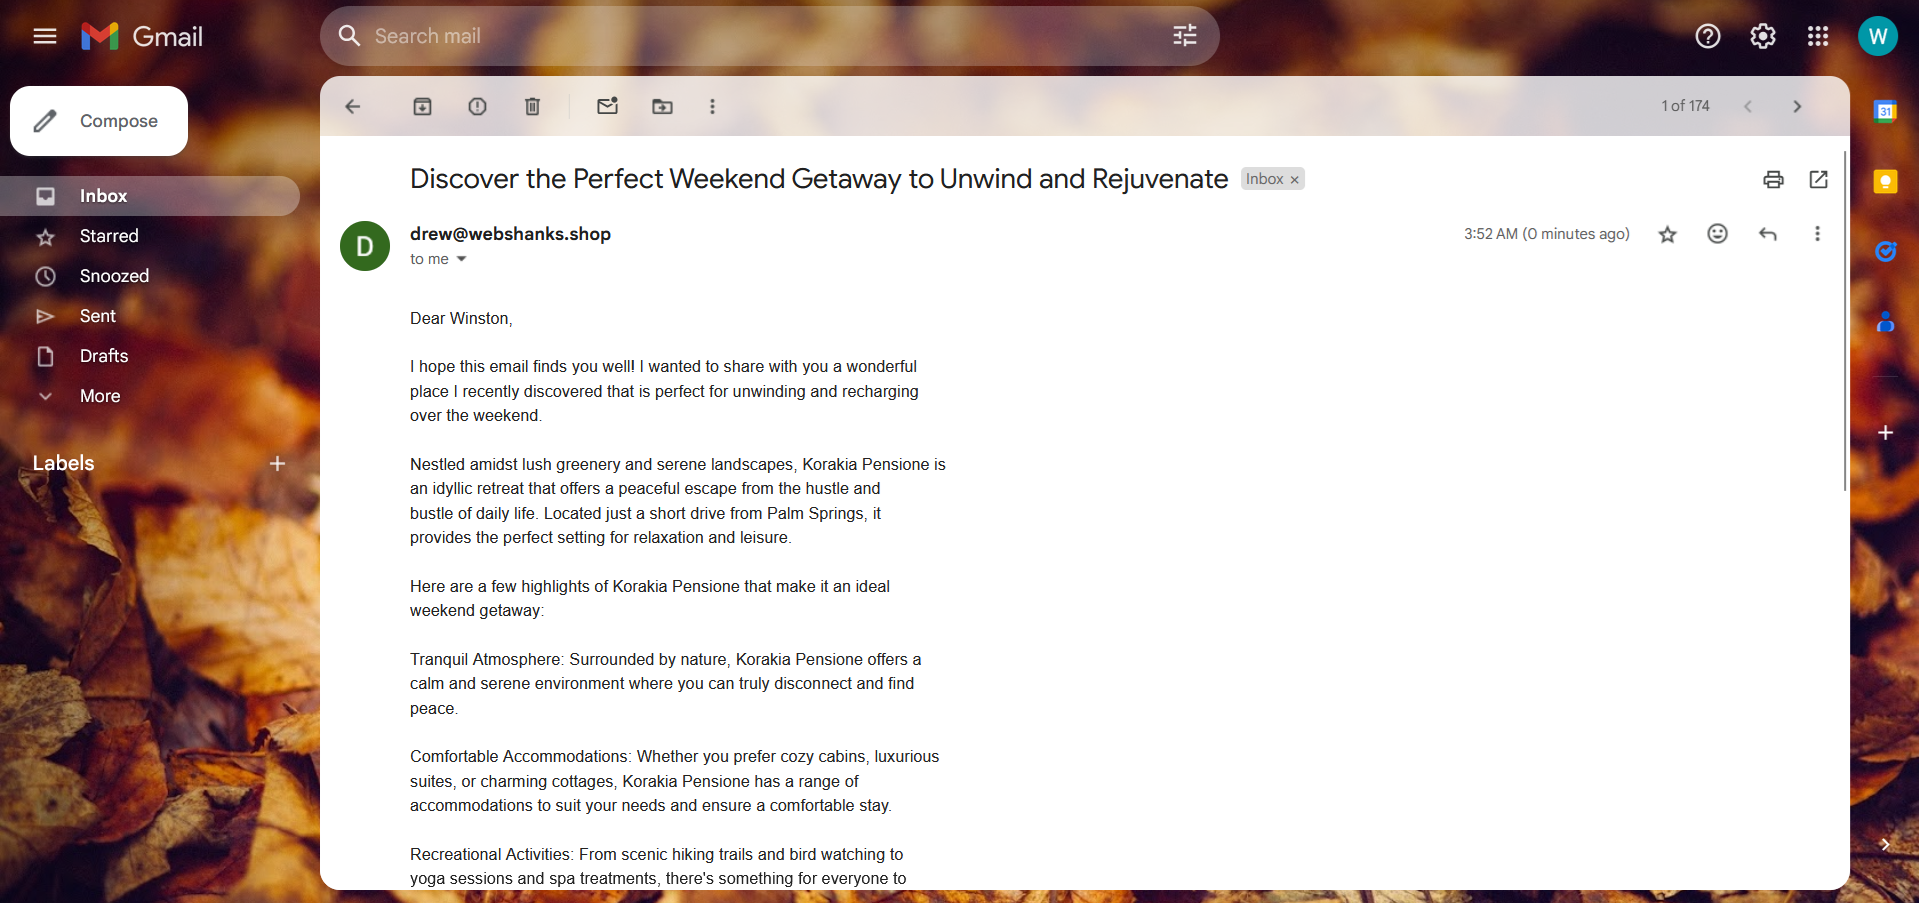
Let’s reply if we can receive it in our Mailu webmail.
And we got the reply!
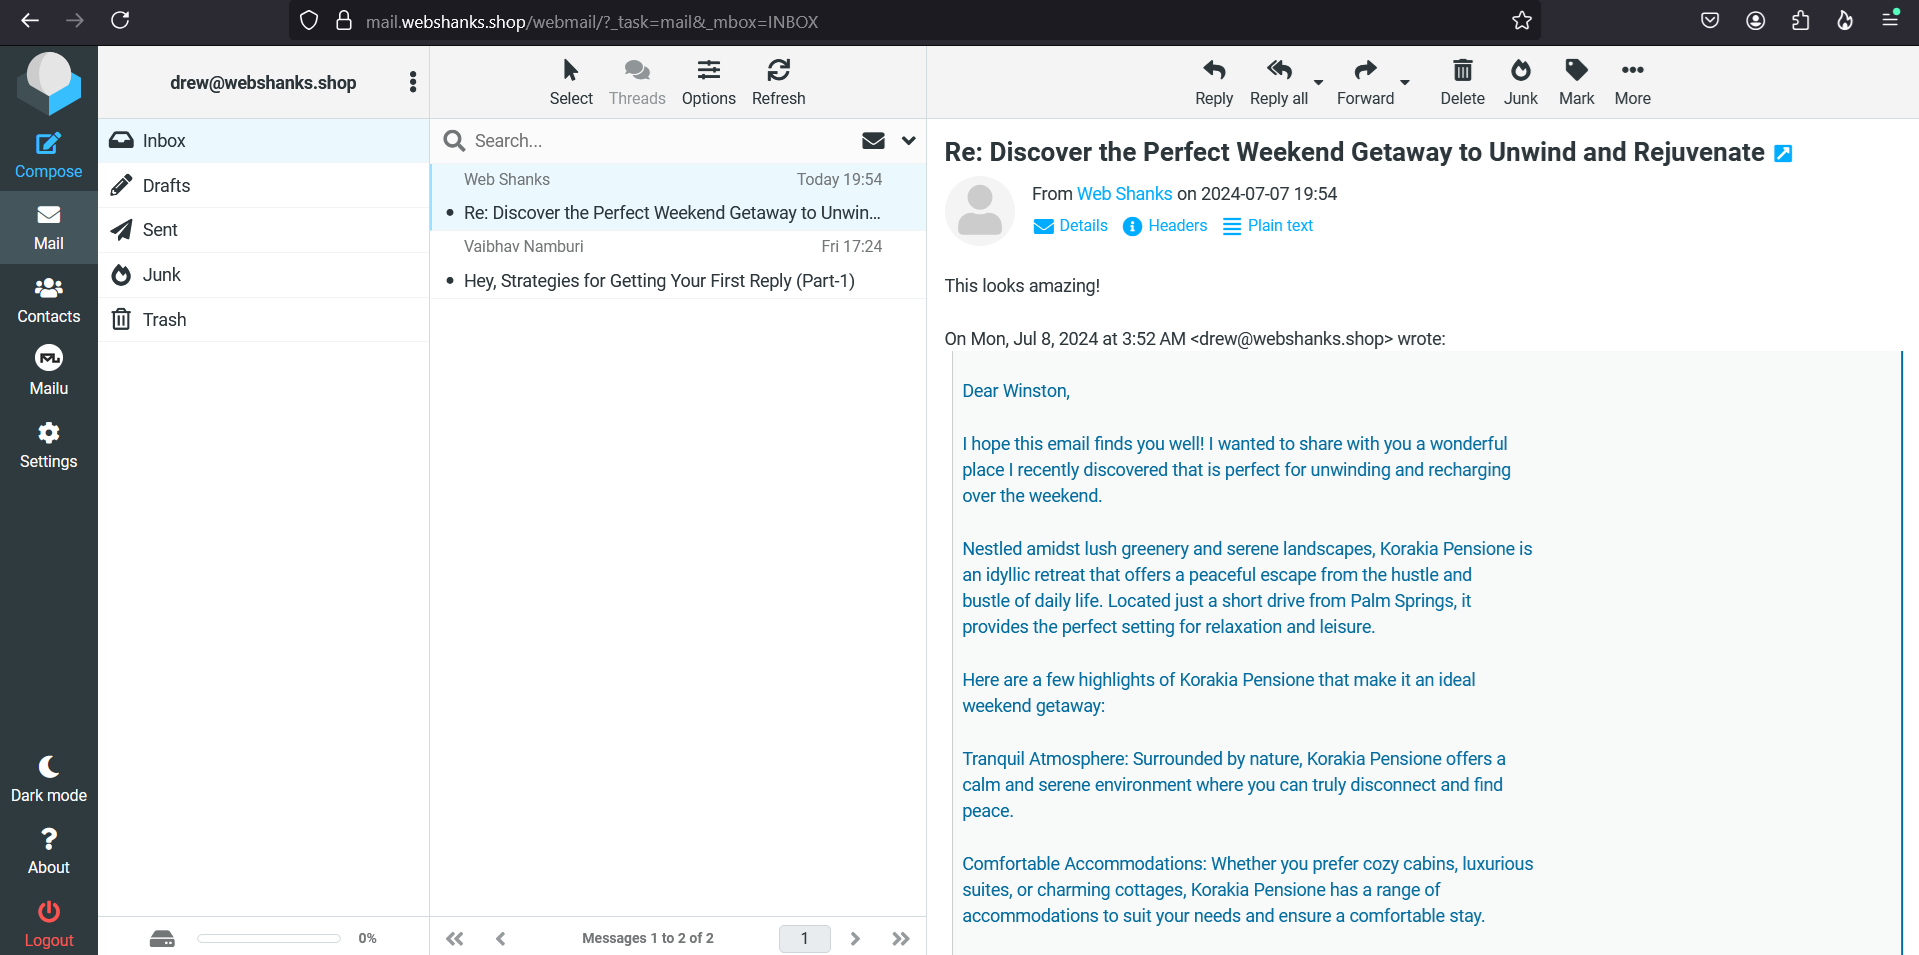
Now we can send and receive email messages using the Mailu mail server.
FAQs
What ports need to be open for Mailu to work?
Ensure the following ports are open on your firewall: 25 (SMTP), 80 (HTTP), 443 (HTTPS), 110 (POP3), 995 (POP3S), 143 (IMAP), 993 (IMAPS).
How do I back up my Mailu server?
You can back up your Mailu server by creating backups of the Docker volumes used by Mailu. Use the docker-compose commands to stop the services, back up the volumes, and then restart the services.
How do I update Mailu?
To update Mailu, pull the latest Docker images and recreate the containers:
docker compose pull && docker compose up -d
Troubleshooting
Issue: Cannot receive emails
- Ensure your MX records are correctly set.
- Verify that your server’s firewall is not blocking port 25.
- Check the Mailu logs for any error messages.
Issue: Cannot send emails
- Verify your SMTP settings.
- Ensure your SPF, DKIM, and DMARC records are correctly configured.
- Check the Mailu logs for any error messages.
Issue: Webmail interface is not accessible. The page isn’t redirecting properly.
Ensure the Mailu containers are running.
docker compose down && docker compose up -d
Conclusion
By following my guide, you should have a functional mail server that can send and receive emails securely.
Remember to keep your server and Mailu up-to-date to ensure security and performance.
If you encounter any issues, refer to the Mailu documentation and community for additional support.
Happy emailing!
thanks bro! i have some problem, the mail server working well, but too many spam mail everyday, can i setup some spam filter rules for my hosted mail server?
You can set the Spam filter tolerance by 100/100 from 80/100.
hi i do to make a mailu server but it will create 1 time and i cannot access to mailu admin then i will connect to vpn so mailu admin open. but i will recreate again becasue of some issue with my vps provider. but i cannot access again mailu admin i aslo use vpn but not works can you please advise whats the problem.
i found a problem, if i install cloudpanel, unable to start mailu anyway, (stop postfix services already) even if the configuration of the docker.yml is changed, open the mail.xxx.com, error message: ERR_SSL_UNRECOGNIZED_NAME_ALERT
docker-compose.yml:
ports:
– “my-ip:7080:80”
– “my-ip:7443:443”
– “my-ip:25:25”
– “my-ip:465:465”
– “my-ip:587:587”
– “my-ip:110:110”
– “my-ip:995:995”
– “my-ip:143:143”
– “my-ip:993:993”
– “my-ip:4190:4190”
I haven’t tried Mailu together with CloudPanel. Did you do a reverse nginx proxy config?
followed your steps but my mail server doesnt open
What exact error are you facing? A blank page?
I have multiple domain for example mail.abc.com, mail.xyx.com and mail.xyc.com. I am i test it only main domain (mail.abc.com) is getting 10/10. rest are 5/10 7/10. How can i fix this
You need to check the mail tester to debug the problems.