 Modoboa is an open-source mail hosting and management platform that simplifies the process of setting up and managing email servers.
In this guide, I’ll walk you through the entire process, from purchasing a domain on Namecheap to configuring Modoboa to send and receive emails.
Prerequisites
Before you begin, ensure you have the following:
- A Server: EUGameHost VPS or dedicated server with open port 25 and a fresh installation of a supported Linux distribution (e.g., Ubuntu 24.04 or Debian 12).
- Domain Name: A registered domain name with DNS access. You can purchase one from Namecheap.
- Root Access: Administrative privileges on your server.
- Basic Linux Knowledge: Familiarity with the command line and Linux system administration.
Complete Guide: Modoboa Mail Server Setup
Step 1: Purchase a Domain on Namecheap

- Create a Namecheap Account: If you don’t already have an account, go to Namecheap and sign up for one.
- Search for a Domain: Use the search bar on the Namecheap homepage to check the availability of your desired domain name (e.g., Webshanks.com). If the domain is available, add it to your cart.
- Complete the Purchase: Follow the checkout process to purchase the domain. Namecheap often offers additional services like WHOIS privacy protection. Consider adding these if needed.
- Verify Domain Ownership: Log in to your Namecheap account and navigate to the Domain List section after purchasing. Ensure your domain is active and properly registered.
Step 2: Set Up Your Server on EUGameHost
 For this guide, we’ll use a VPS from EUGameHost, a reliable hosting provider known for its affordable and high-performance VPS solutions.
Follow these steps to set up your VPS:
- Go to EUGameHost VPS page and select a plan that meets your needs (e.g., 4GB RAM, 2 vCPUs).
- Choose a server location close to your target audience for better performance.
- Select an operating system (Ubuntu 22.04/24.04 or Debian 11/12/13 recommended).
- Complete the purchase and wait for your VPS to be provisioned.
You can also watch the video tutorial on setting up EUGameHost VPS.
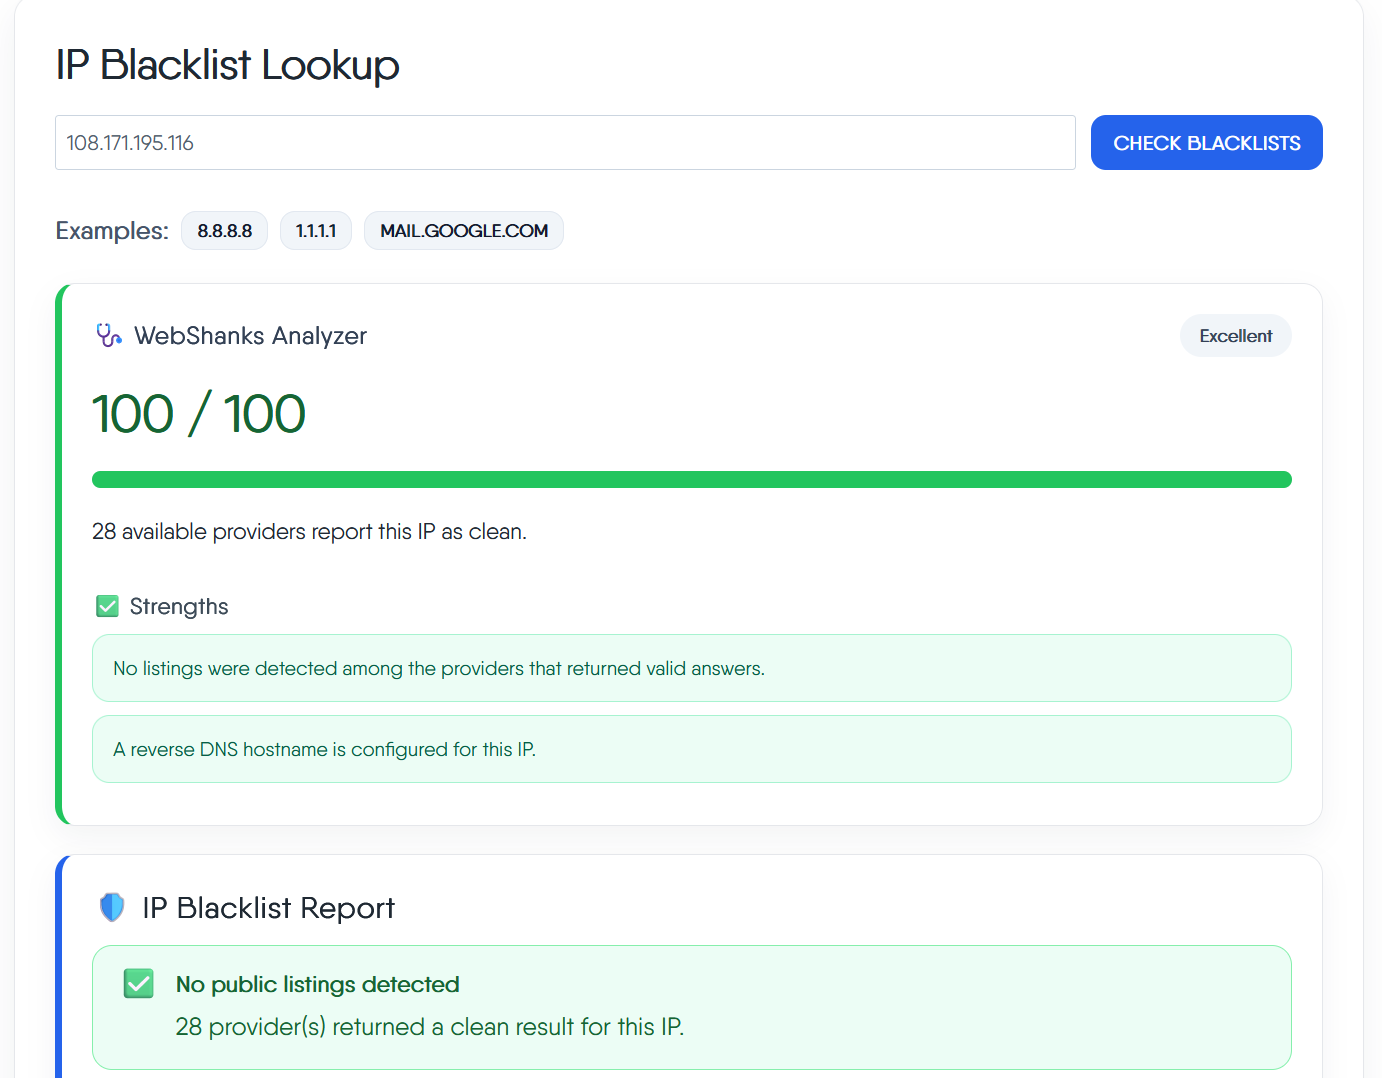
Then check whether your IP is clean using this tool.
Once your VPS is ready, log in via SSH using the credentials provided by EUGameHost:
ssh root@your-server-ip
You can also use Bitvise.

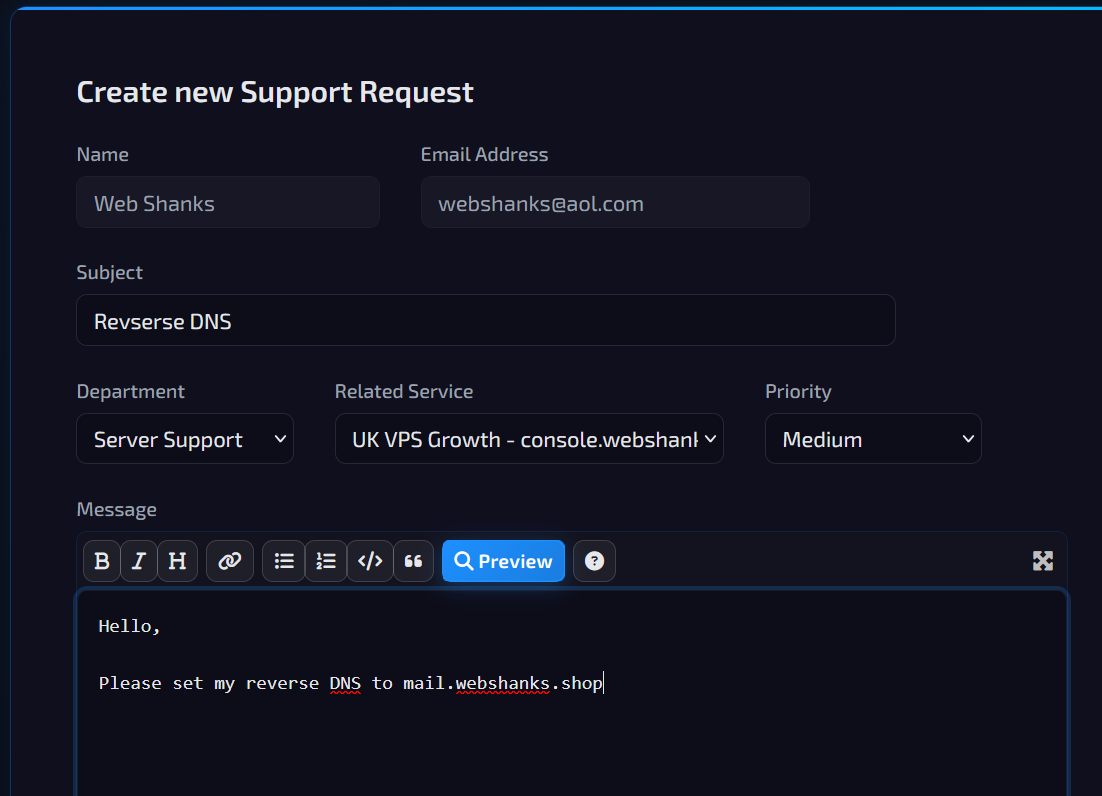
Then setup your rDNS. EUGameHost manually manages PTR. You need to create a ticket and let them know you want your rDNS set to something mail.yourdomain.com.
Update your server to ensure all packages are up to date:
sudo apt update && sudo apt upgrade -y
Step 3: Configure Initial DNS Records
Go to your Namecheap account and navigate to the Domain List.
| Record Type | Name | Content | Priority | TTL |
| A | webshanks.org | YourServerIP | Auto | |
| A | YourServerIP | Auto | ||
| AAAA | webshanks.org | YourIPv6 | Auto | |
| AAAA | YourIPv6 | Auto | ||
| MX | webshanks.org | mail.webshanks.org | 10 | Auto |
| TXT | webshanks.org | v=spf1 a mx ip4:181.214.152.68 ip6:2602:f9f3:0:2::2cc ~all | Auto |
Step 4: Install Modoboa
Download the Modoboa Installer: Use the following commands to download and prepare the installer:
git clone https://github.com/modoboa/modoboa-installer
cd modoboa-installer
sudo ./run.py --stop-after-configfile-check <your domain>

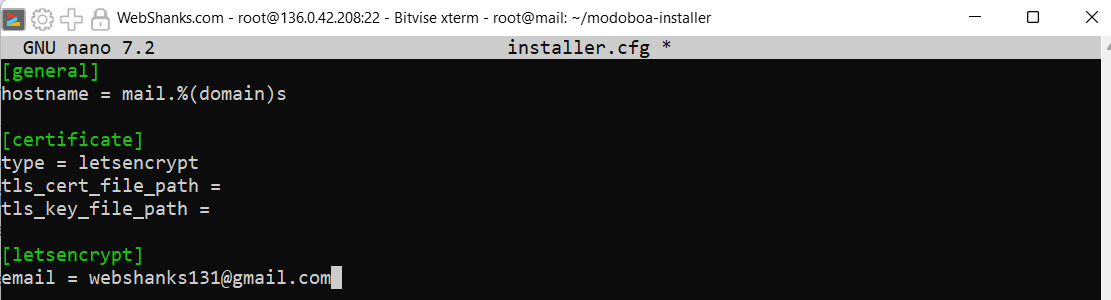
Open installer.cfg and set:
[certificate]
type = letsencrypt
[letsencrypt]
email = [email protected]
Then save. Use ctrl X Y.
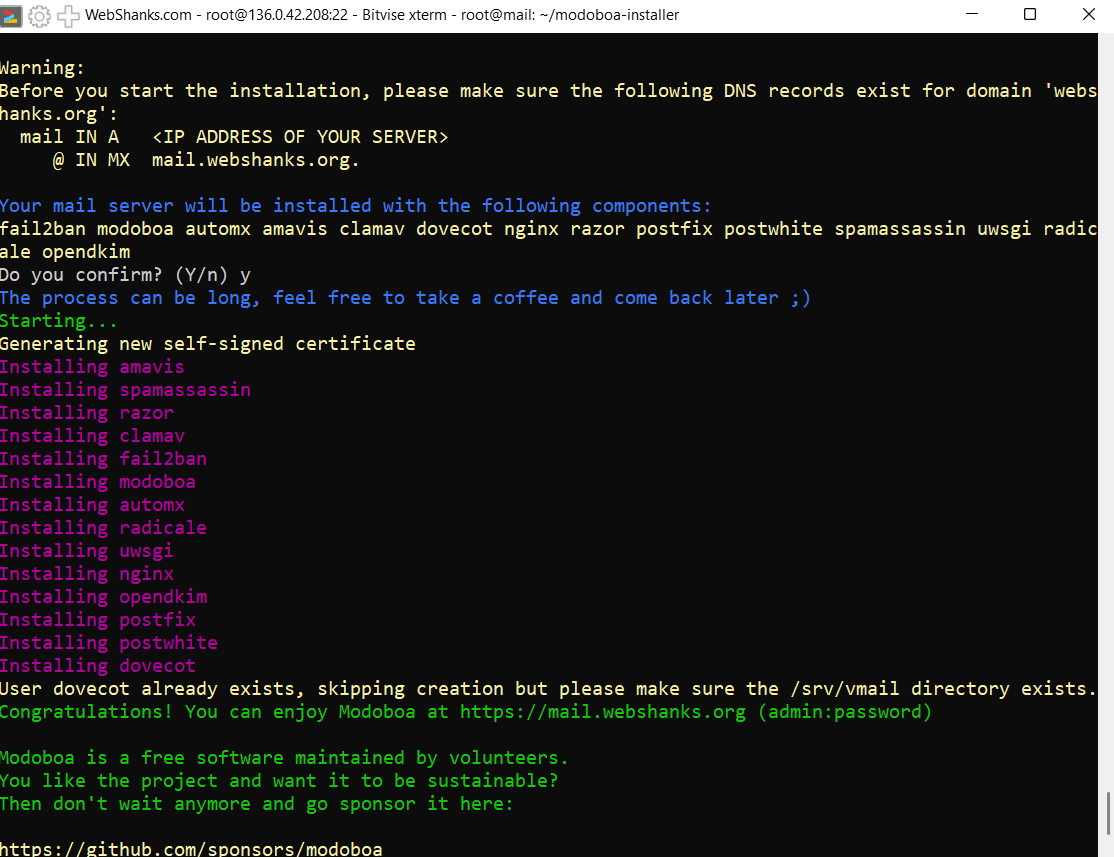
Finally, run this command to start installing Modoboa.
sudo python3 run.py <your domain>
Your mail server will be installed with the following components:
fail2ban modoboa automx amavis clamav dovecot nginx razor postfix postwhite spamassassin uwsgi radicale opendkim
Do you confirm? (Y/n) y
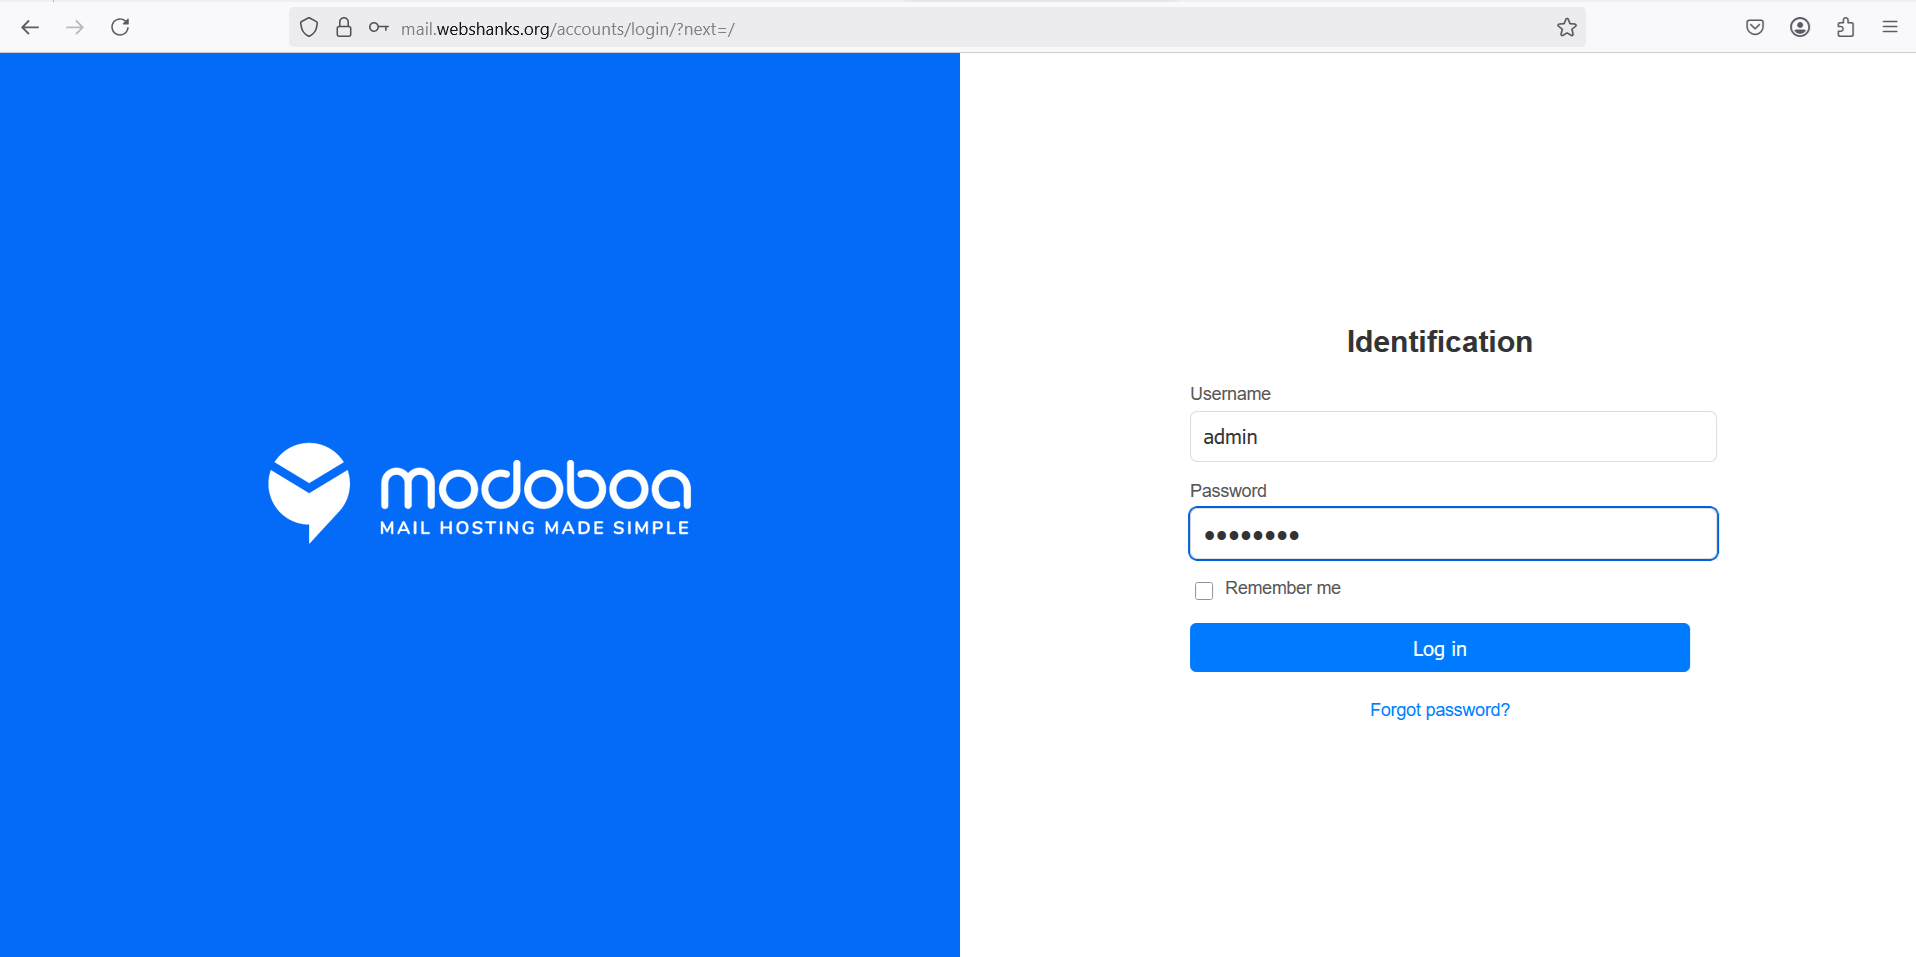
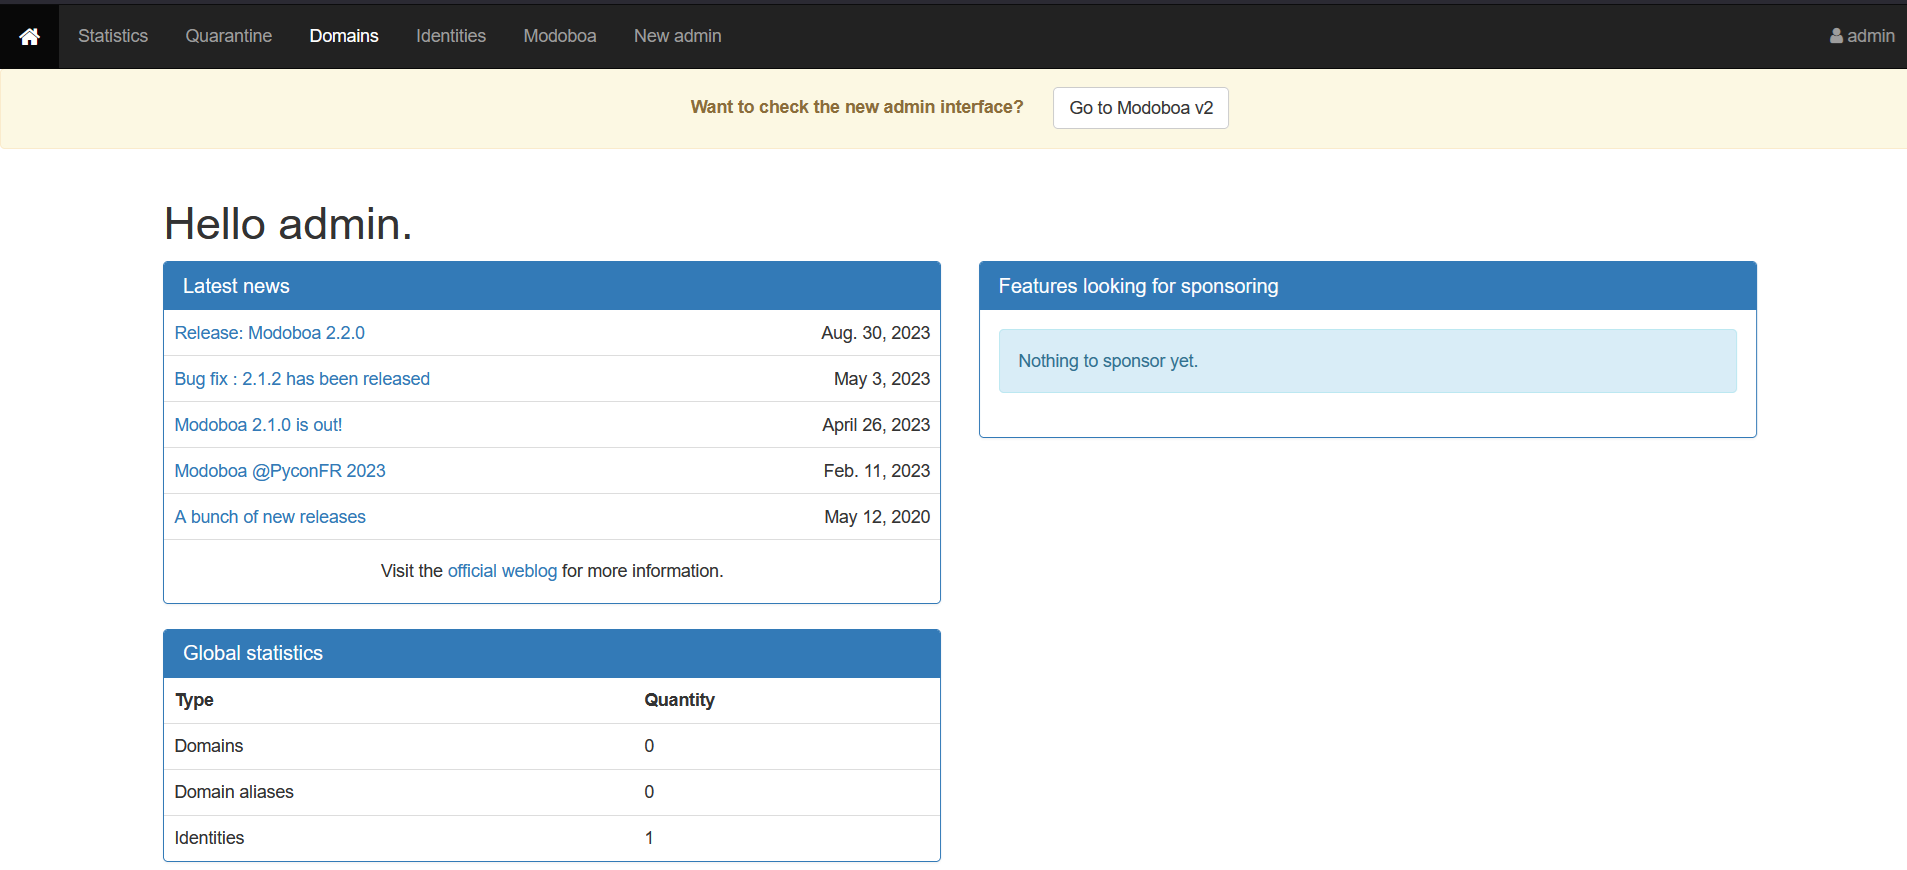
Step 5: Access the Modoboa Admin Panel
Open your browser and navigate to https://mail.example.com. Log in using the admin credentials you set during installation.
Use the admin/password login credentials provided.
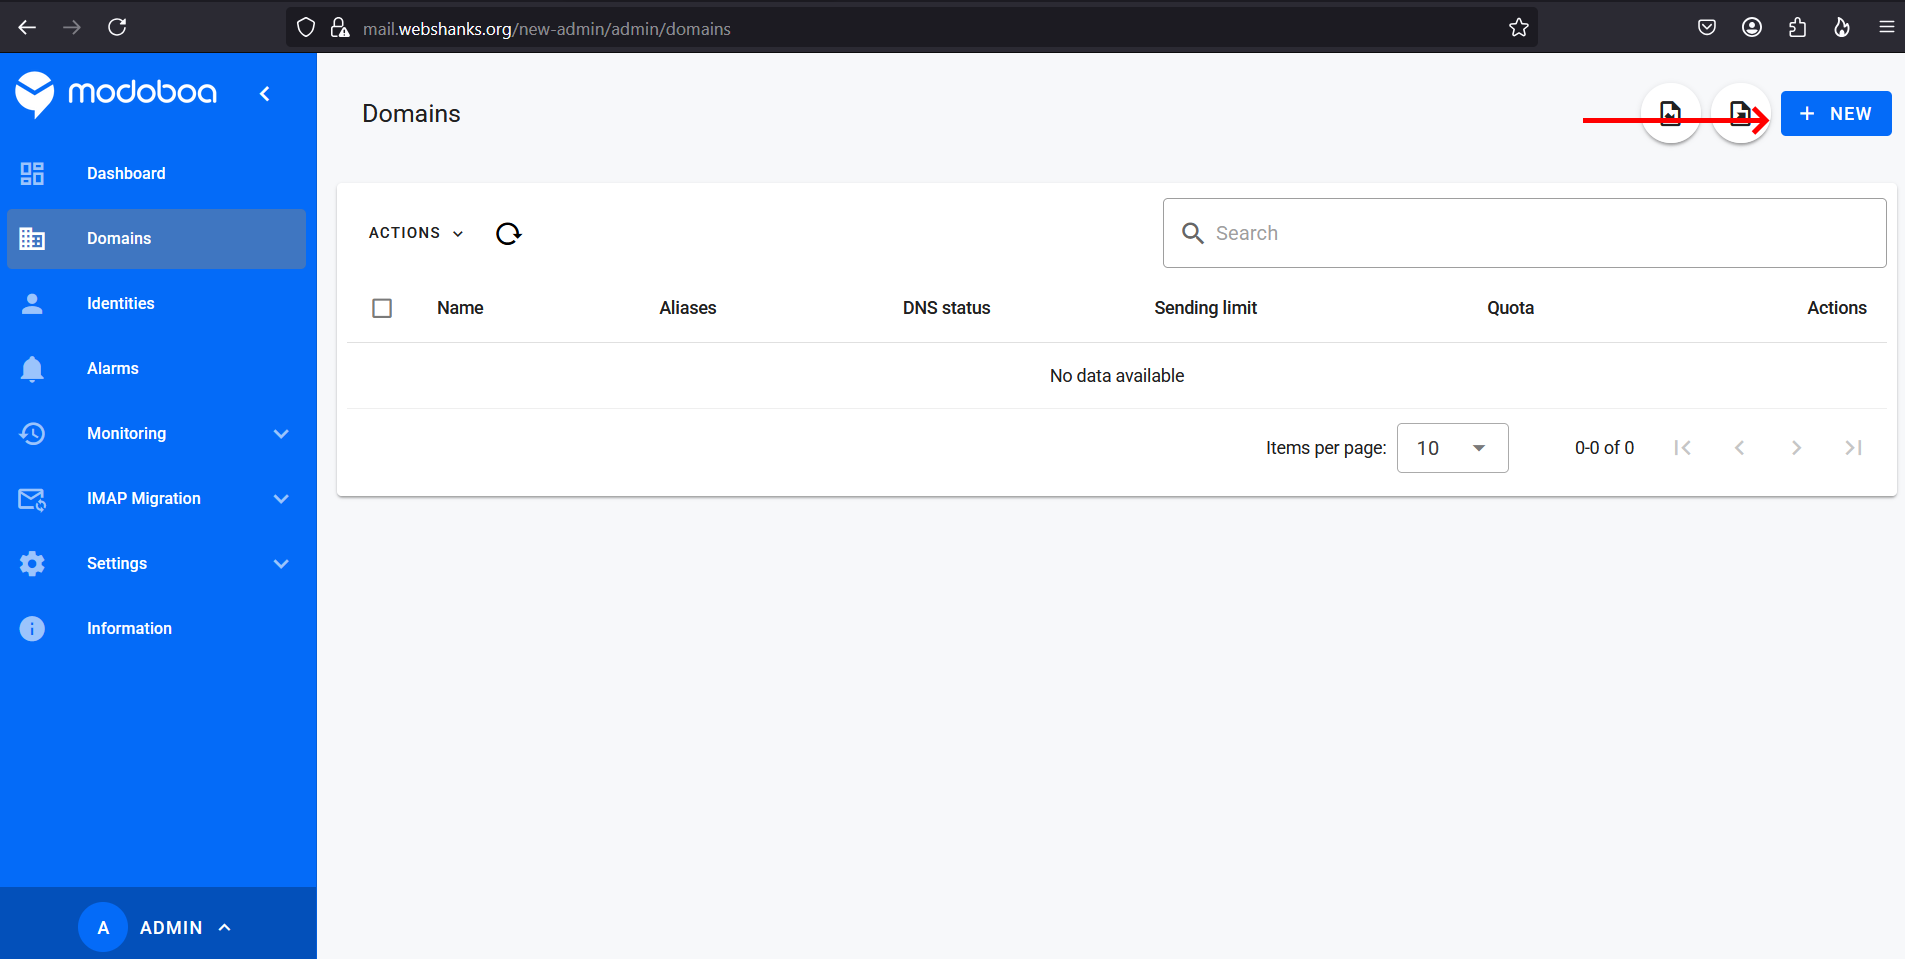
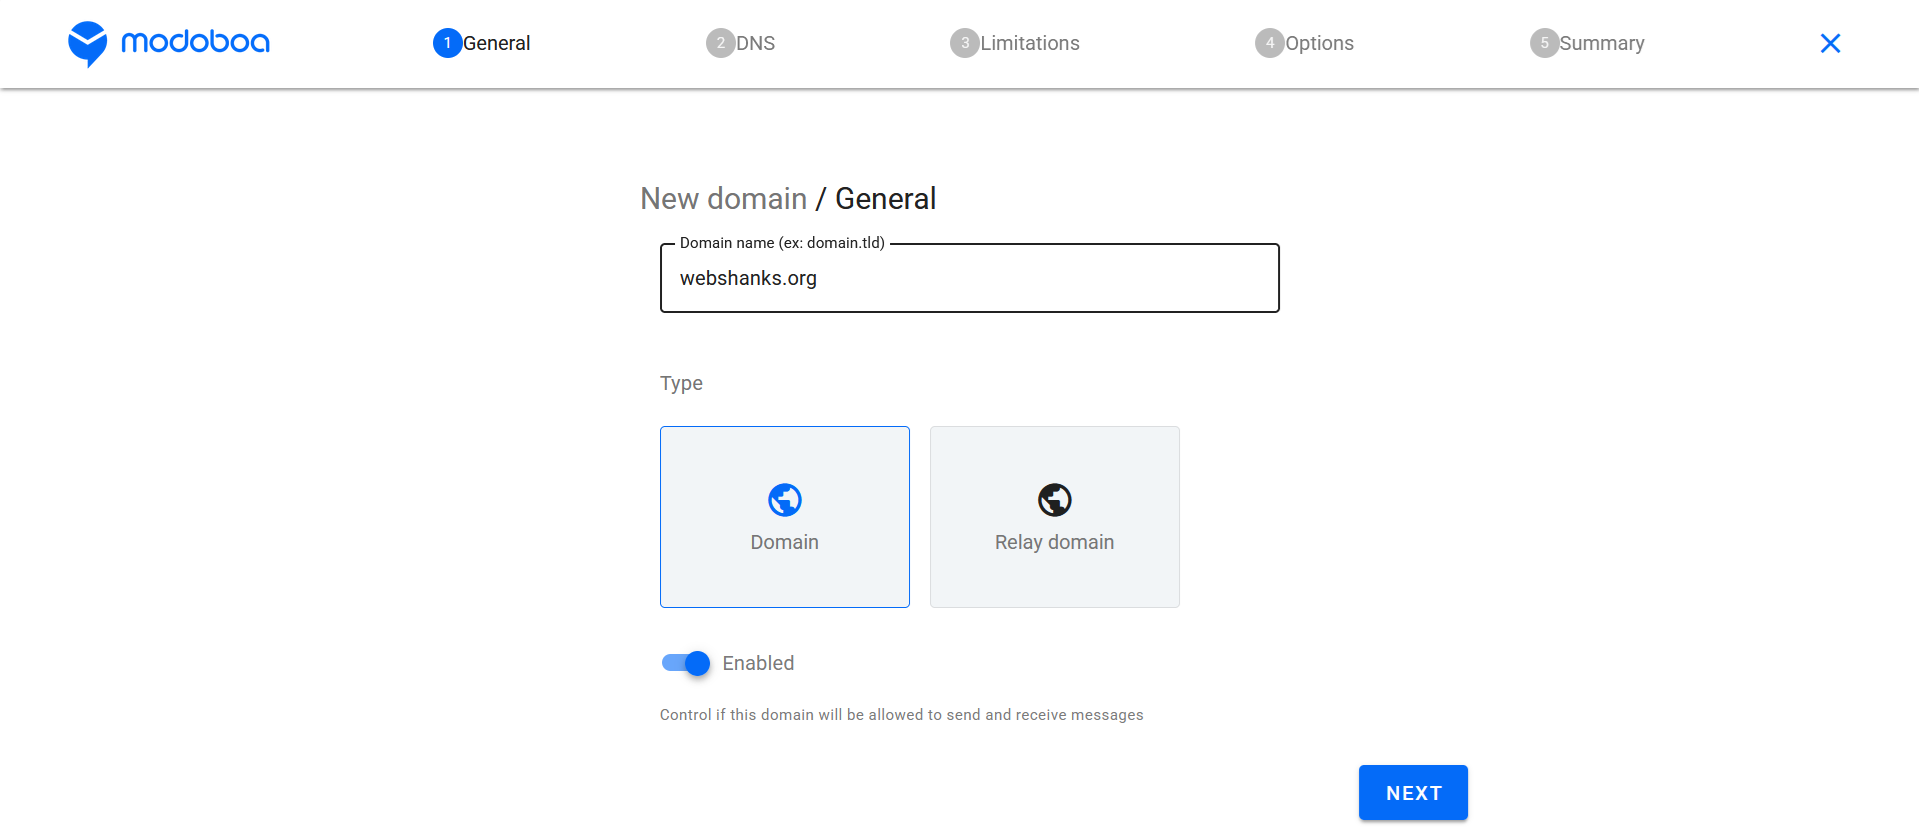
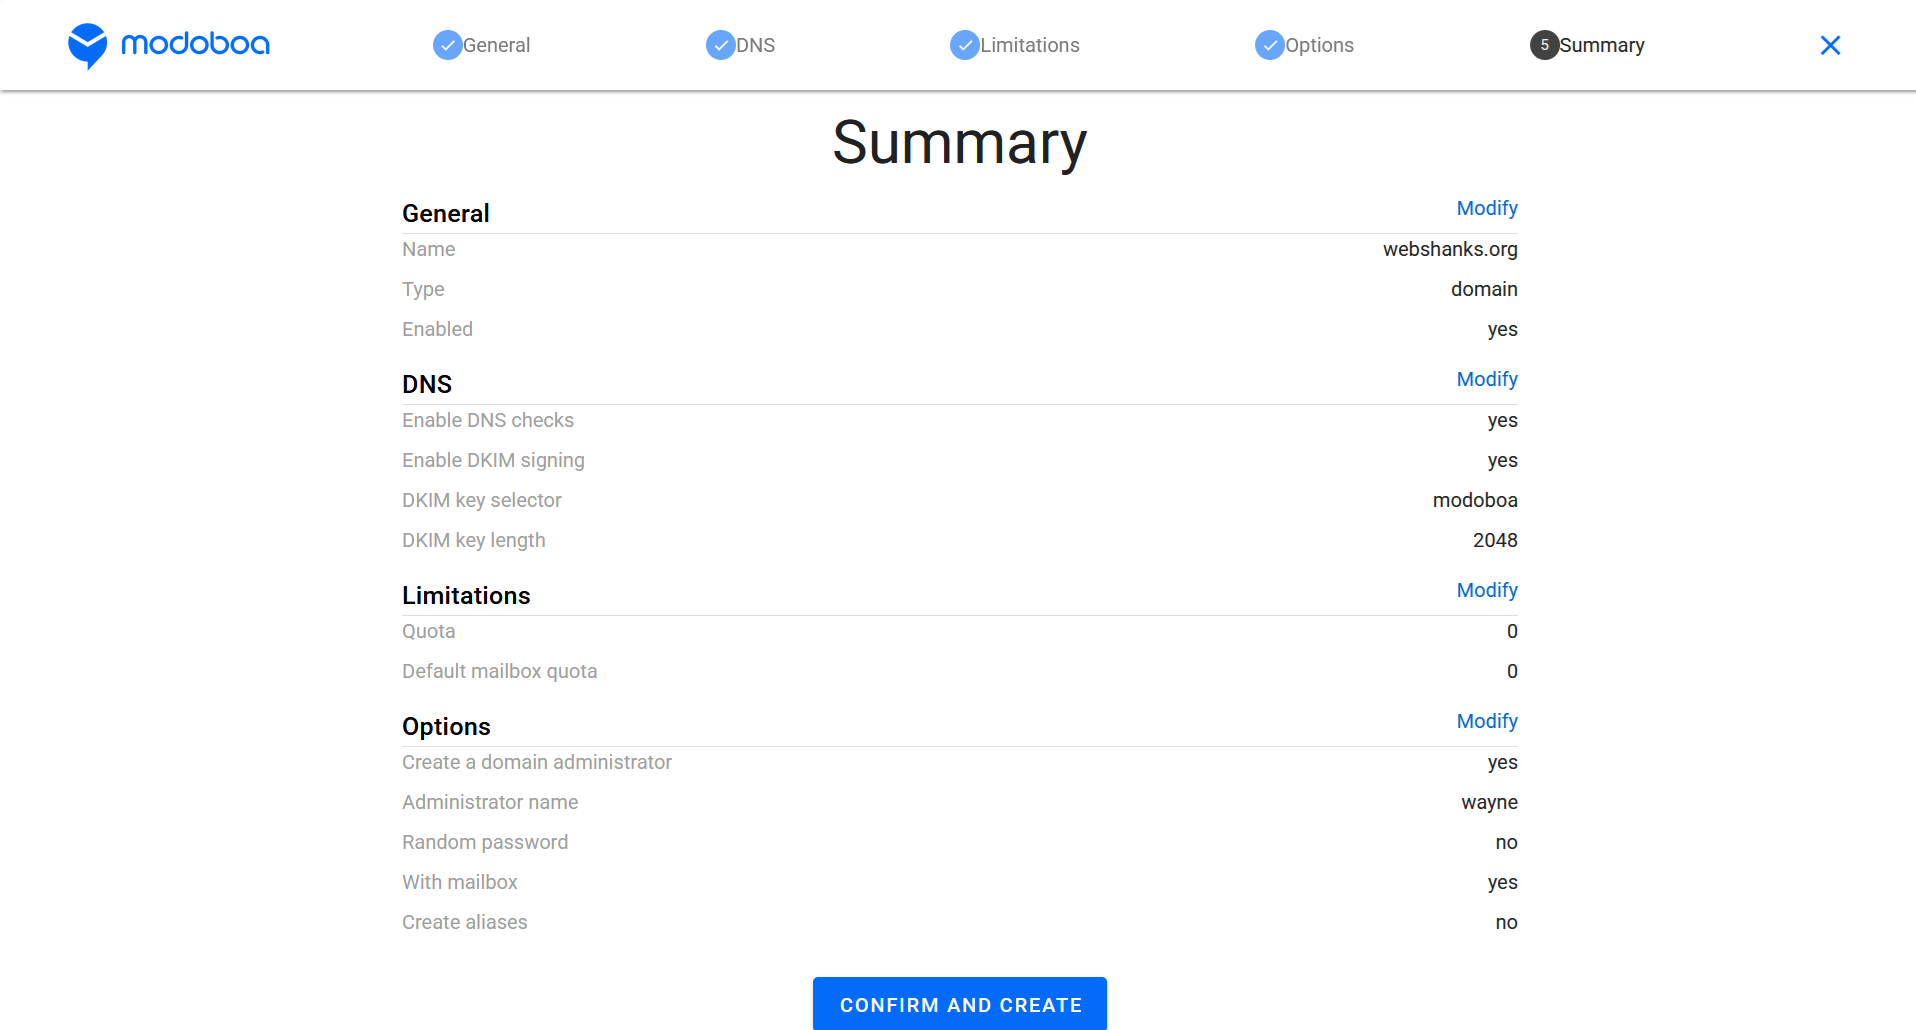
Let’s add a domain.
We will use the new admin interface so click New admin.
Add a domain.
Enter your domain.
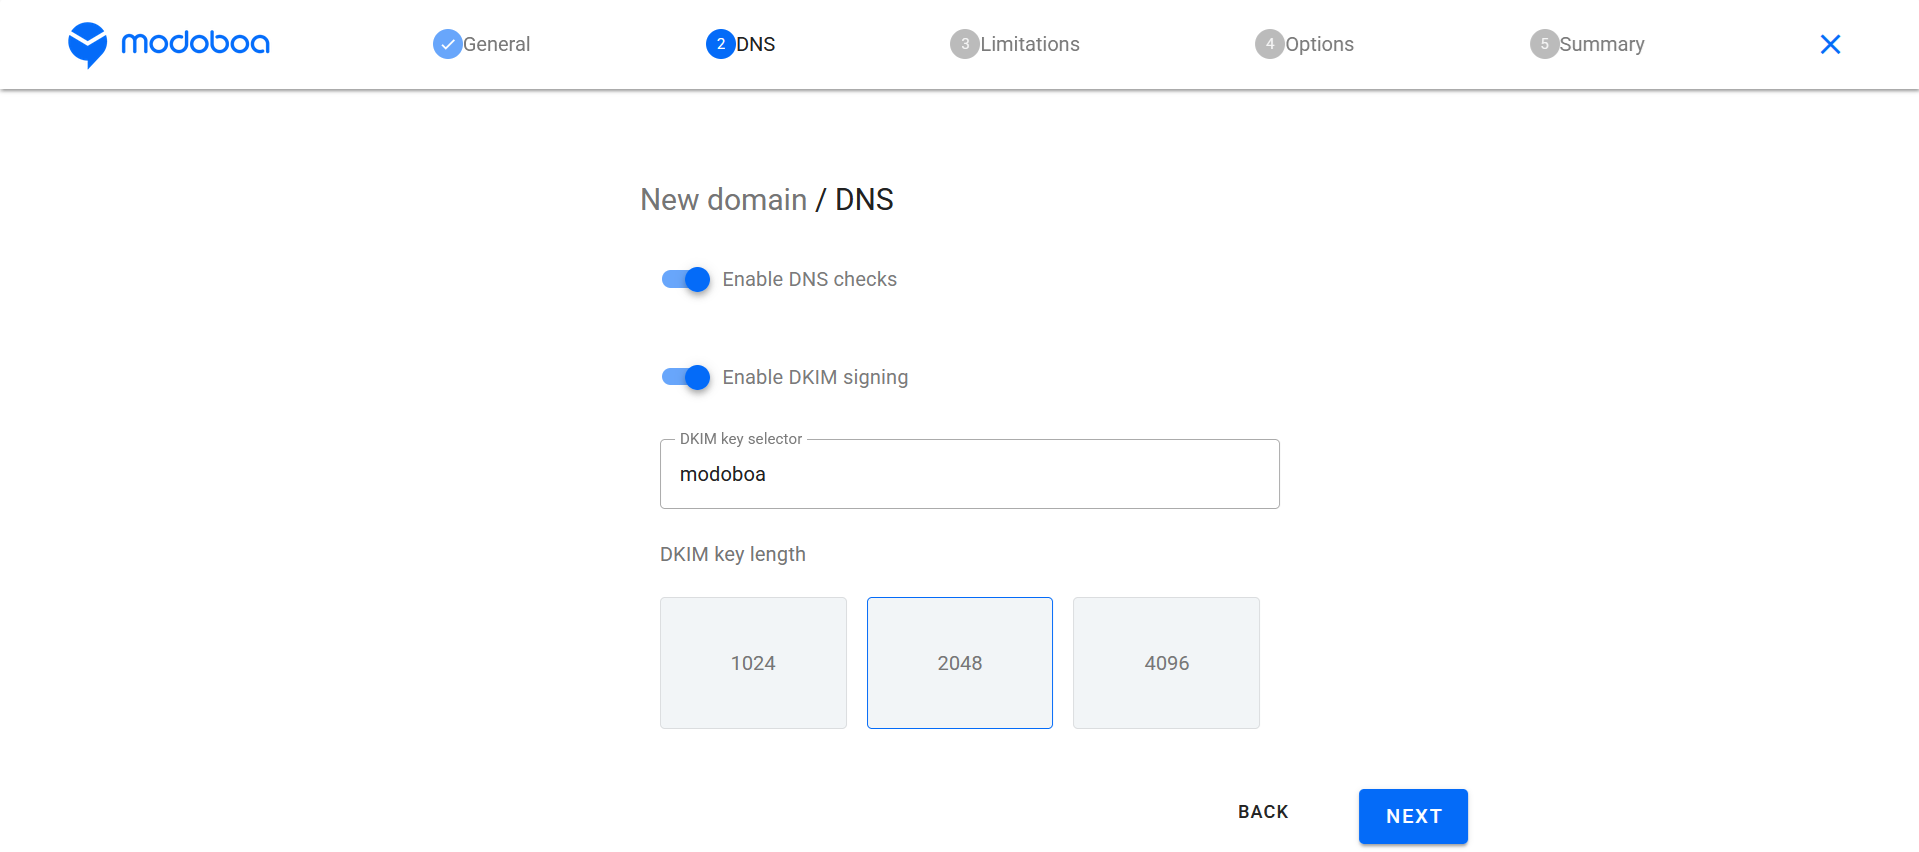
Enable DNS checks and signing. Choose 2048 bits.
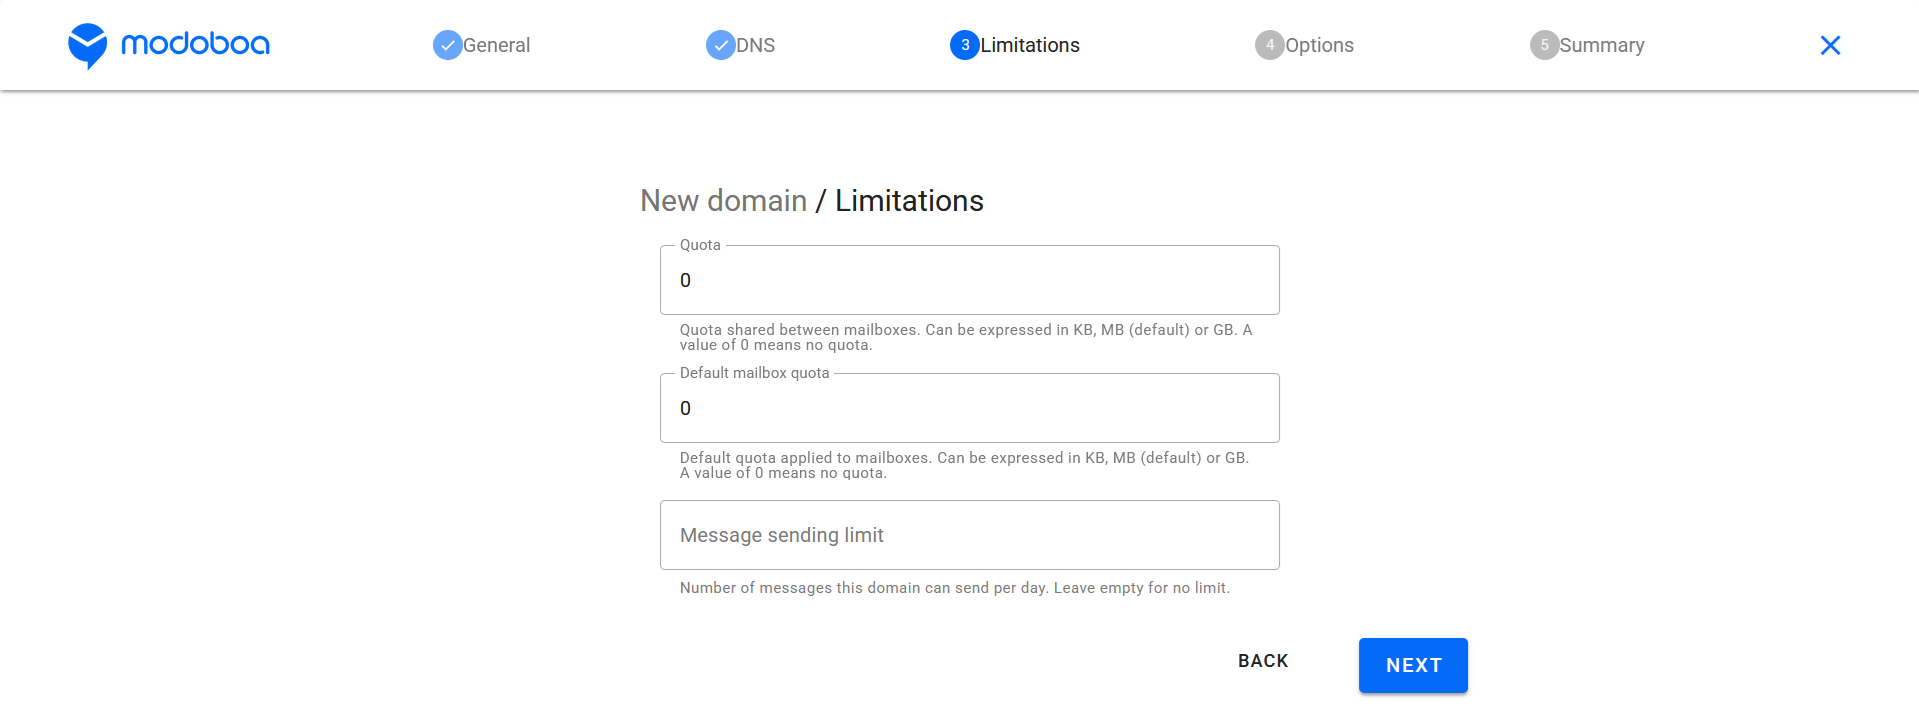
Set limits.
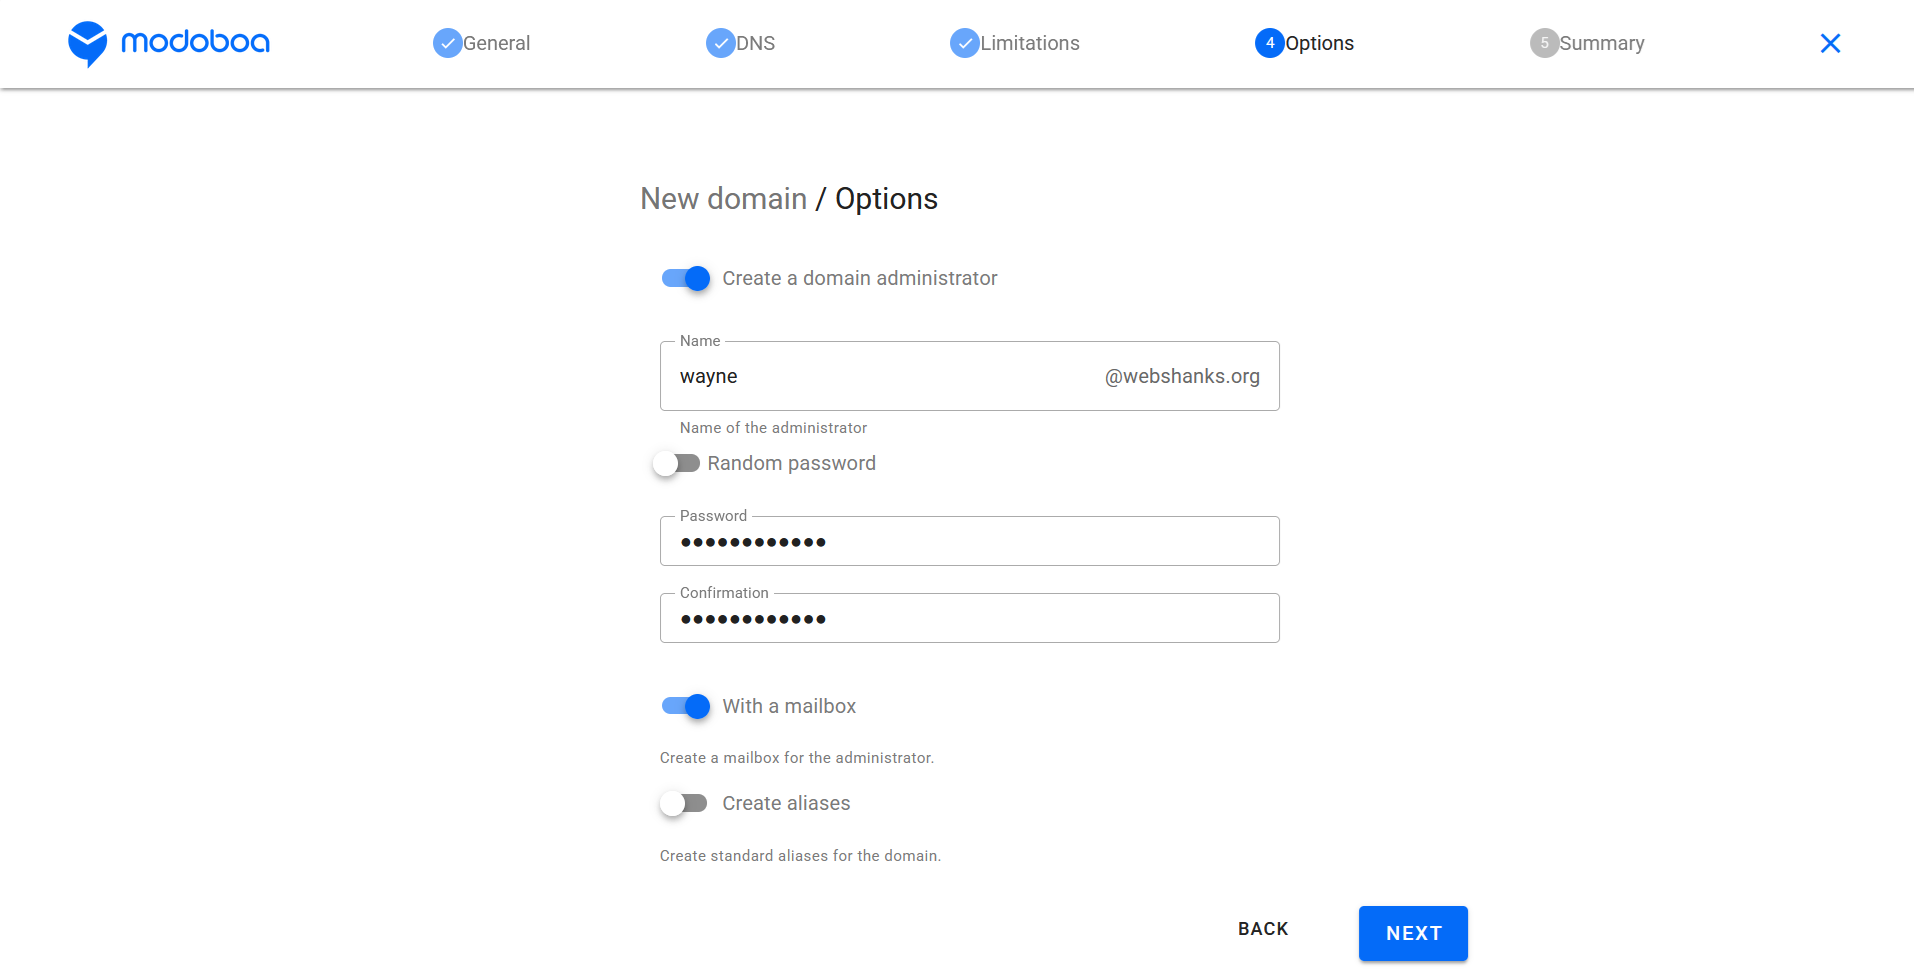
Add a new mailbox.
Summary. If you’re good with the summary, click Confirm and Create.
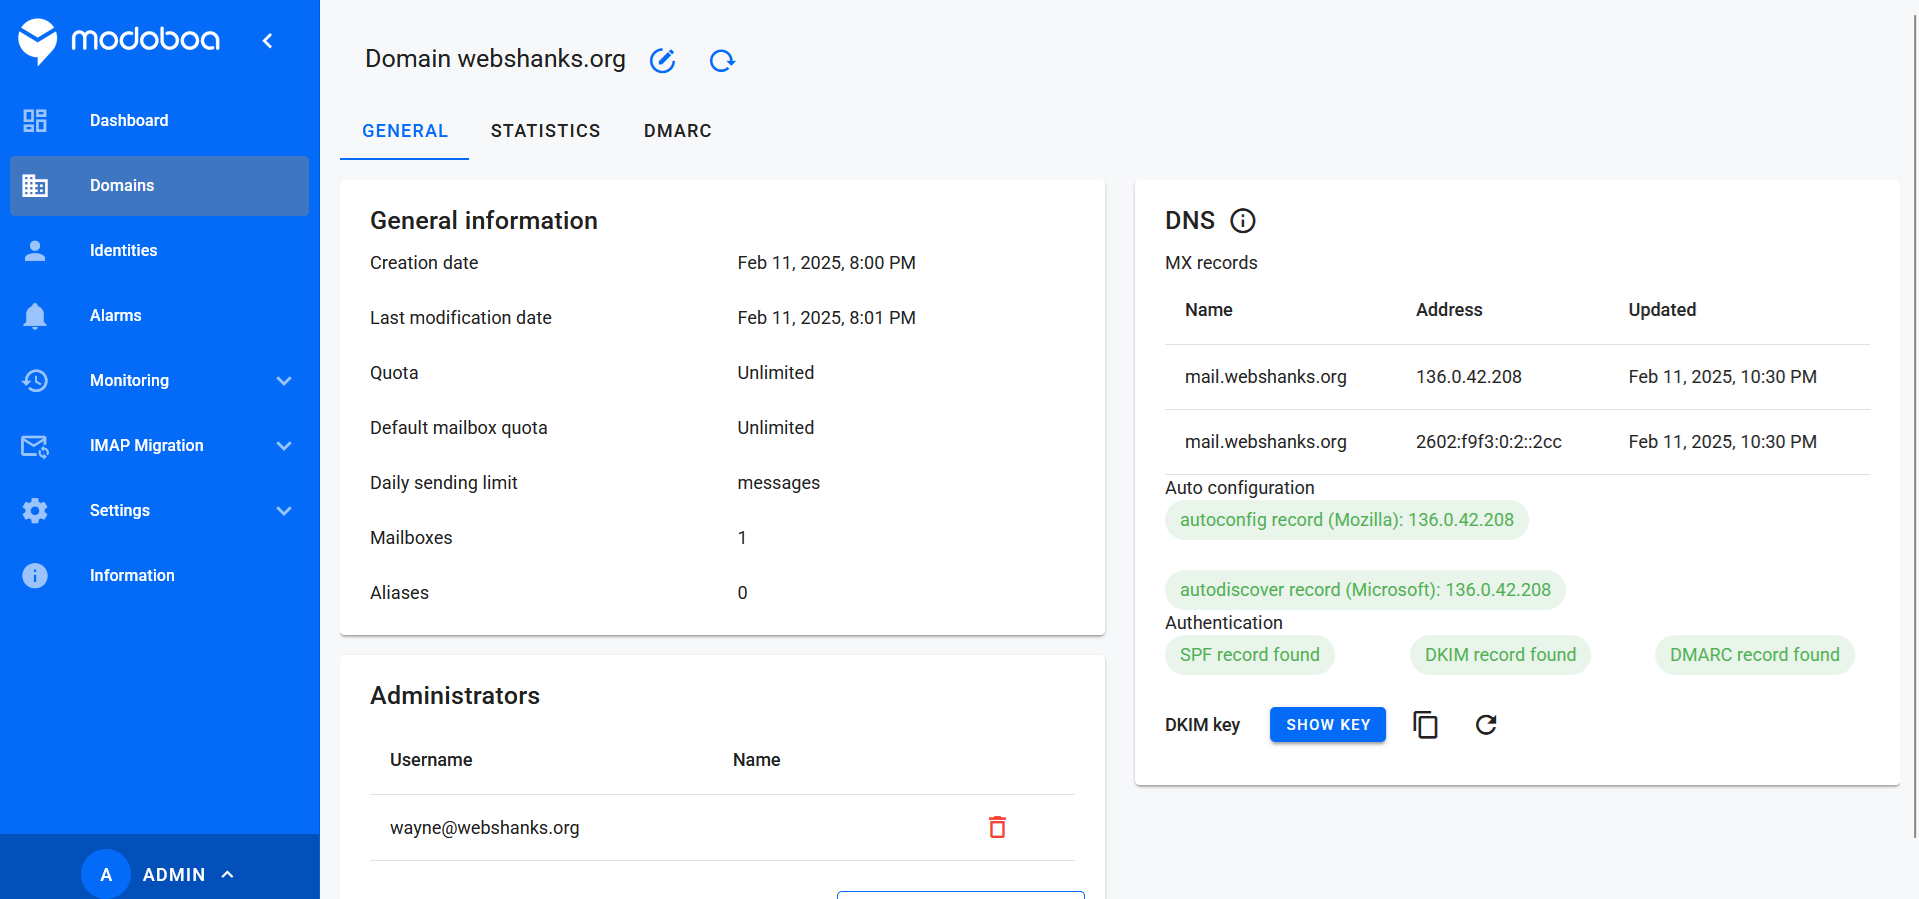
Step 6: Setup DMARC and DKIM
After you add the domain, we will setup our DMARC and DKIM.
We will first generate our DKIM key.
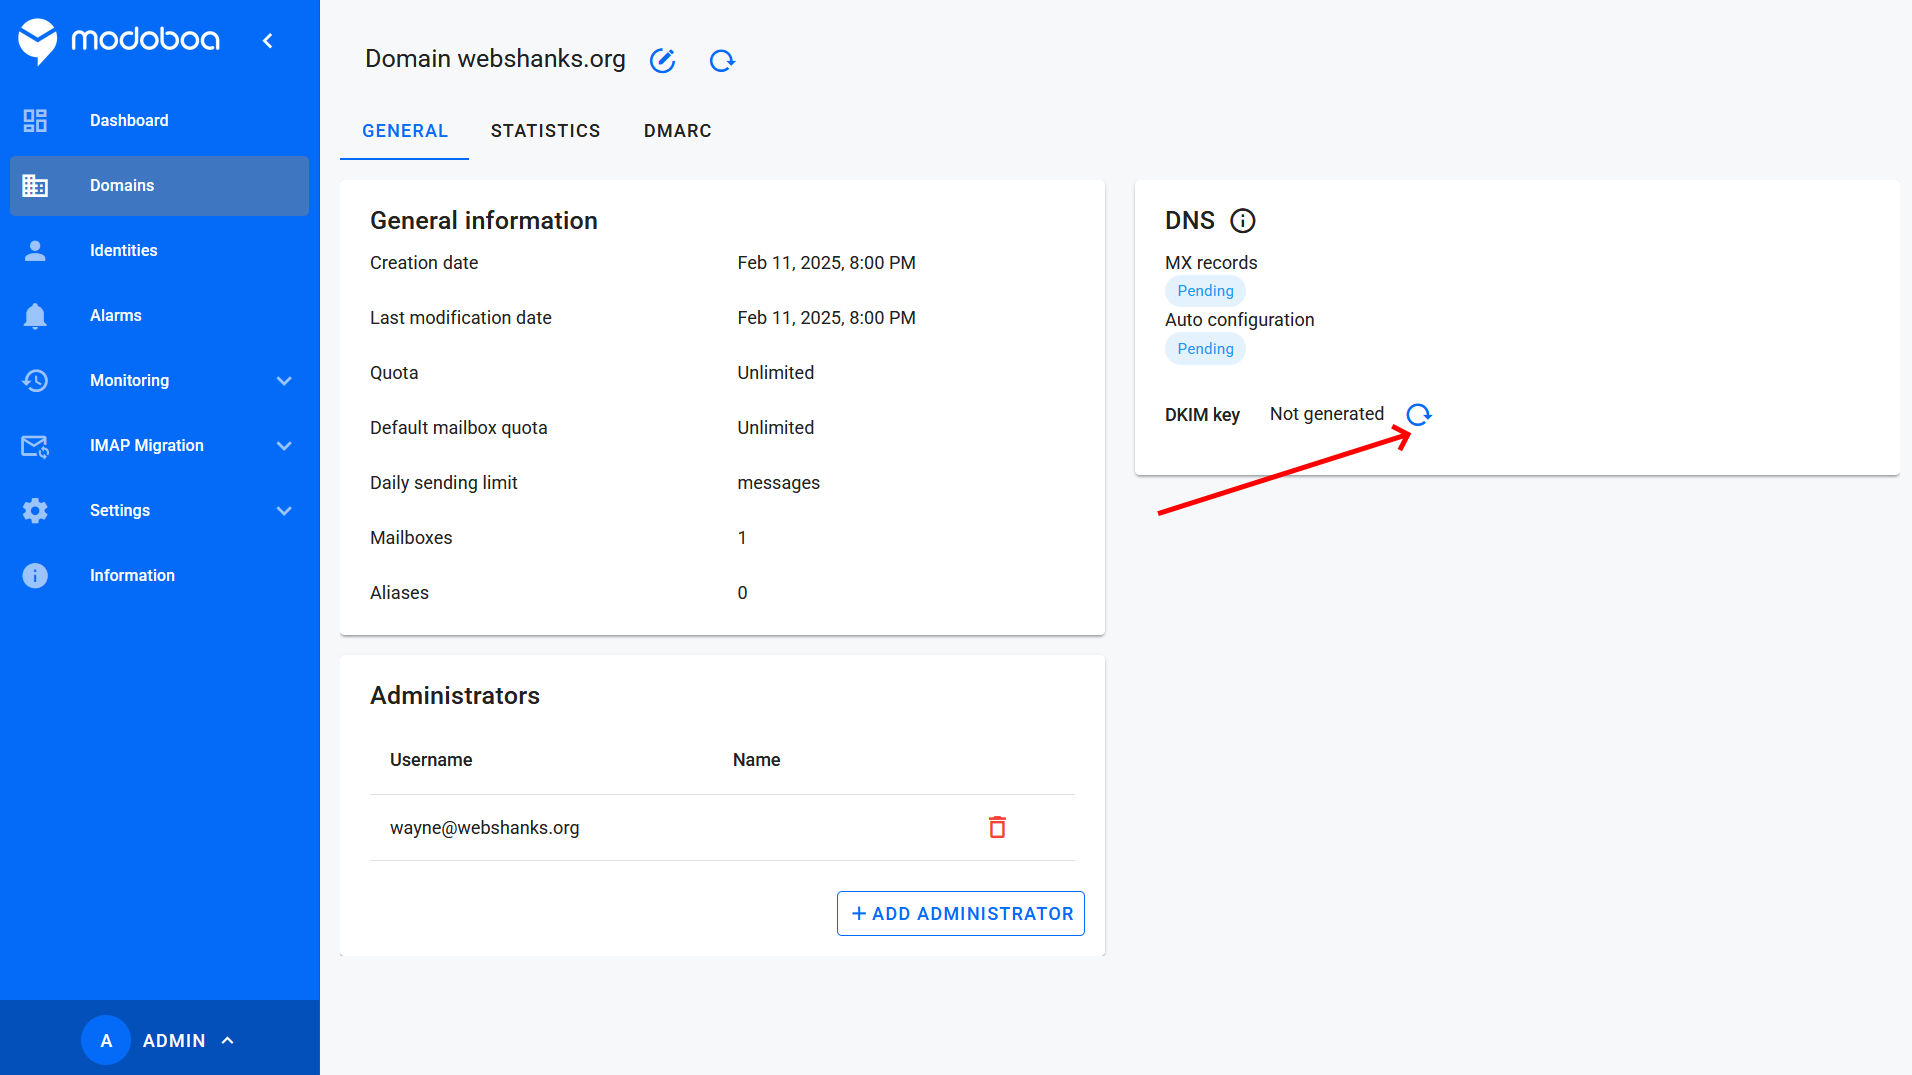
After that, click on the information icon.
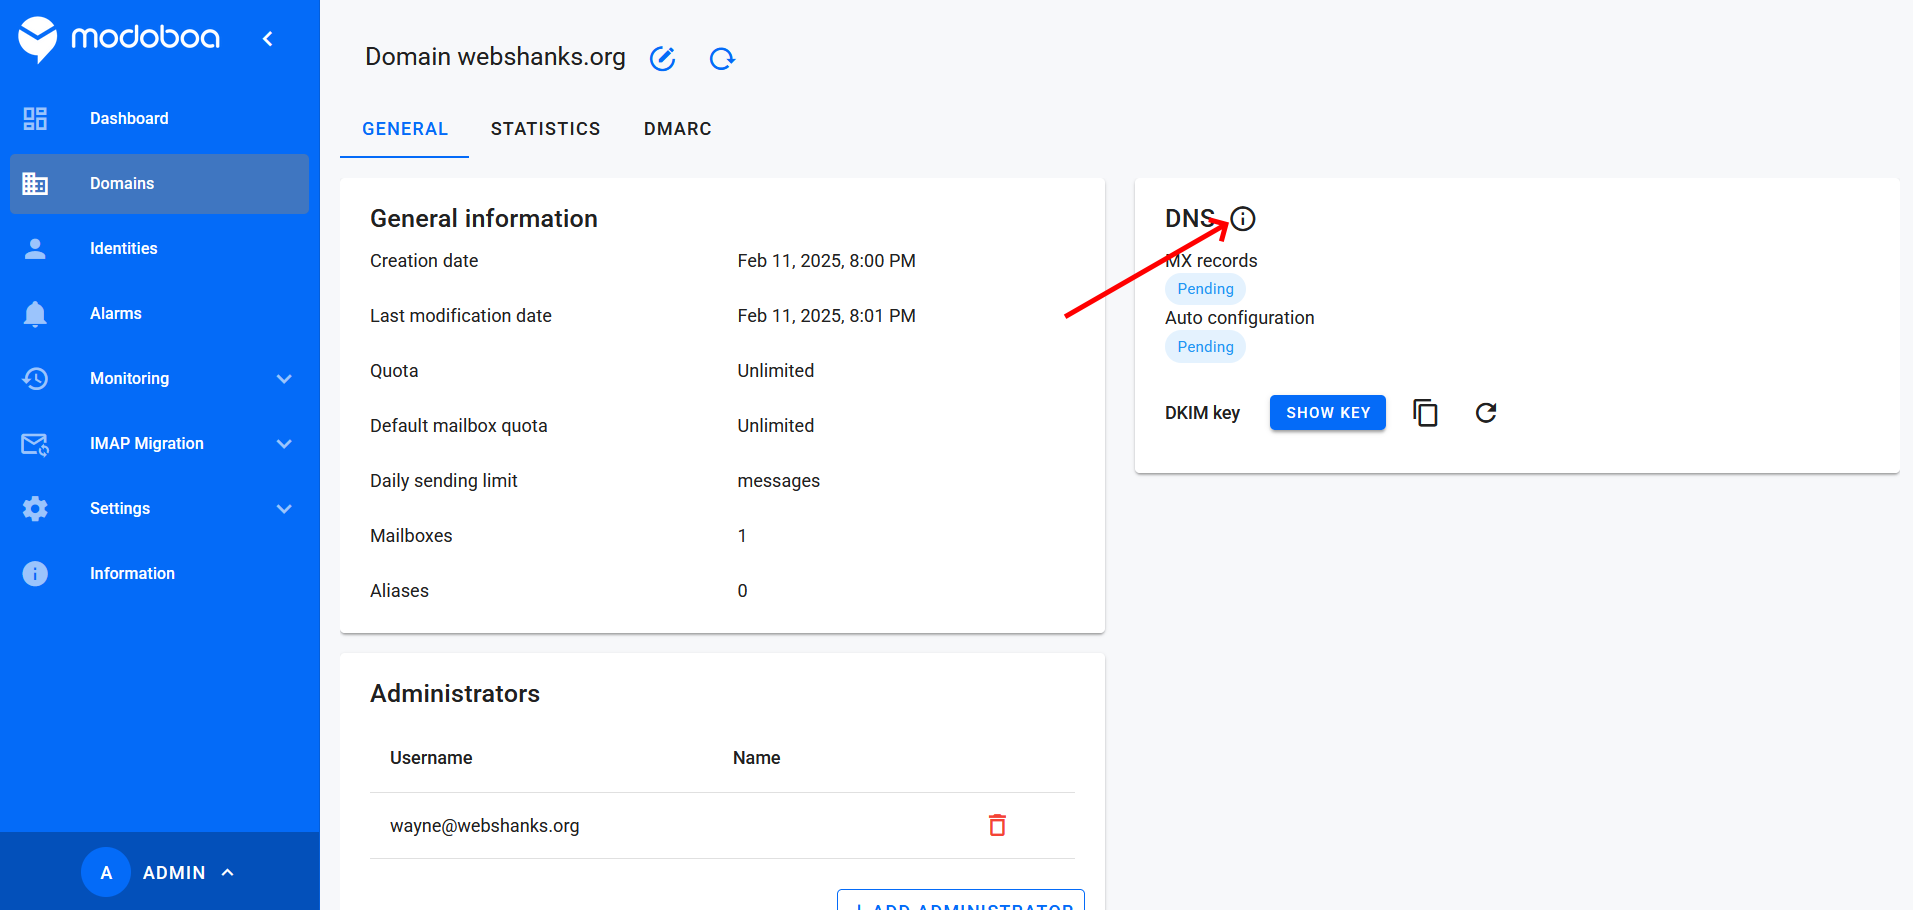
Then the information will be displayed.
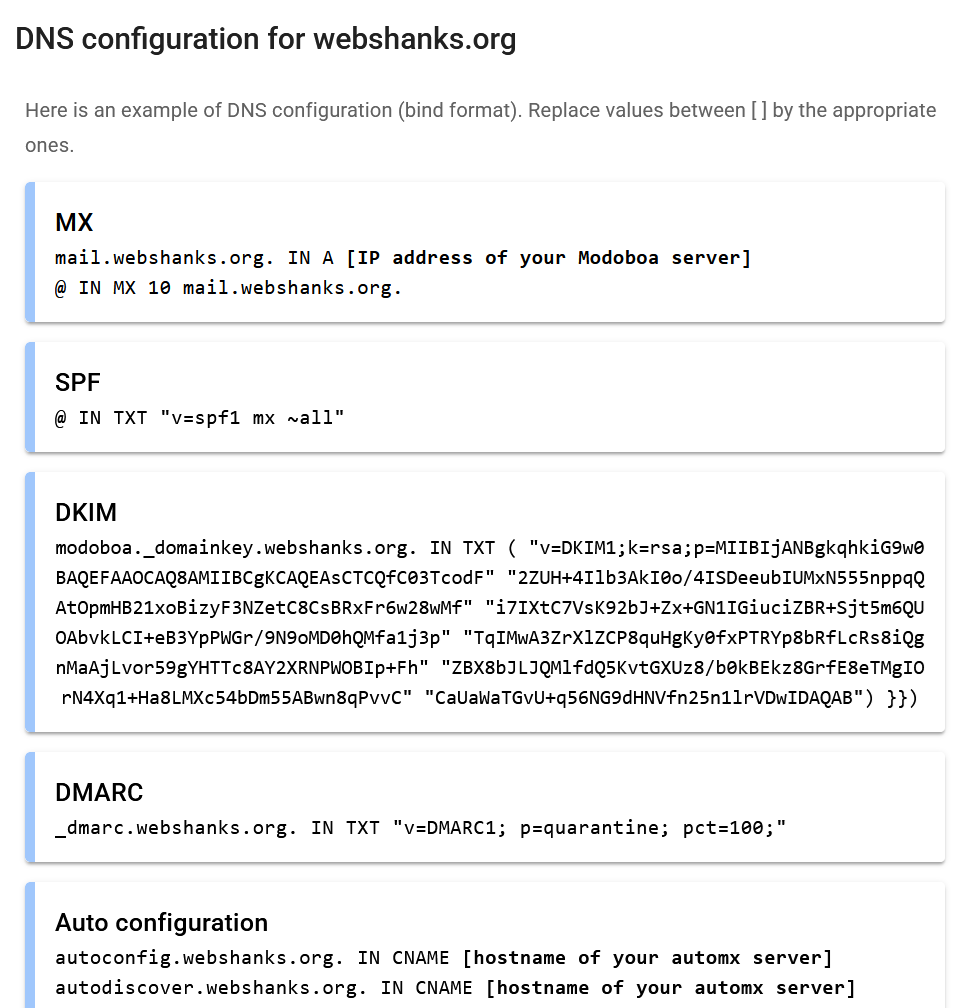
Map the remaining DNS records to your DNS provider.
If all goes well, it will look like this.
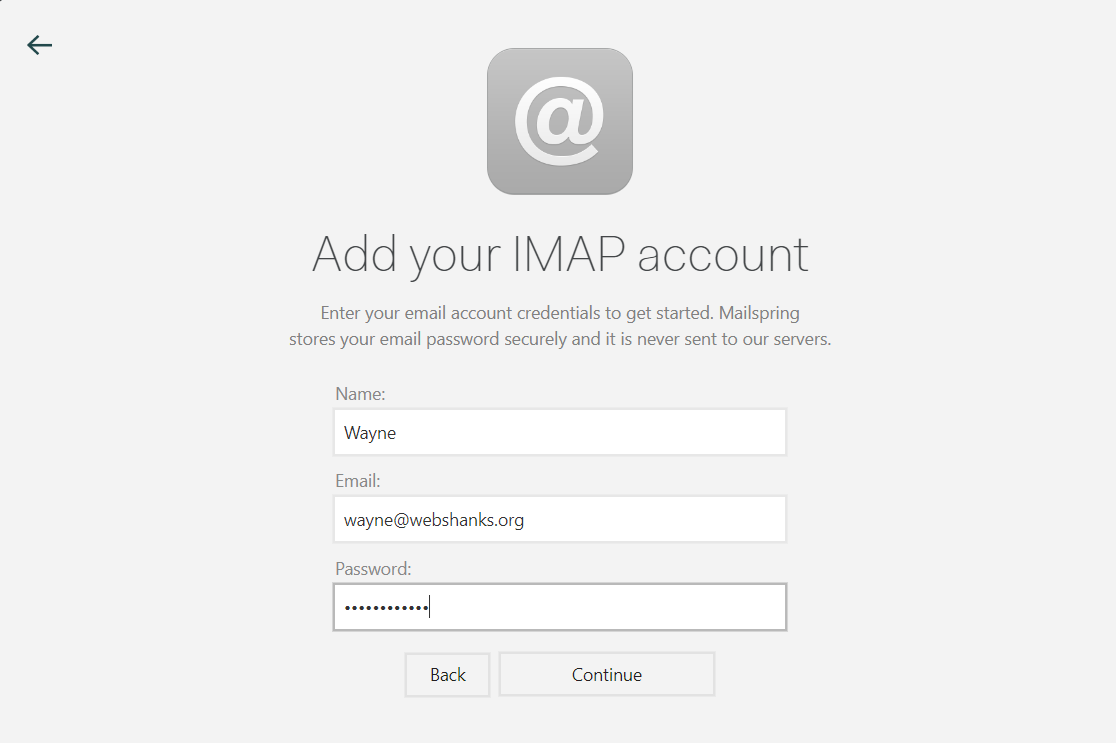
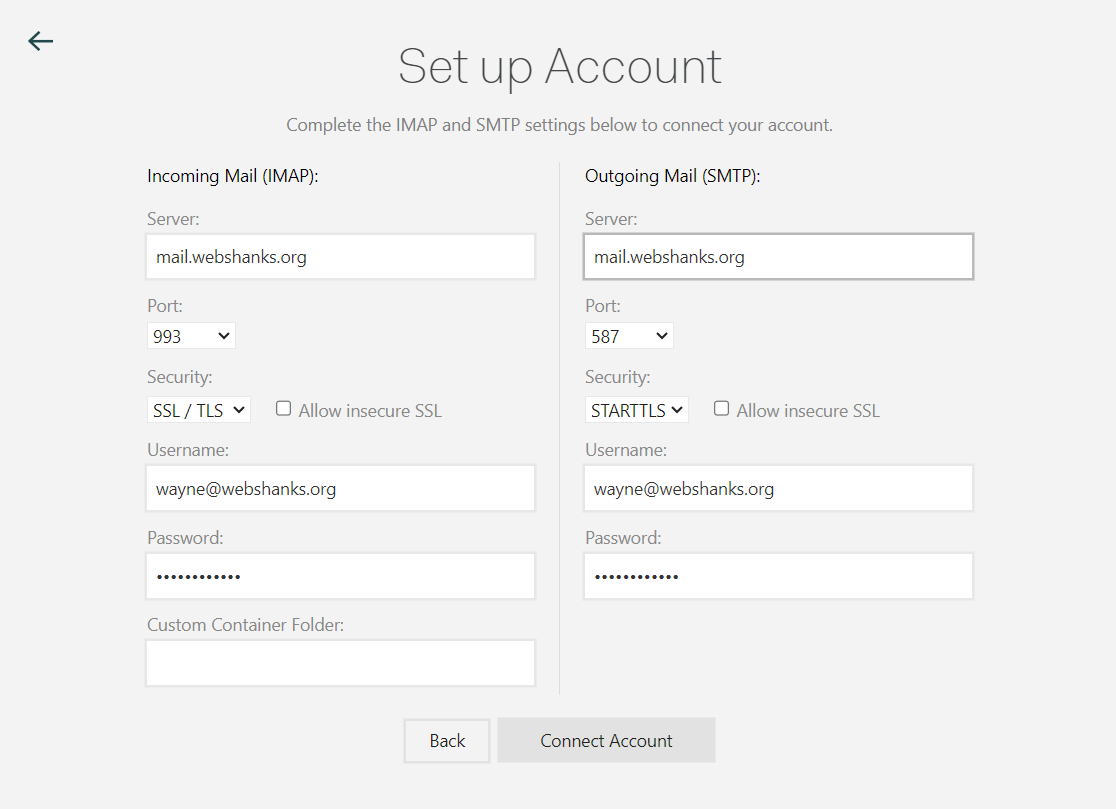
Step 7: Configure Email Clients
To send and receive emails, configure your email client (e.g., Thunderbird, Outlook, or mobile apps) with the following settings:
- Incoming Server (IMAP):
- Server: mail.example.com
- Port: 993
- Encryption: SSL/TLS
- Outgoing Server (SMTP):
- Server: mail.example.com
- Port: 587
- Encryption: STARTTLS
- Username: Your full email address (e.g., [email protected]).
- Password: The password you set for the email account.
Follow the images below if you want to configure with MailSpring using the settings above.
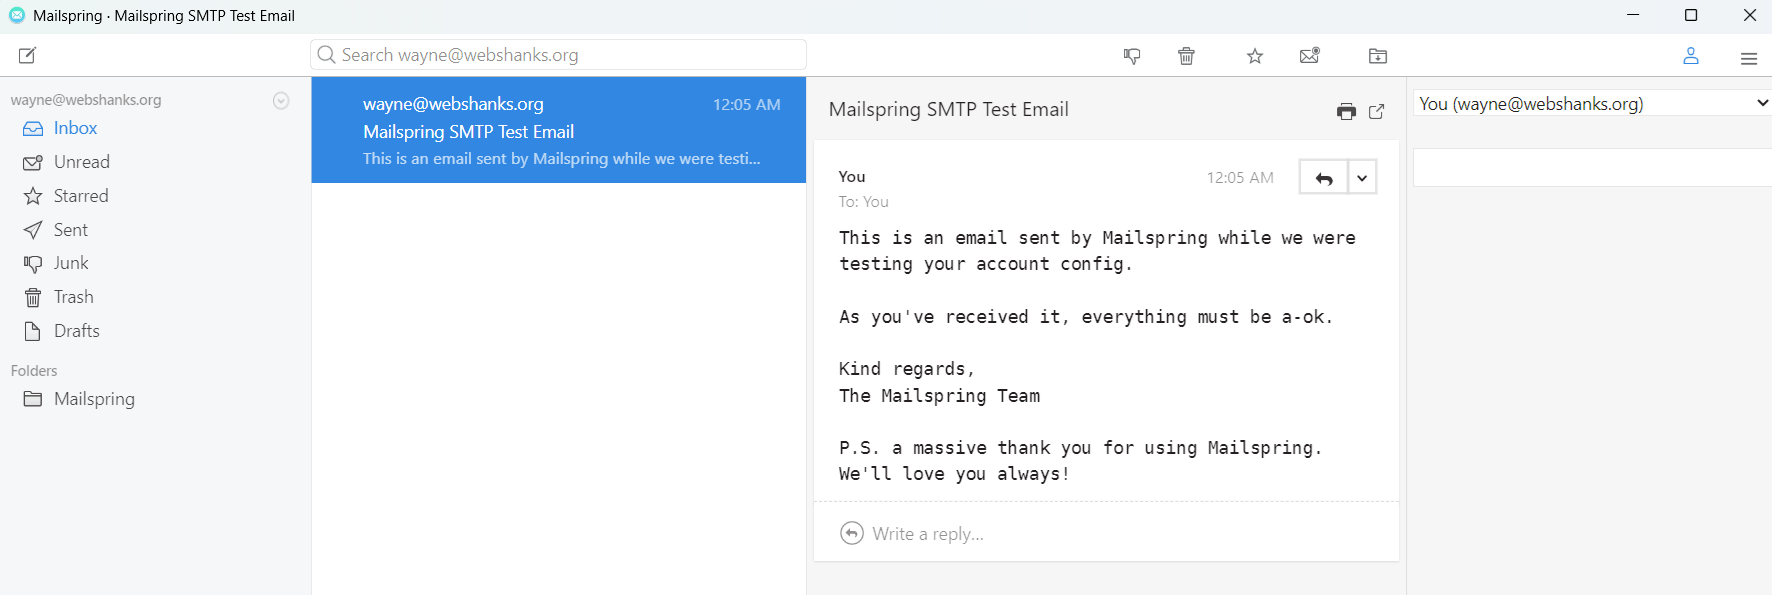
Step 8: Test Email Functionality
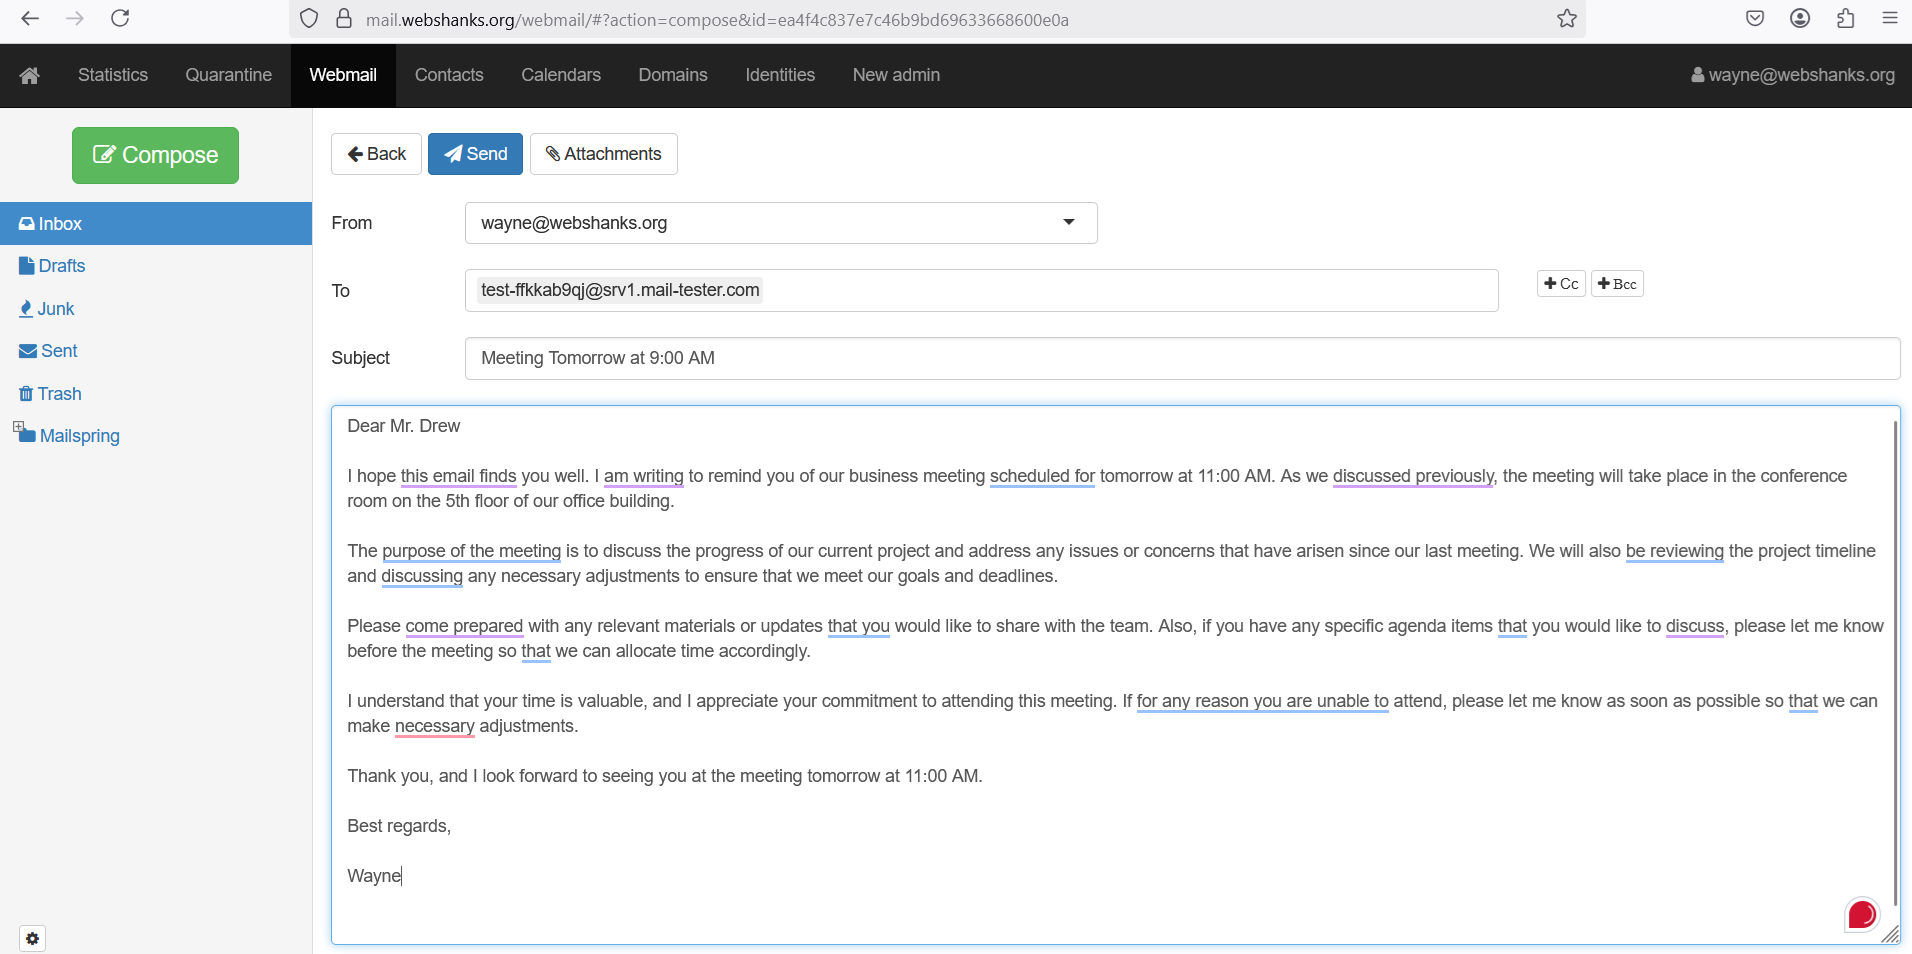
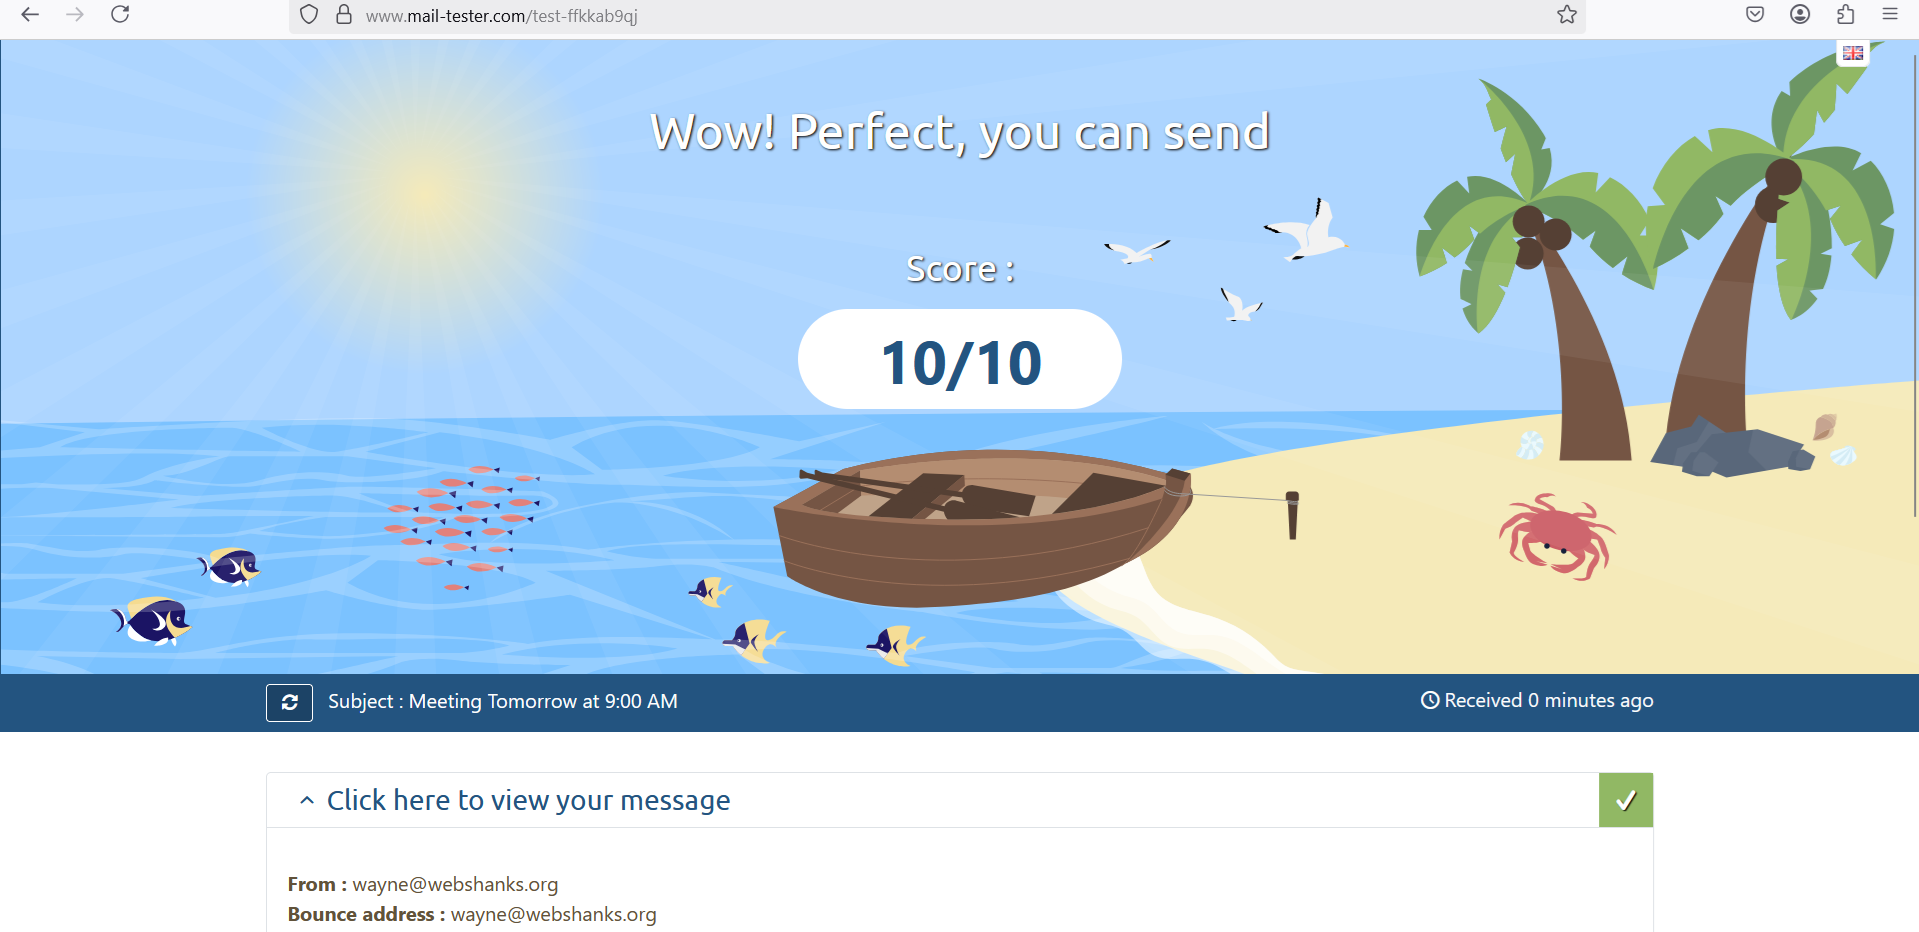
We will send a test email to Mail-Tester to check our deliverability.
First, logout from your admin account and, using the email created, login.

Go to Webmail.
Let’s compose a message.
We got a 10/10!
Step 9: Secure Your Mail Server
Setup SSH keys: Using SSH keys is one of the most secure ways to authenticate and access your server, including your self-hosted email server. Follow my guide on how to generate and use SSH keys.
Enable Firewall: Allow only necessary ports (e.g., 25, 587, 993, 995) and block others:
sudo ufw allow ssh
sudo ufw allow 25,587,993,995/tcp
sudo ufw enable
Regular Updates: Keep your server and Modoboa components updated:
sudo apt update && sudo apt upgrade -y
Install Fail2Ban: It is a powerful tool that helps protect your self-hosted email server by monitoring log files for suspicious activity and automatically banning IP addresses that exhibit malicious behavior.
sudo apt install fail2ban
Troubleshooting Common Issues
- Emails Not Delivered: Check DNS records (MX, SPF, DKIM). Ensure port 25 is open and not blocked by your ISP. Check if your port 25 is open using our Port Checker Tool.
- Cannot Log In to Email Client: Verify the username and password. Check Dovecot logs for authentication errors.
- High Spam Score: Ensure SPF, DKIM, and PTR records are correctly configured. Use tools like Mail Tester to analyze your email setup.
Conclusion
By following this guide, you’ve learned how to purchase a domain on Namecheap, set up a server, install Modoboa, and configure it to send and receive emails. Modoboa’s user-friendly interface and automated installer make it an excellent choice for both beginners and experienced administrators.
If you encounter any issues, refer to the Modoboa documentation or seek help from the community forums.
The most comprehensive guide I have searched for Modoboa Mail Server Setup. Can we use that steps to any VPS eg with 8GB RAM? Like Ubuntu, or CentOS? So many thanks.
Yes on Ubuntu.