 Hosting multiple email accounts and domains efficiently is a crucial task for any organization.
Today I’ll show you how to make a free email server with multiple domains using aaPanel, RackNerd, and Cloudflare. I’ve written a guide using this method but for only a single domain. Check it out here.
This article will guide you through the systematic steps of setting up and managing multiple emails and domains using aaPanel on an Ubuntu 22.04 server.
Prerequisites
Before diving into the setup process, ensure you have the following prerequisites in place:
- Ubuntu 22.04 Server: A freshly installed Ubuntu 22.04 server with root access on RackNerd VPS.
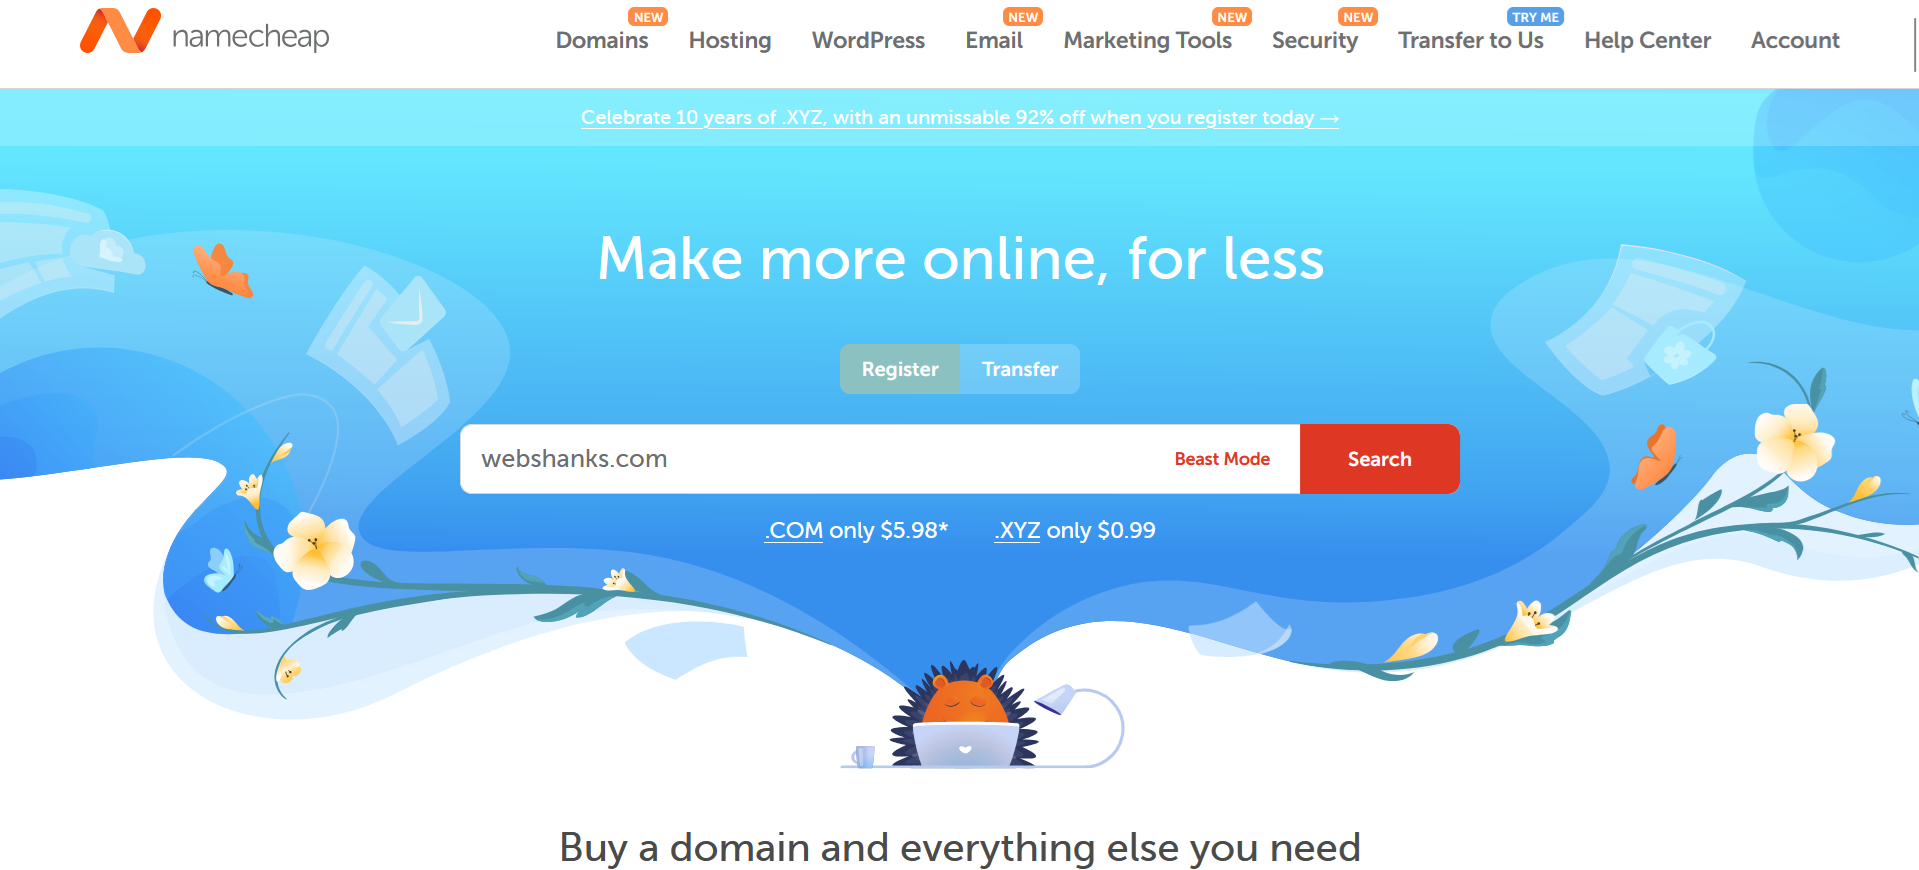
- Domain Names: Registered domain names that you plan to manage using the server. Buy your domains on Namecheap.
- Basic Linux Knowledge: Familiarity with Linux command-line operations.
Make a Free Email Server with Multiple Domains Using aaPanel, RackNerd and Cloudflare
aaPanel provides a user-friendly interface that simplifies server management tasks, including web hosting, email server configuration, and domain management.
Let’s start!
Step 1: Get a VPS on RackNerd
Go to RackNerd and get at least 2GB VPS. Follow these steps on how you can setup RackNerd VPS.
Why RackNerd? Because it has an open port 25. We need this port to send emails. You can also choose Contabo.

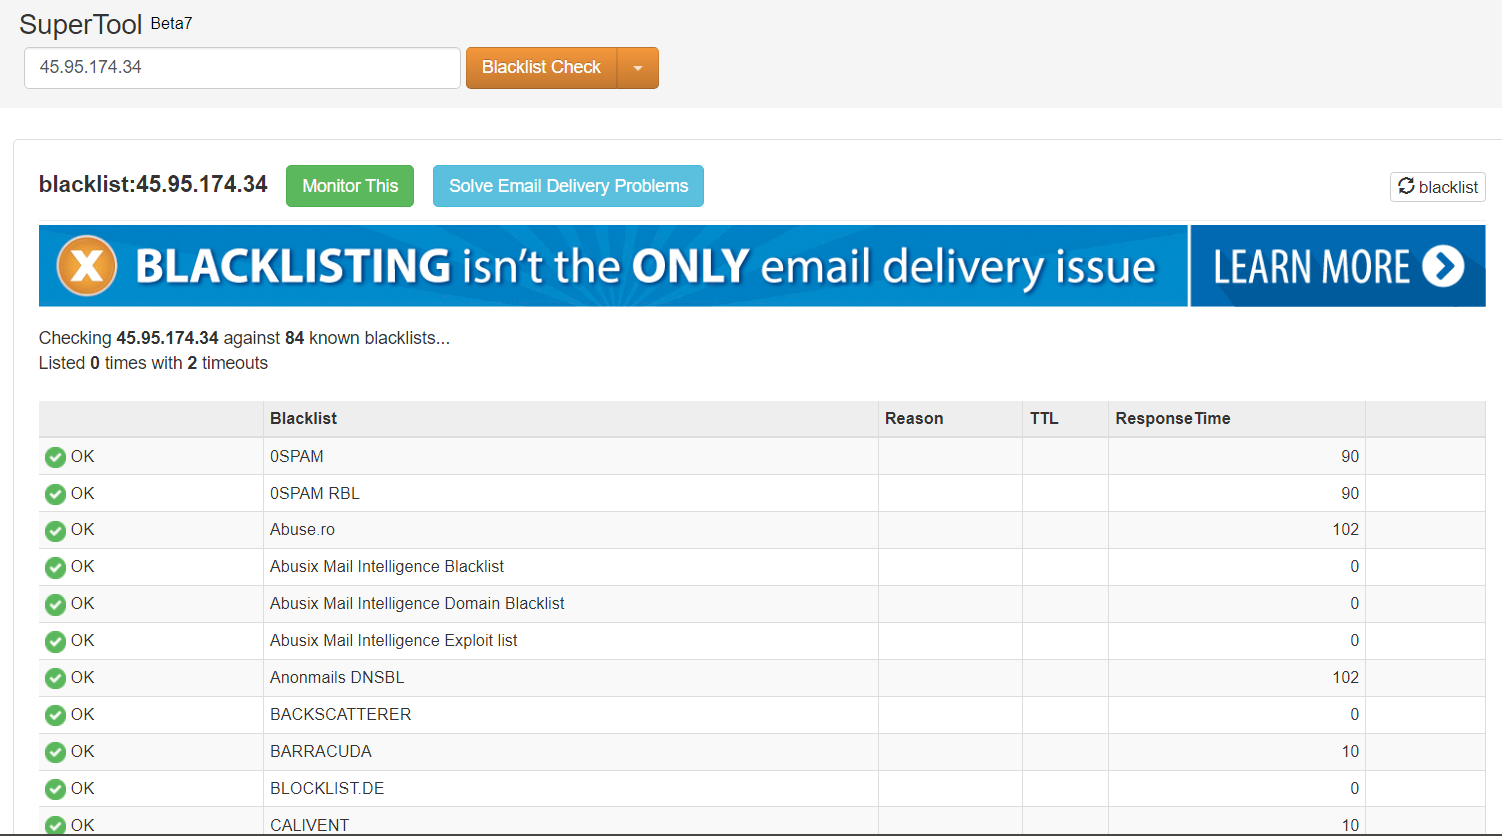
Once your VPS is ready, check your IP for any blacklist.
Then ask for an IPv6 to enhance your email deliverability. You need to contact RackNerd support to do this. It’s free!
Step 2: Get a Domain
Now we need a domain. Go to Namecheap and register your domain. Avoid .work .date .top .fun .life .review .xyz .bid .stream .site .space .gdn .click .pro top-level domains.
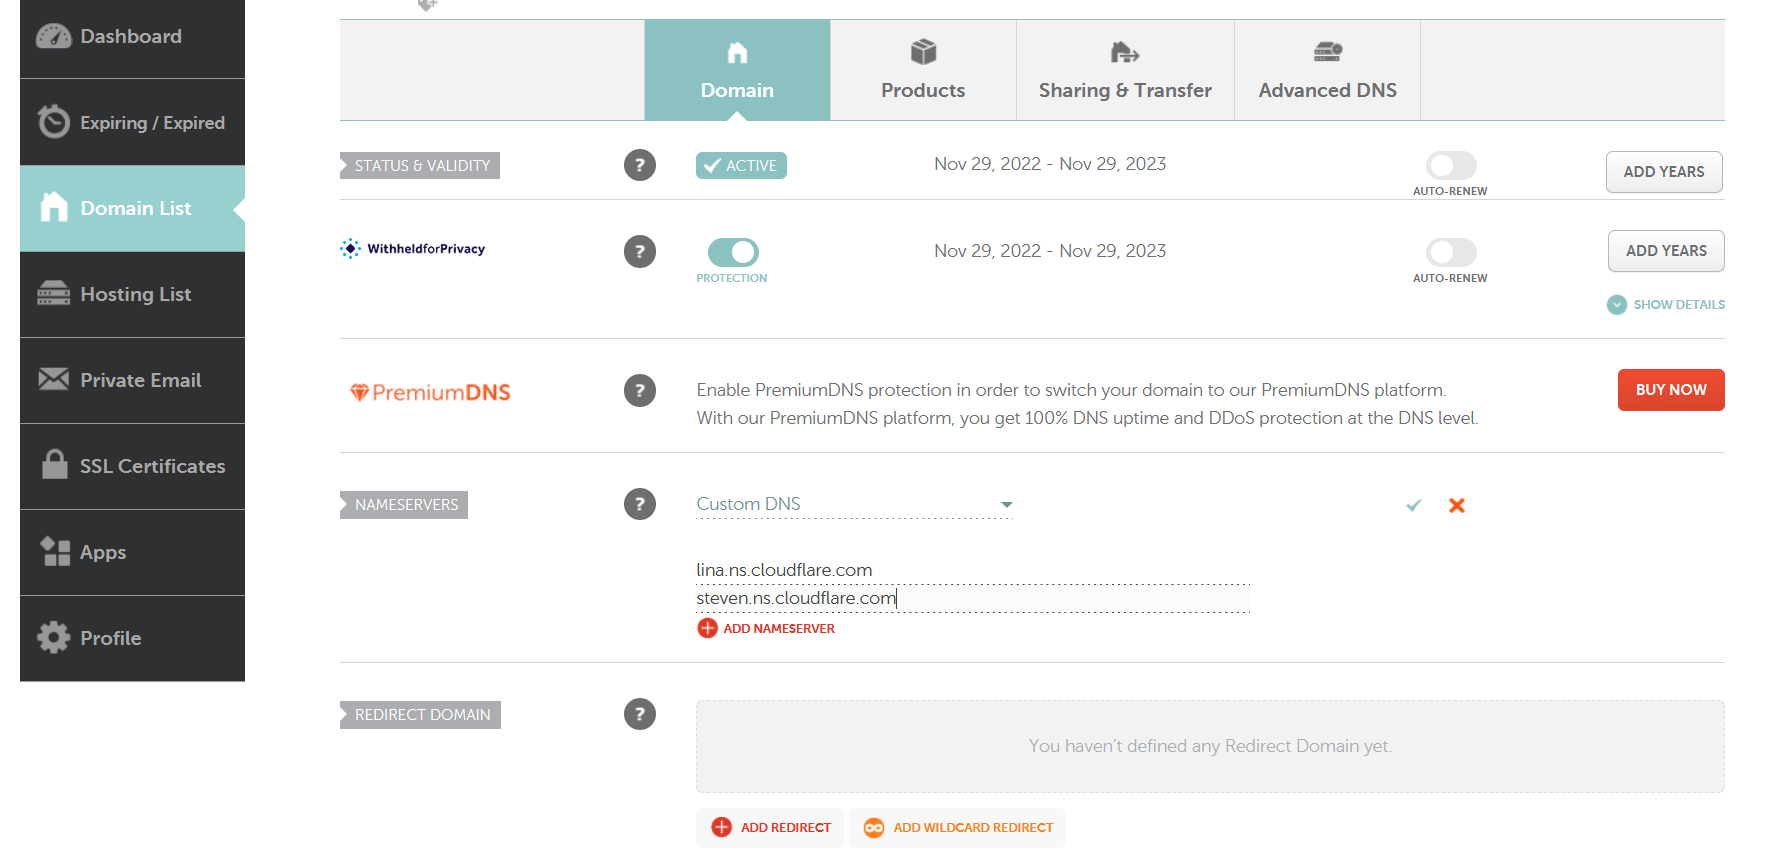
Create a free Cloudflare account and add a website.
Then add its nameservers to Namecheap.

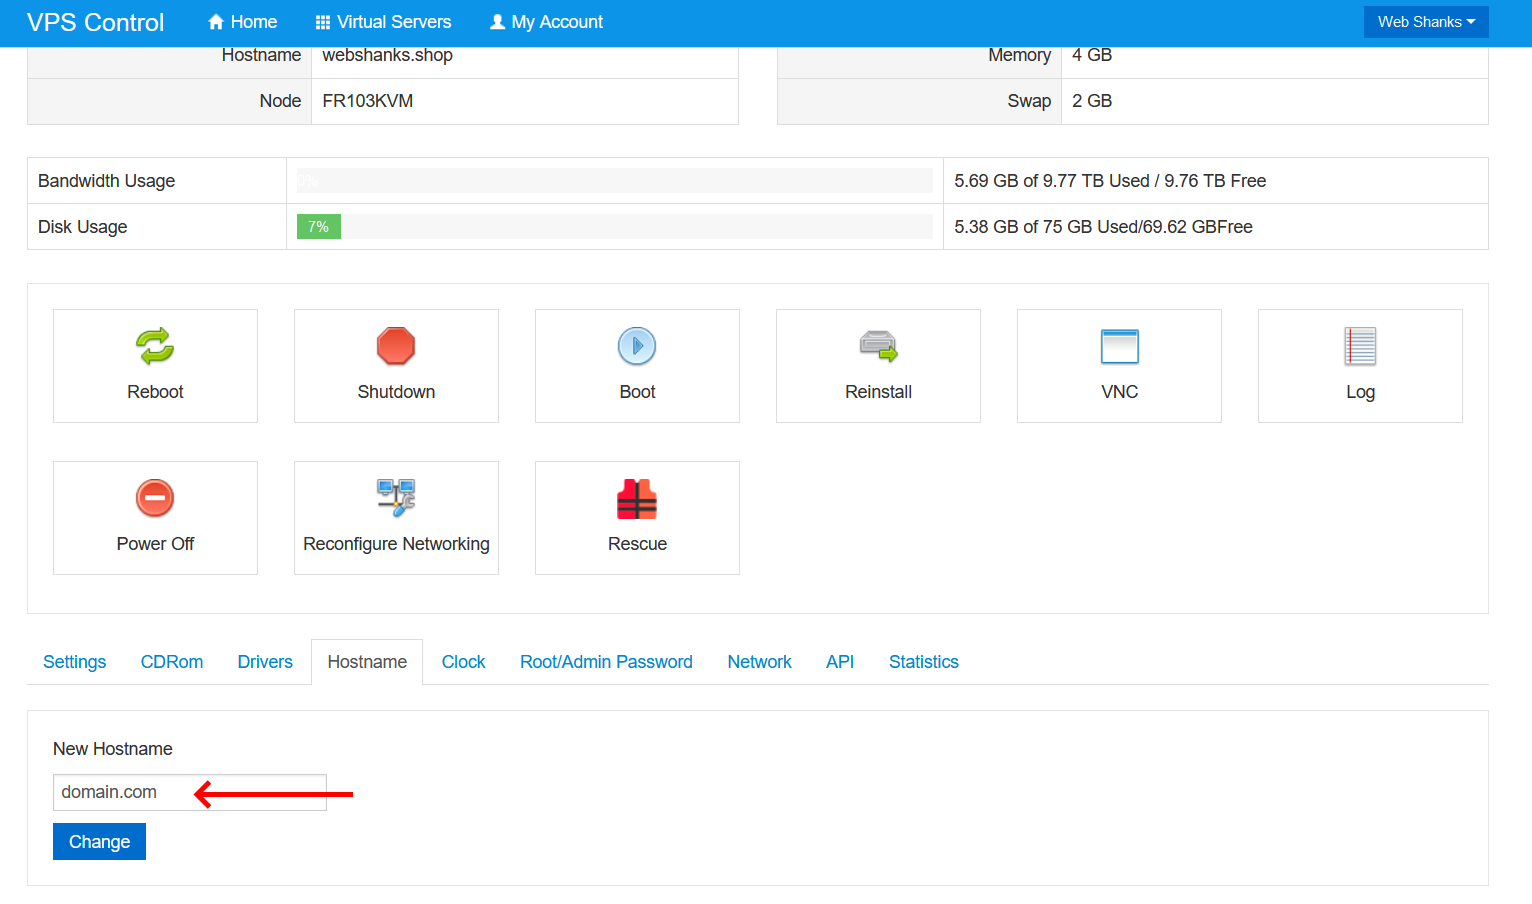
Step 3: Setup Hostname, Initial DNS and rDNS
In your VPS control panel, go to the Hostname tab and change your hostname to mail.domain.com or you can change it on the command line.
nano /etc/hostname
Set the hostname for IPv4 and IPv6.
nano /etc/hosts
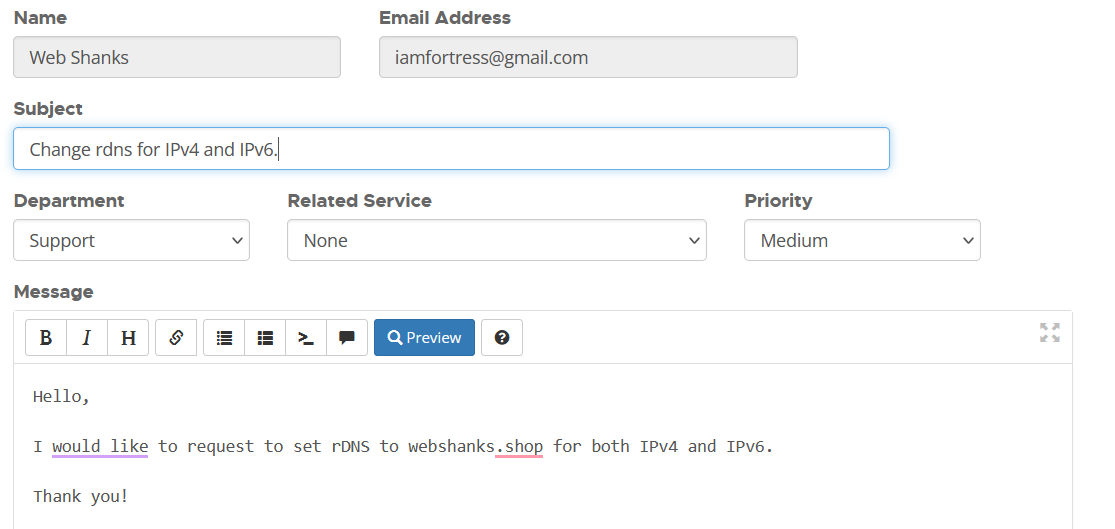
RackNerd handles rDNS. You need to open a ticket and set your rDNS to domain.com the same as your hostname.
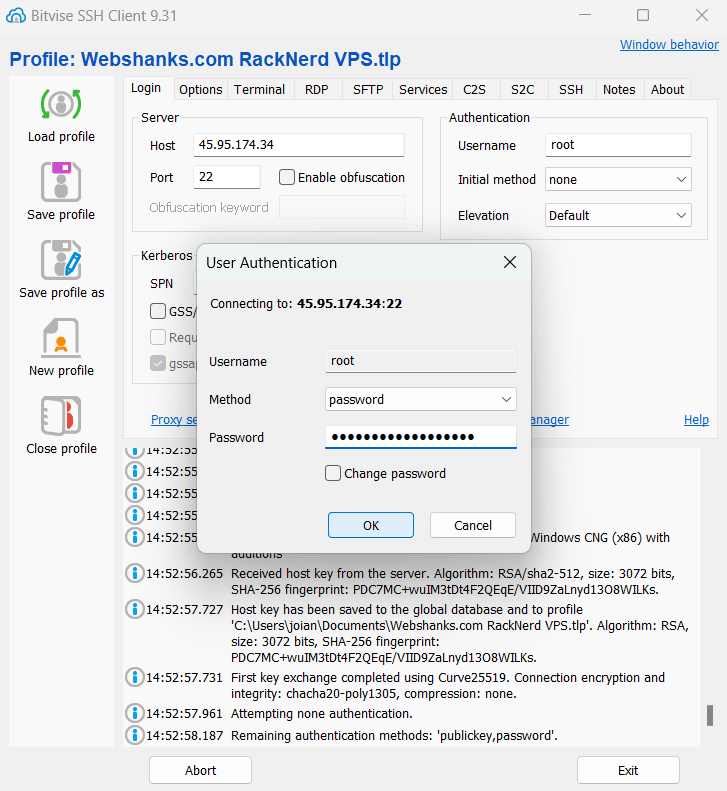
Step 4: Connect to your Server
Download and install Bitvise – it’s a free SSH client.
Step 5: Install aaPanel
Begin by updating your system’s package list and upgrading the installed packages:
sudo apt update && sudo apt upgrade -y
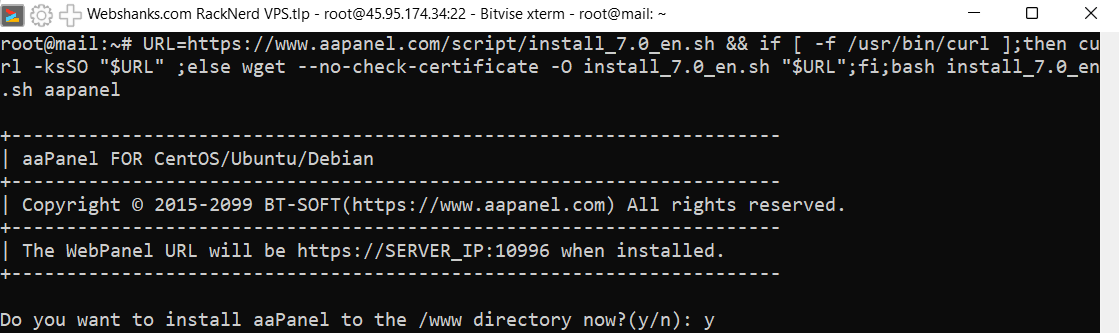
Download and install aaPanel using the following commands:
URL=https://www.aapanel.com/script/install_7.0_en.sh && if [ -f /usr/bin/curl ];then curl -ksSO "$URL" ;else wget --no-check-certificate -O install_7.0_en.sh "$URL";fi;bash install_7.0_en.sh ipssl
If you want to install aaPanel in /www directory just choose Y.
Do you want to install aaPanel to the /www directory now?(y/n): y
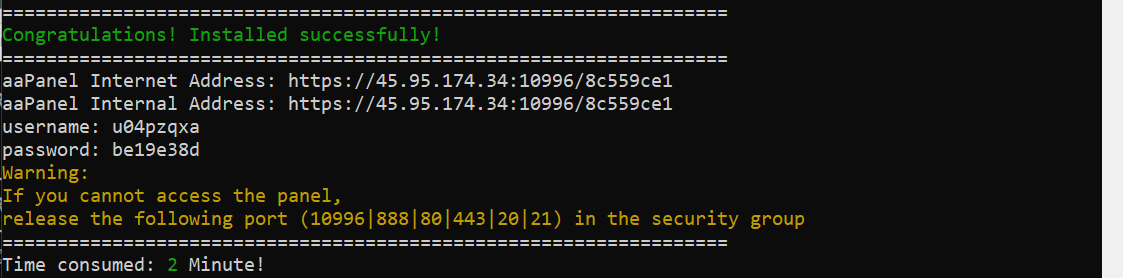
If successfully installed, you will see this message.
Note down the login URL, username, and password provided at the end of the installation.
Be sure to enable IPv6 on /etc/sysctl.conf file. The default IPv6 is disabled.
nano /etc/sysctl.conf
The values should be set to 0.
net.ipv6.conf.all.disable_ipv6 = 0
net.ipv6.conf.default.disable_ipv6 = 0
net.ipv6.conf.lo.disable_ipv6 = 0
Reboot your server.
reboot
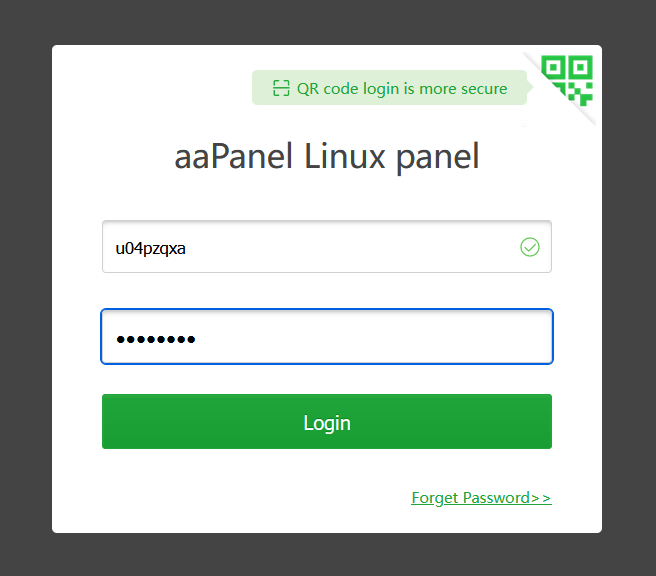
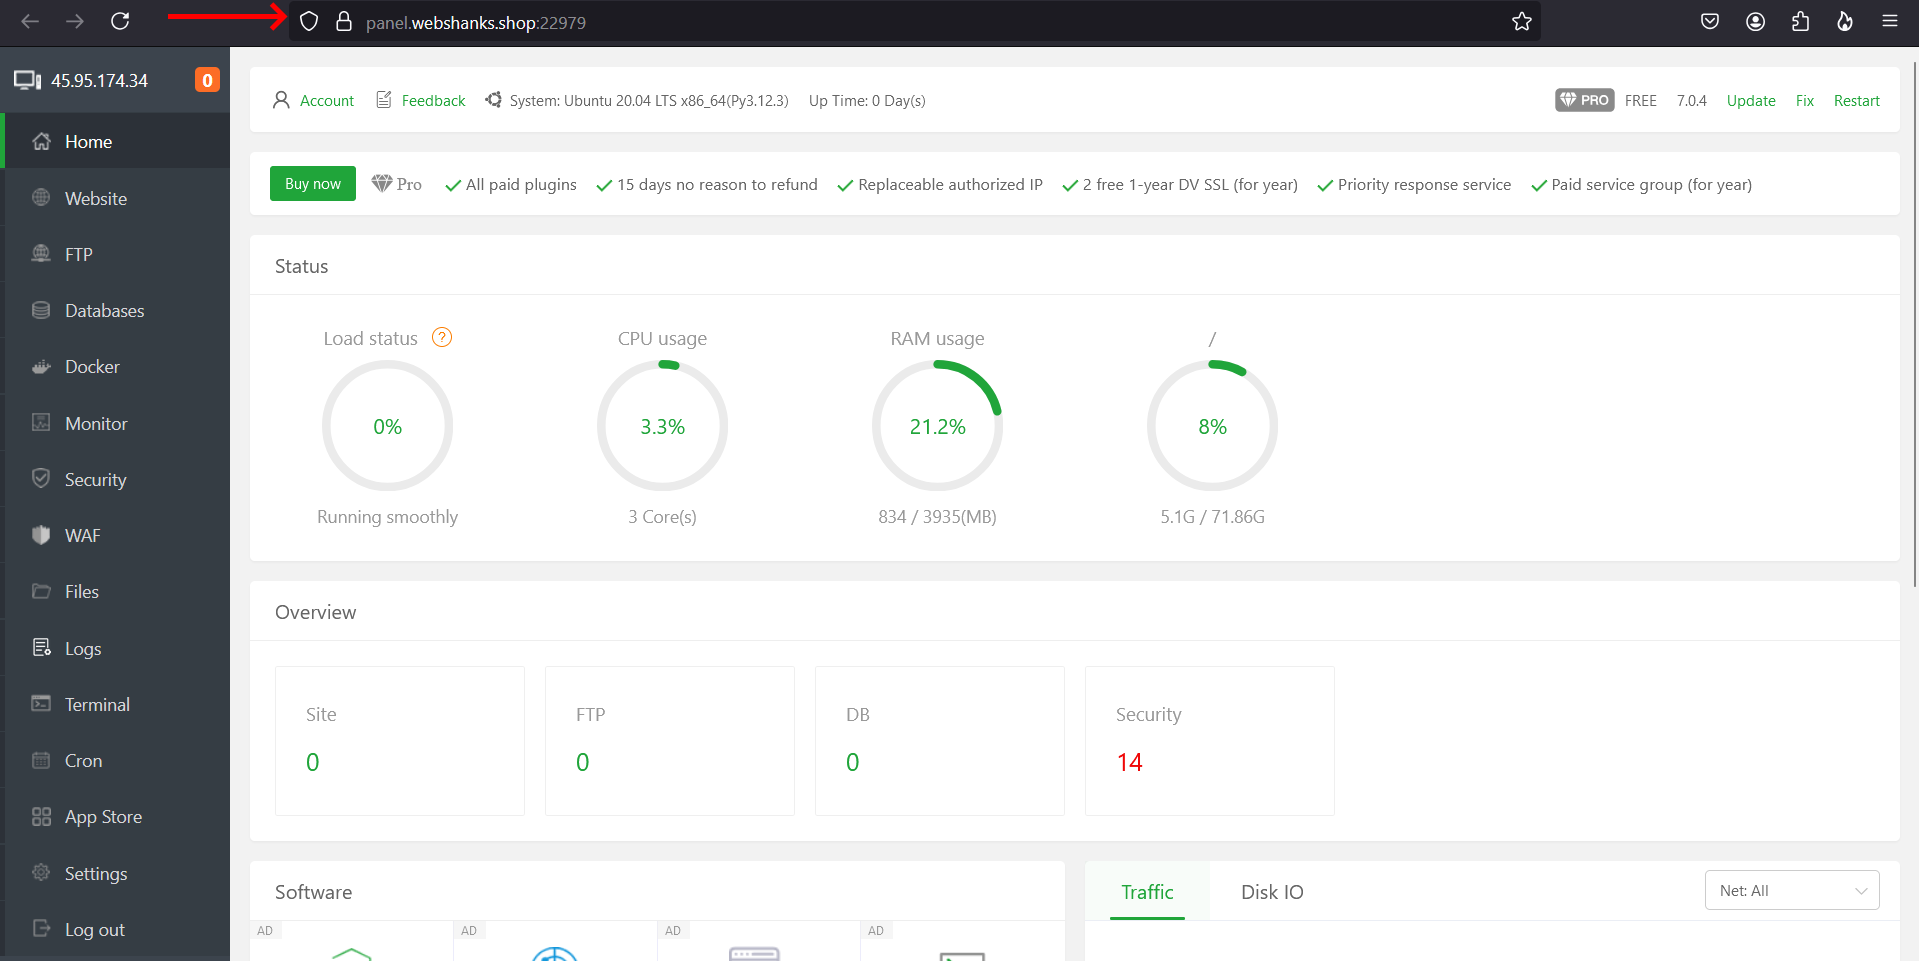
Open a web browser and navigate to the aaPanel login URL. Use the provided credentials to log in to the panel.
Enter the login details given to you after installation.
Once you’re logged in, install important software packages. You can follow my selection. I’m using the latest version as much as possible.

If the task takes long or lags, you can restart the panel on the top right menu.
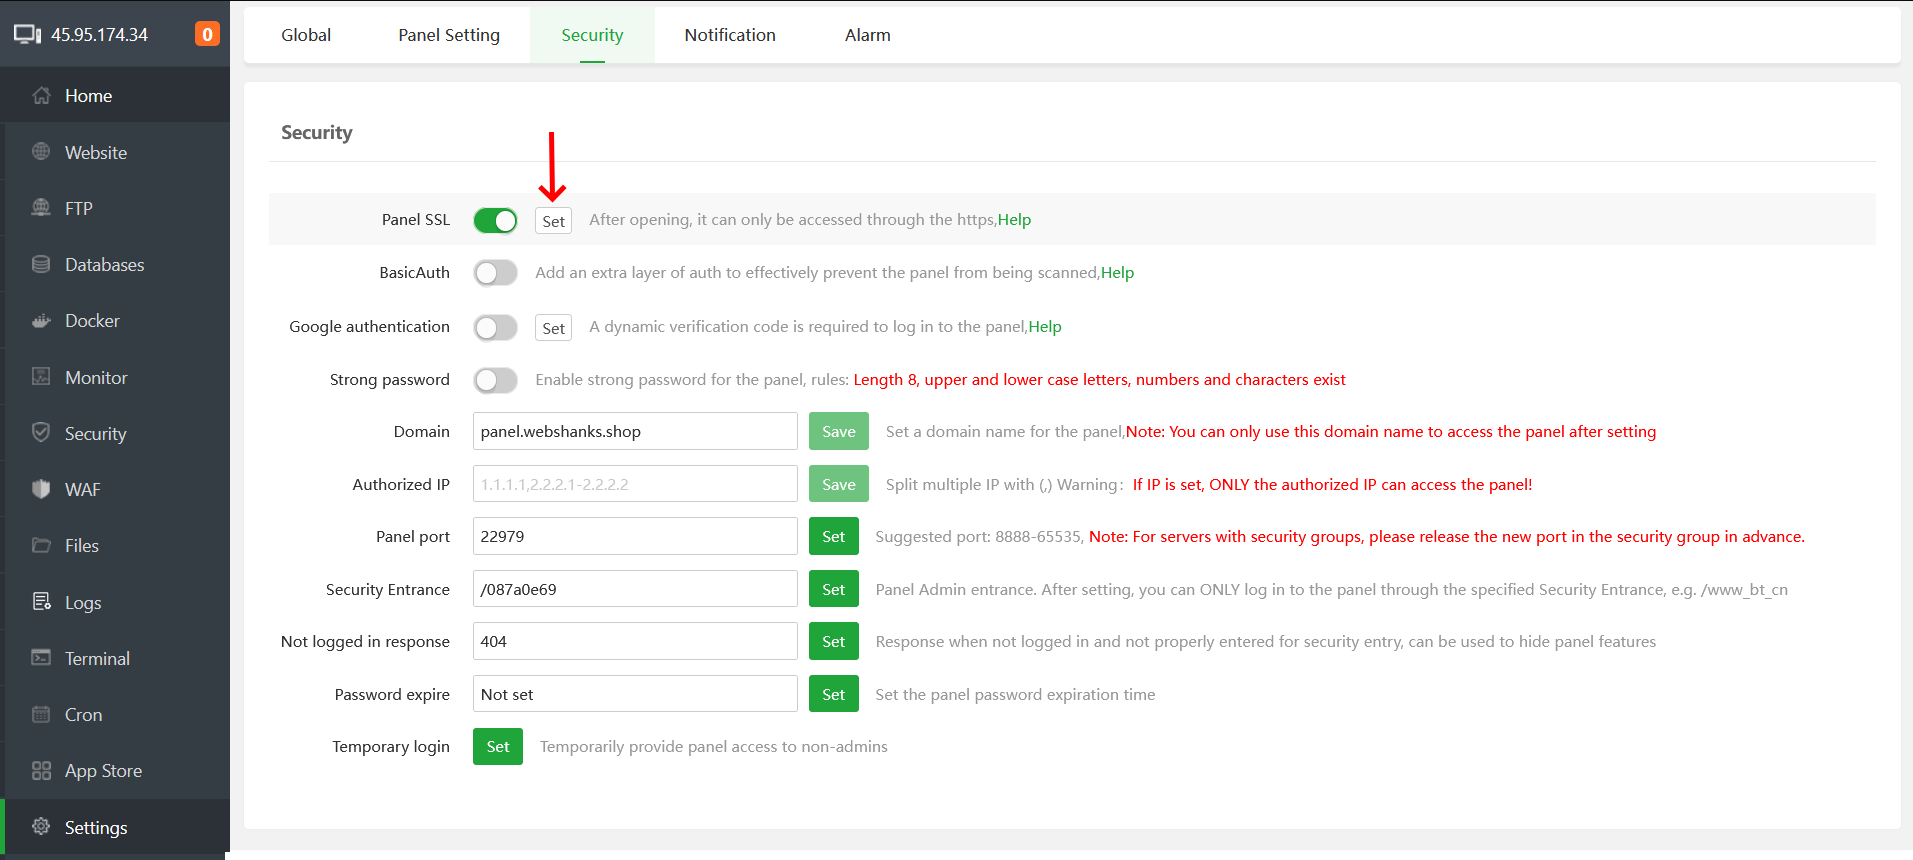
Before we add domains and emails, we need to use a secure URL to access our aaPanel.
First, add an A record for the domain panel, for example, panel.webshanks.shop on Cloudflare.
Next, go to Settings > Security > Domain.
Be sure that Panel SSL is toggled on. Click Save.

You will get a ‘The domain name access has been opened, and I cannot access it through IP, please re -enter’ error on your browser but it’s normal. You will need to login using your panel address.
This is the format of your new panel login address: panel.domain.com:port/security-entrance.
In my case, it will be: panel.webshanks.shop:33172/ac699b0c
Then hit Click to jump.

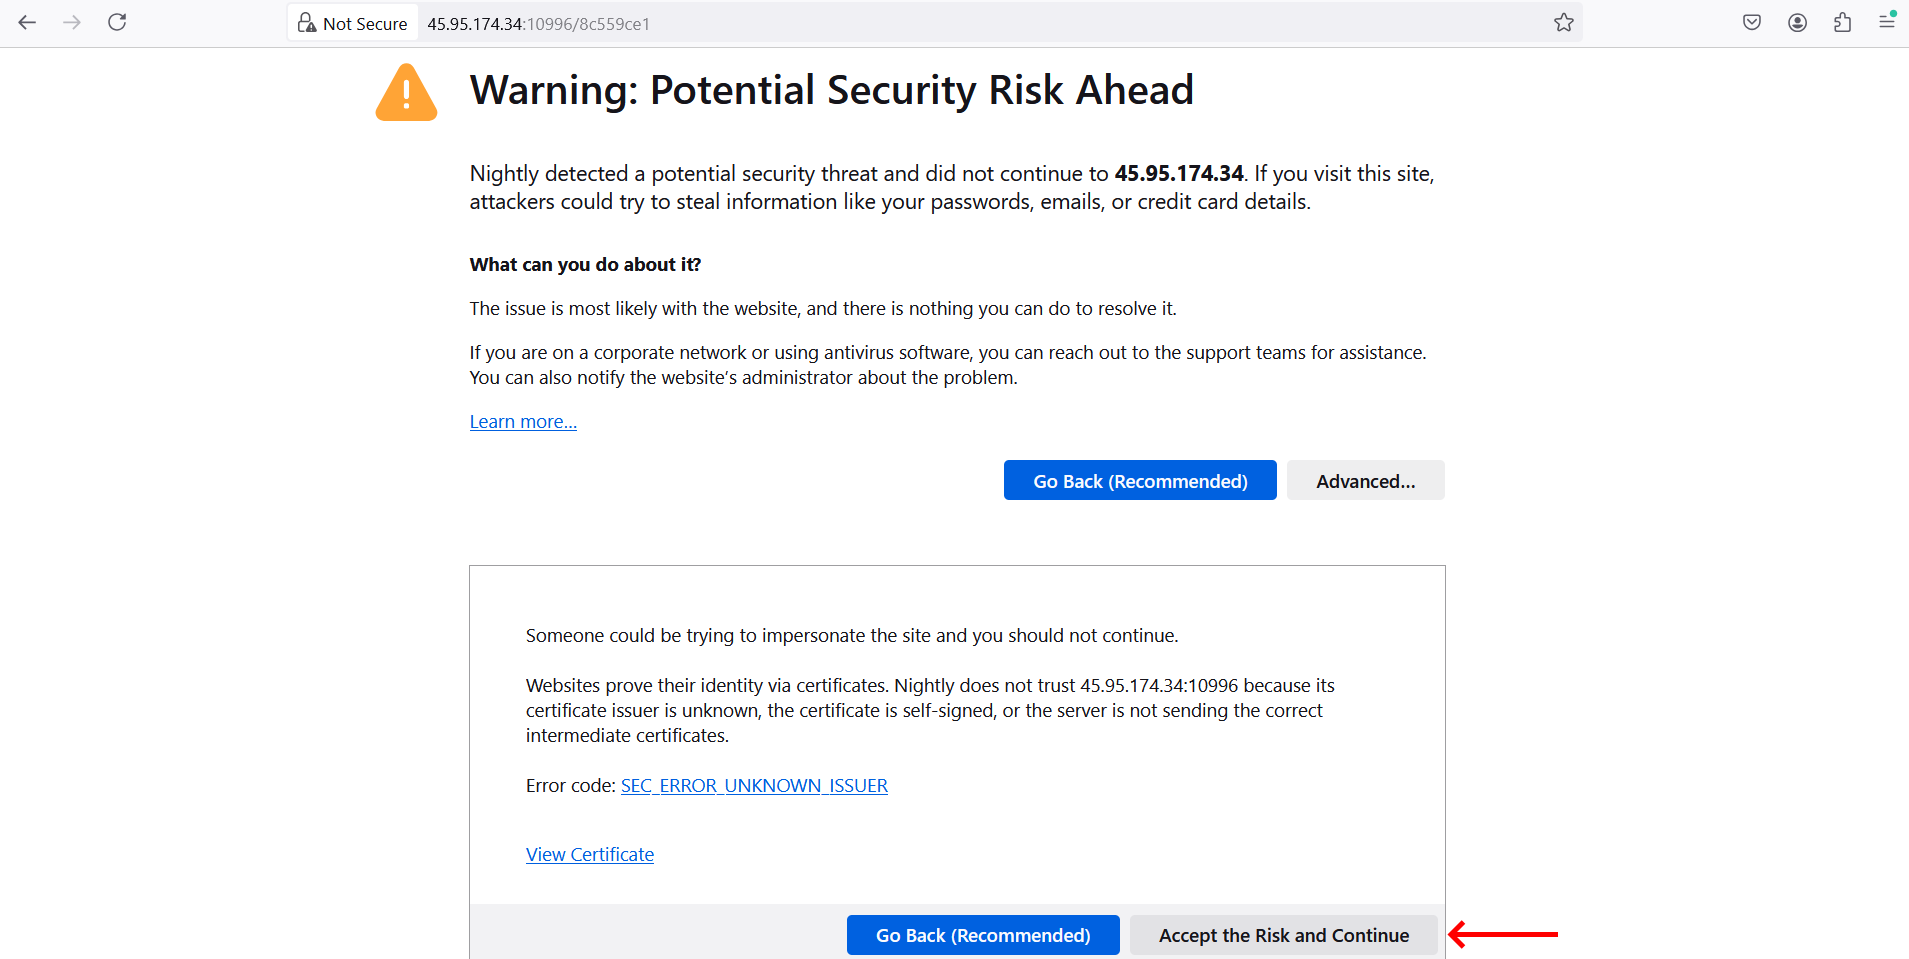
In this part, you will see a Warning: Potential Security Risk Ahead. The panel SSL is not yet activated. Just proceed to Accept the Risk and Continue.
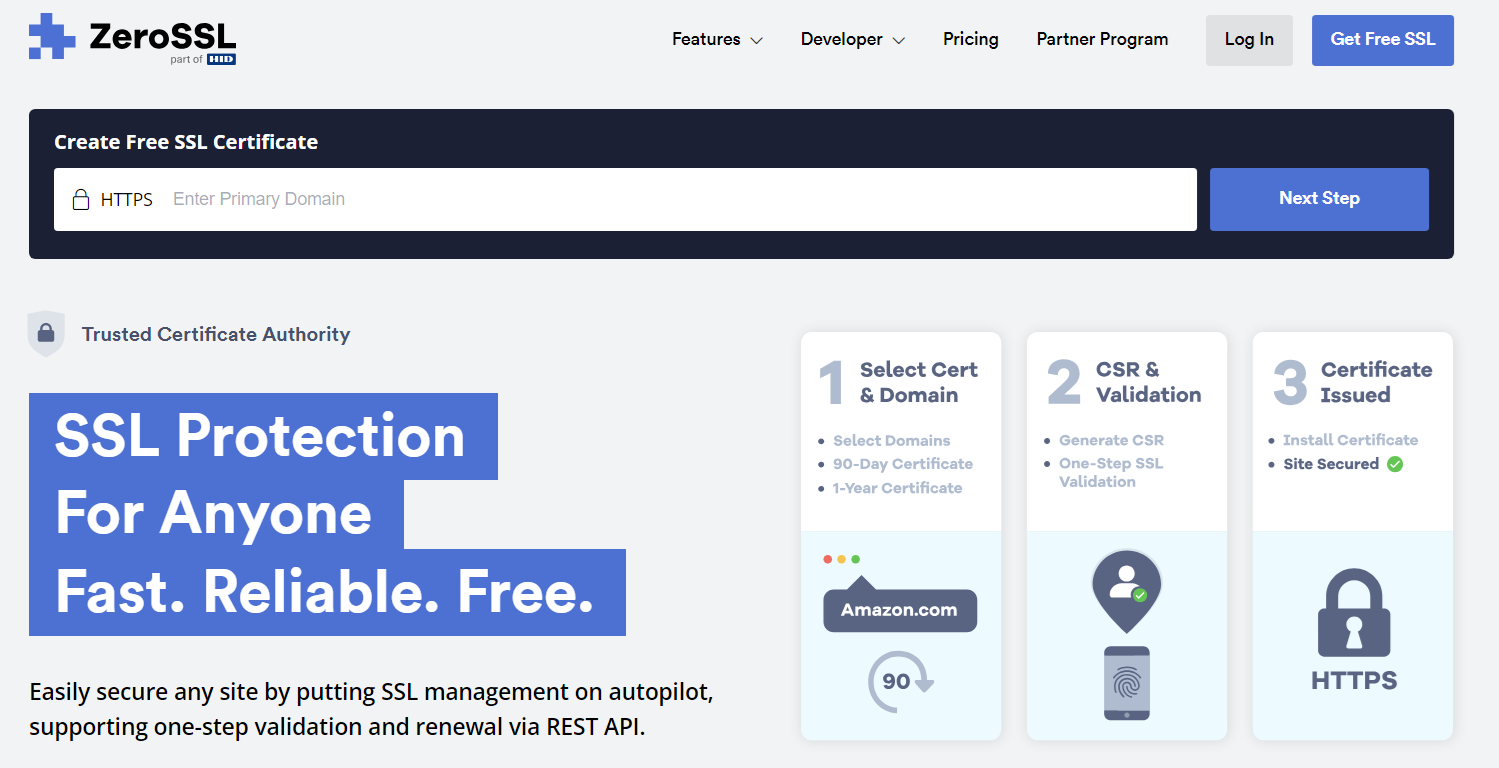
Now we will use a free SSL from Zero SSL.
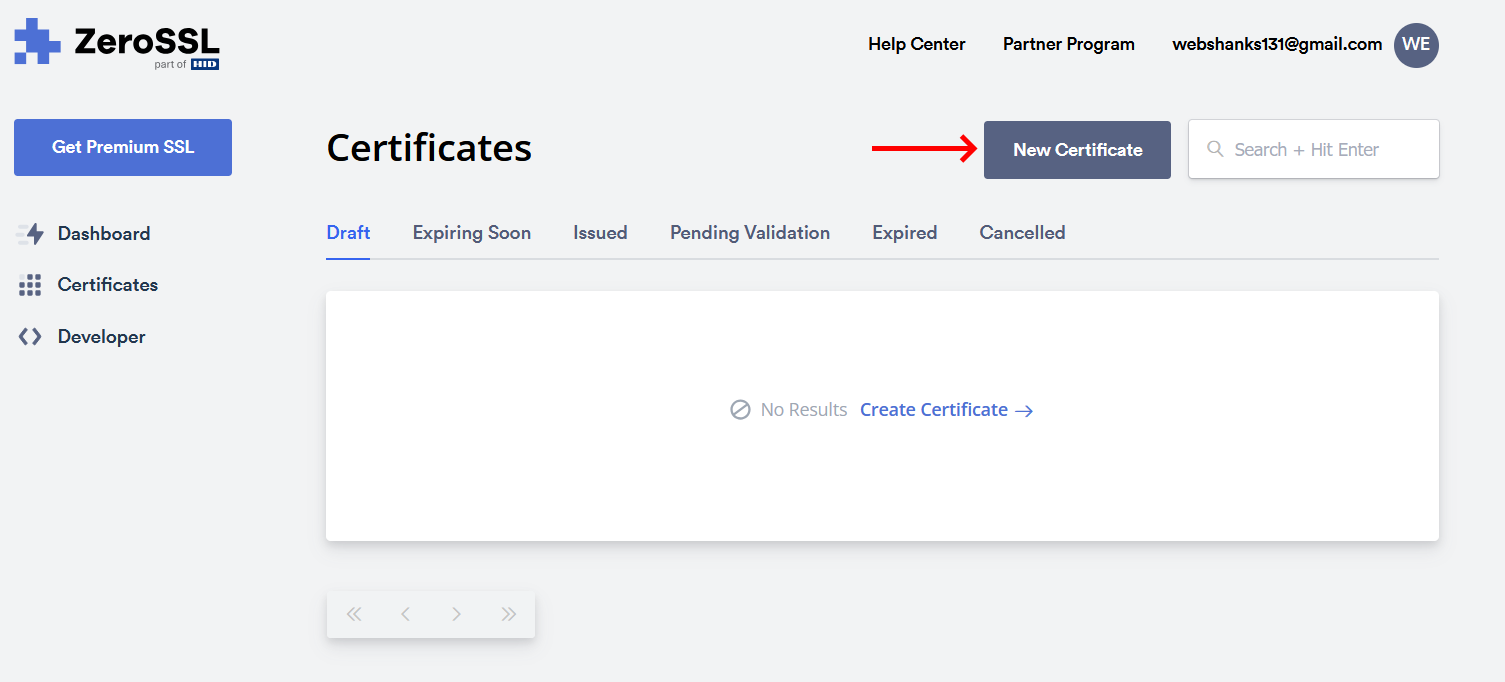
Signup with ZeroSSL.
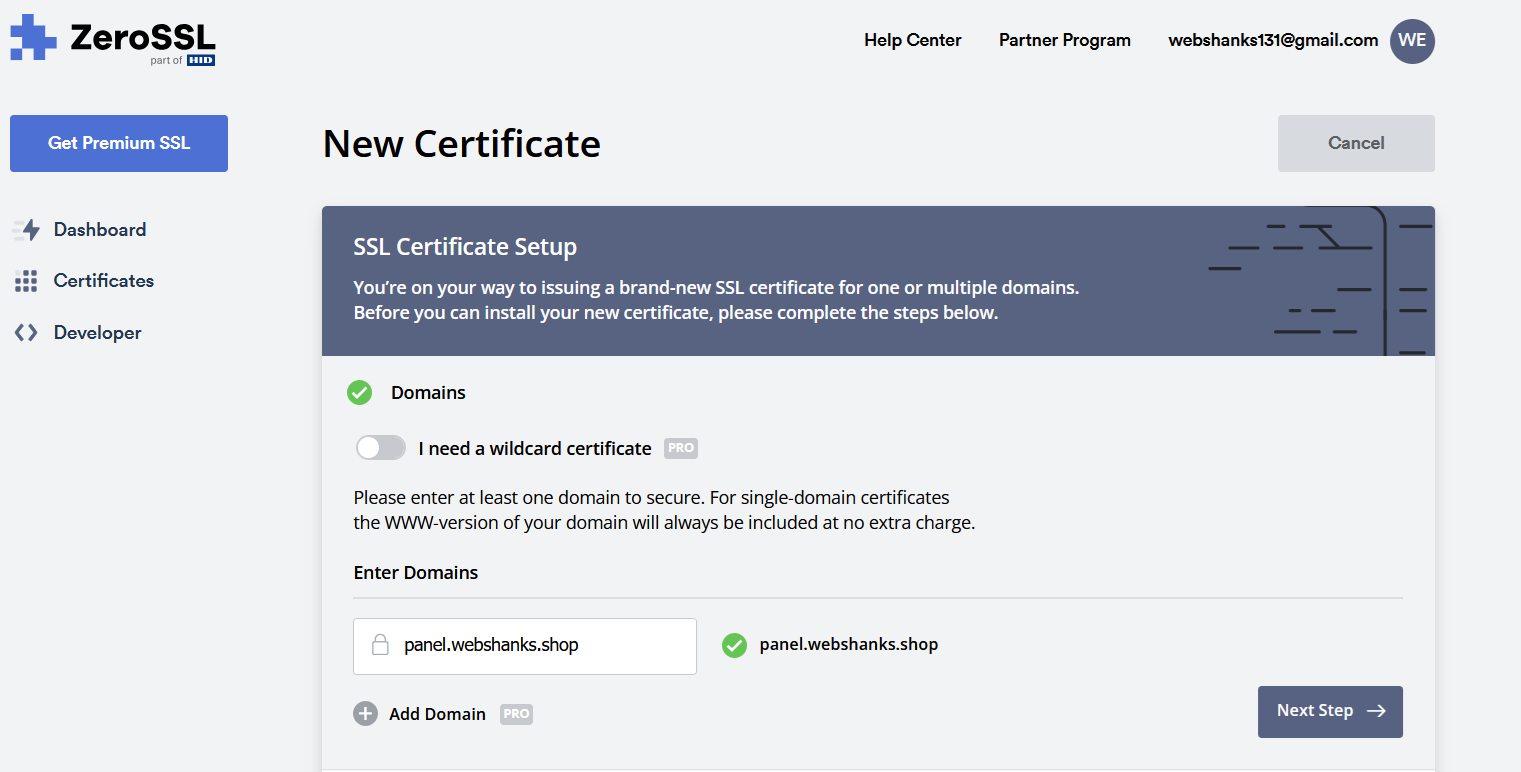
Create a new certificate.
Enter the domain name(s) you want the certificate for. If you’re ordering a Multi-Domain certificate, you can add multiple domains. Click Next.
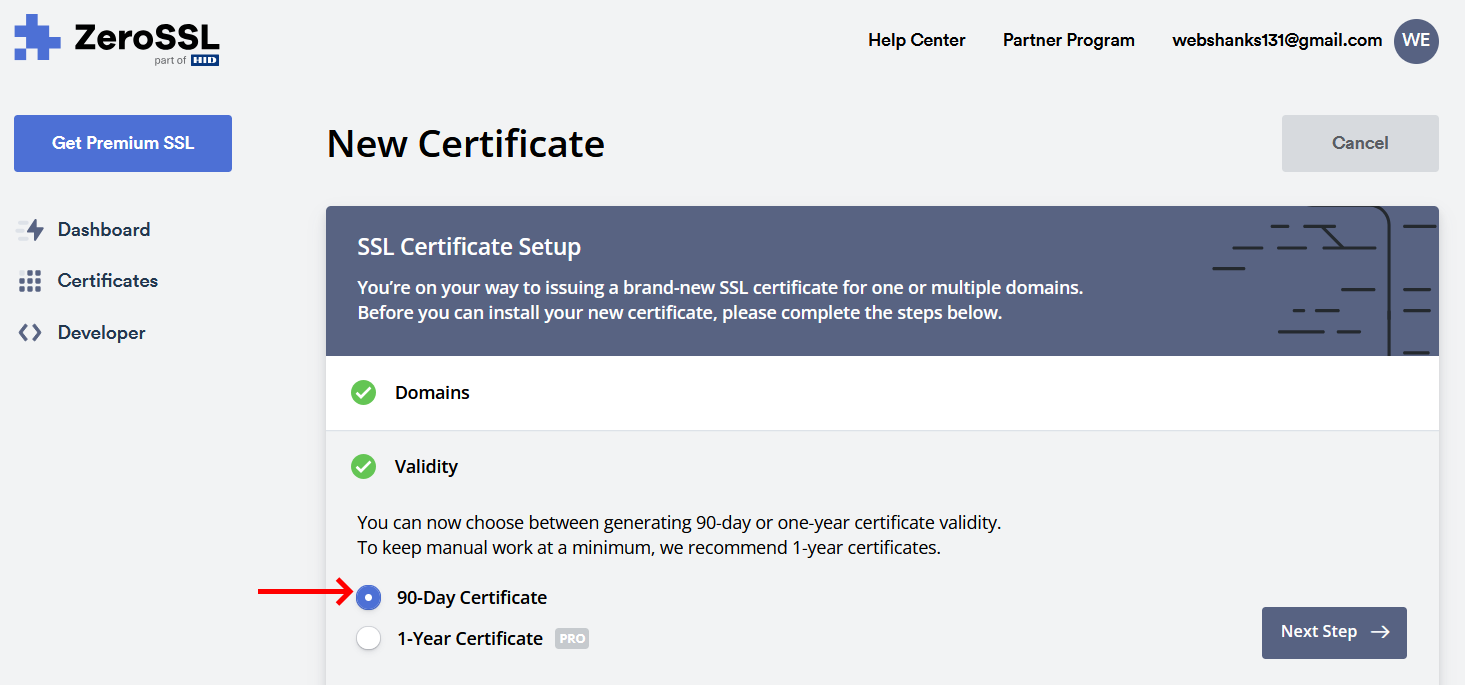
Choose the validity period for the certificate (e.g., 90 days, 1 year). Note that the free certificates are typically for 90 days. Click Next.
Choose whether you want ZeroSSL to generate the CSR (Certificate Signing Request) for you or if you want to upload your own CSR.
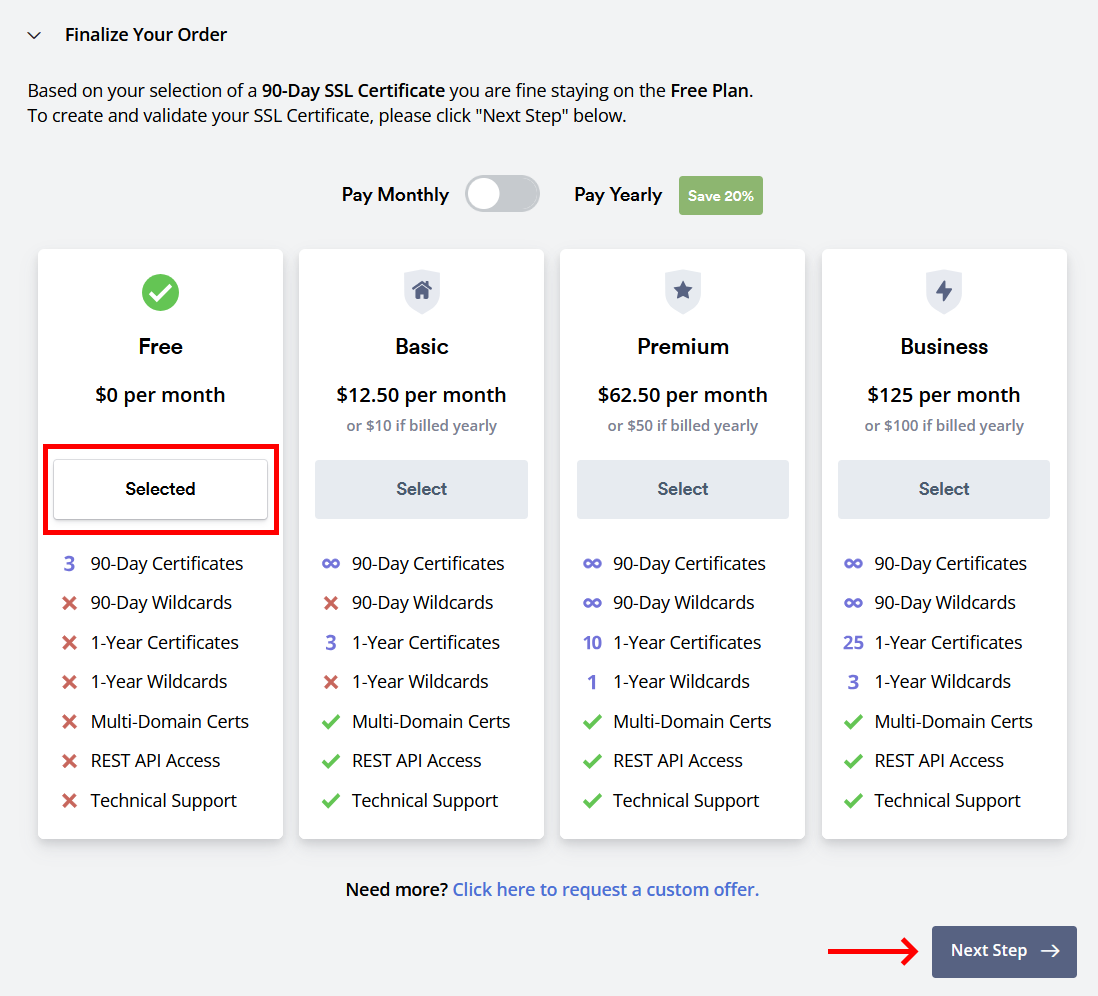
Then just choose the free plan.
Choose a method to verify your domain ownership. The available methods are:
- Email Verification: An email will be sent to a domain-related email address (e.g., [email protected]) with a verification link.
- DNS (CNAME) Verification: You’ll need to add a CNAME record to your domain’s DNS settings.
- HTTP File Upload: You’ll need to upload a specific file to your website’s root directory.
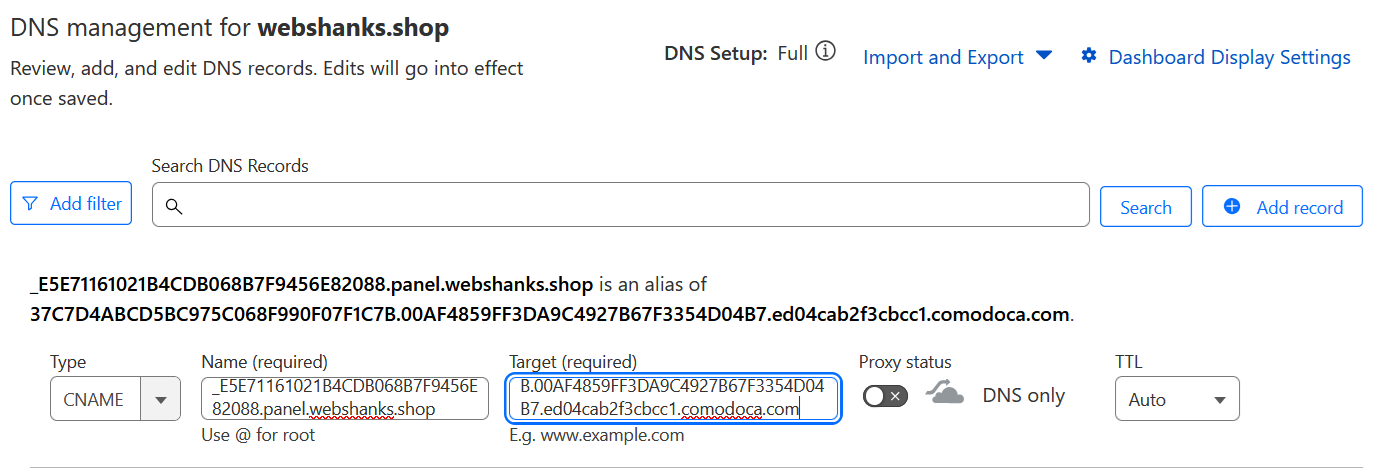
We will be using DNS Verification. We will add a CNAME on Cloudflare.
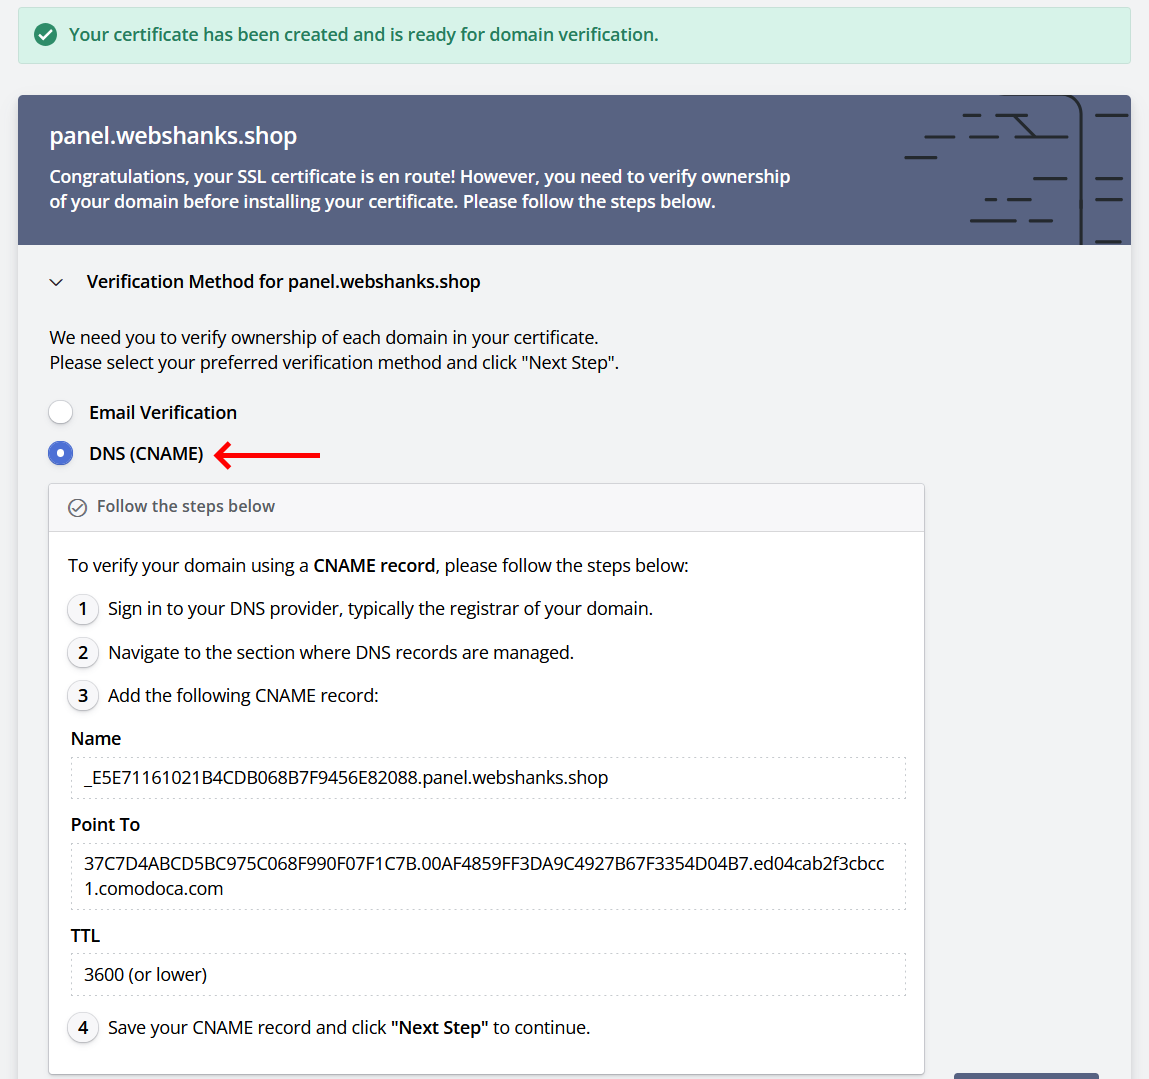
Copy the Name and Point To it on Cloudflare.
Follow the instructions provided to complete the verification process for your chosen method. Once verified, you can proceed.
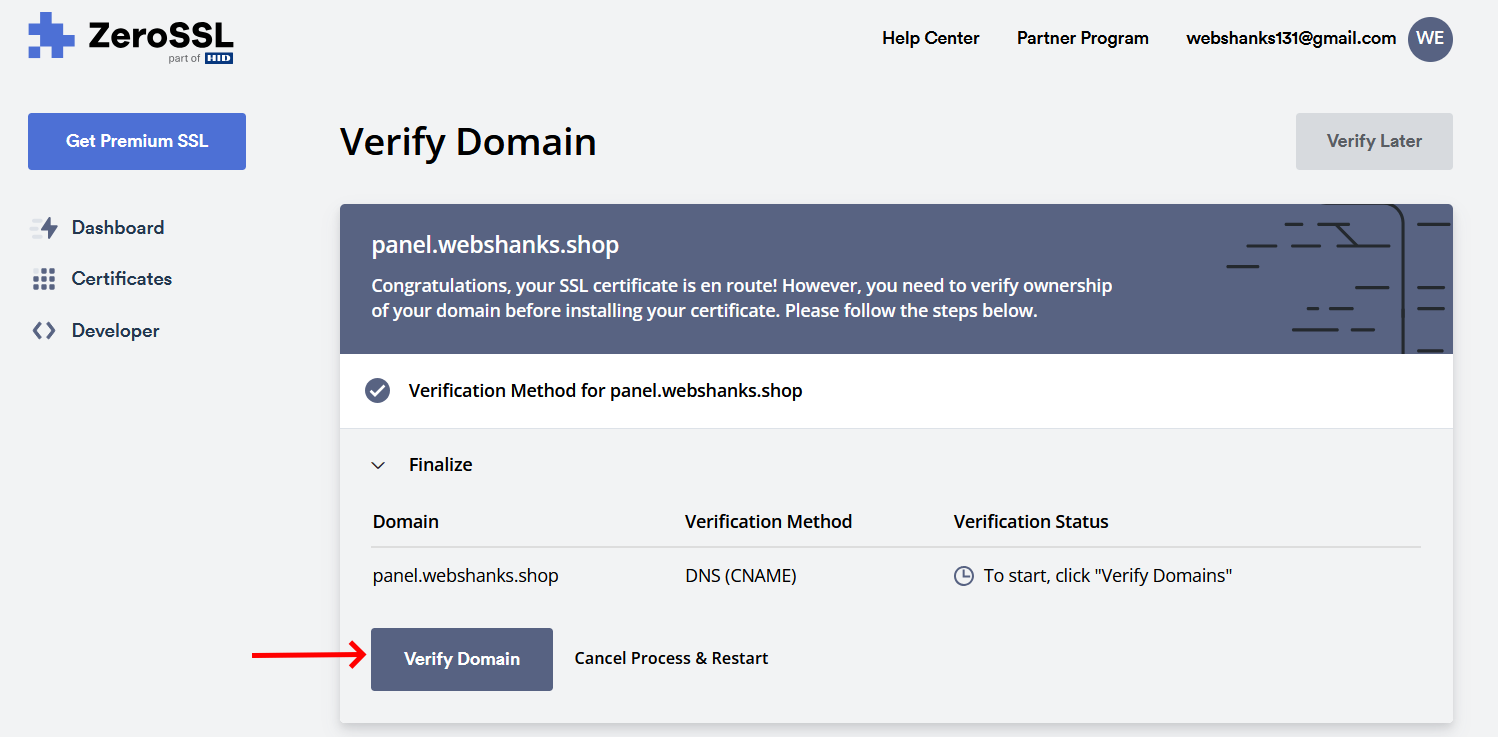
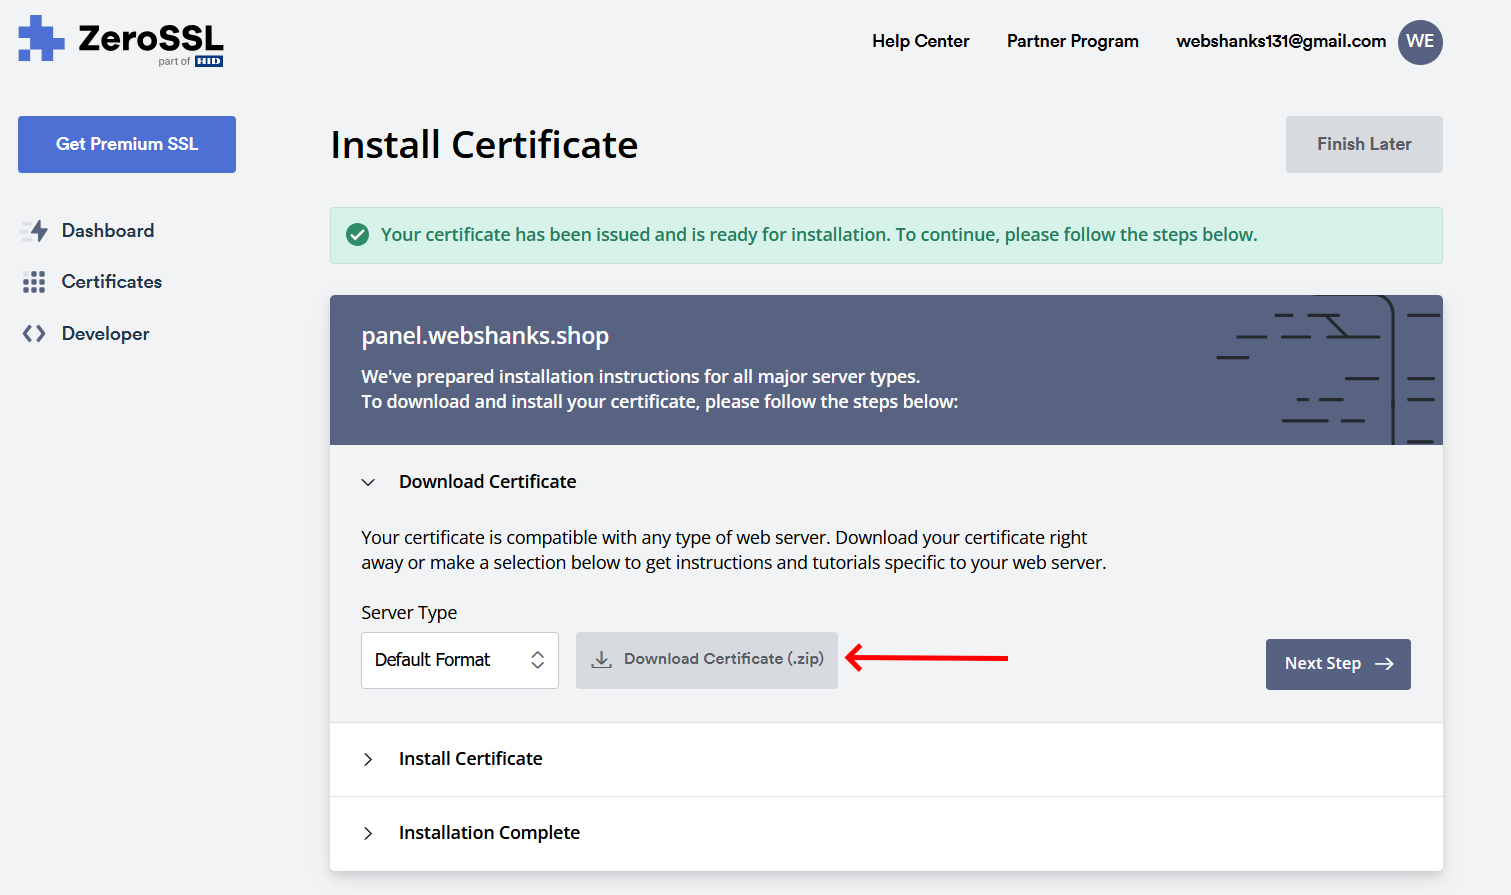
Once your domain is verified, ZeroSSL will issue your certificate.
Download the certificate files, which typically include:
- The SSL certificate (certificate.crt)
- The CA bundle (ca_bundle.crt)
- The private key (if you generated the CSR with ZeroSSL)
Open certificate.crt and private.key using Notepad.

Now go back to your aaPanel control panel and go to Settings > Security > Panel SSL.
On the Key textbox, paste the private.key and certificate.crt to Certificate (in pem format). Click Save.
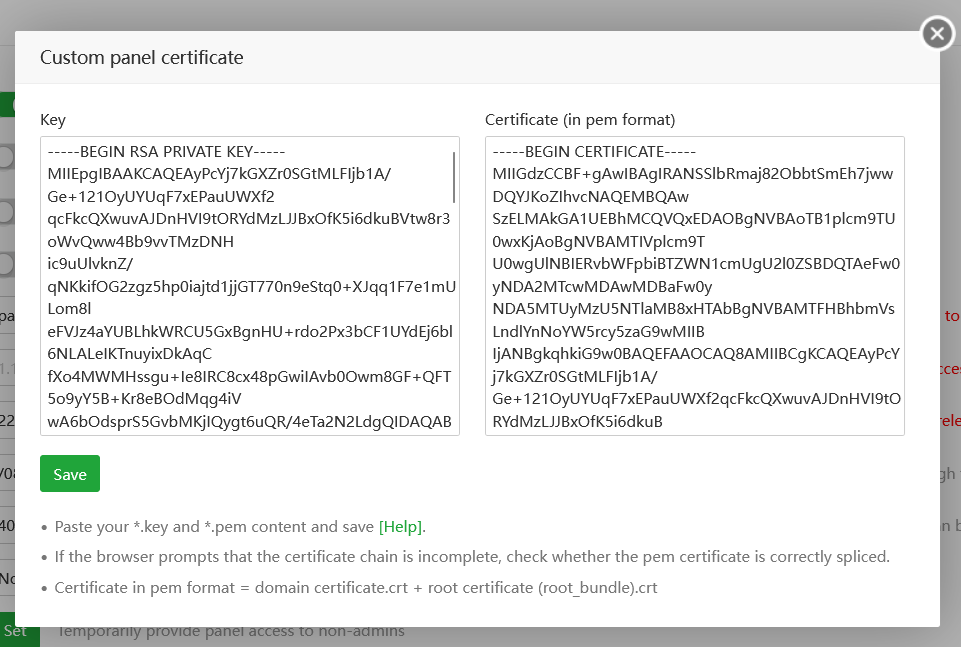
Then refresh your aaPanel.
Step 6: Install and Configure aaPanel Mail Server
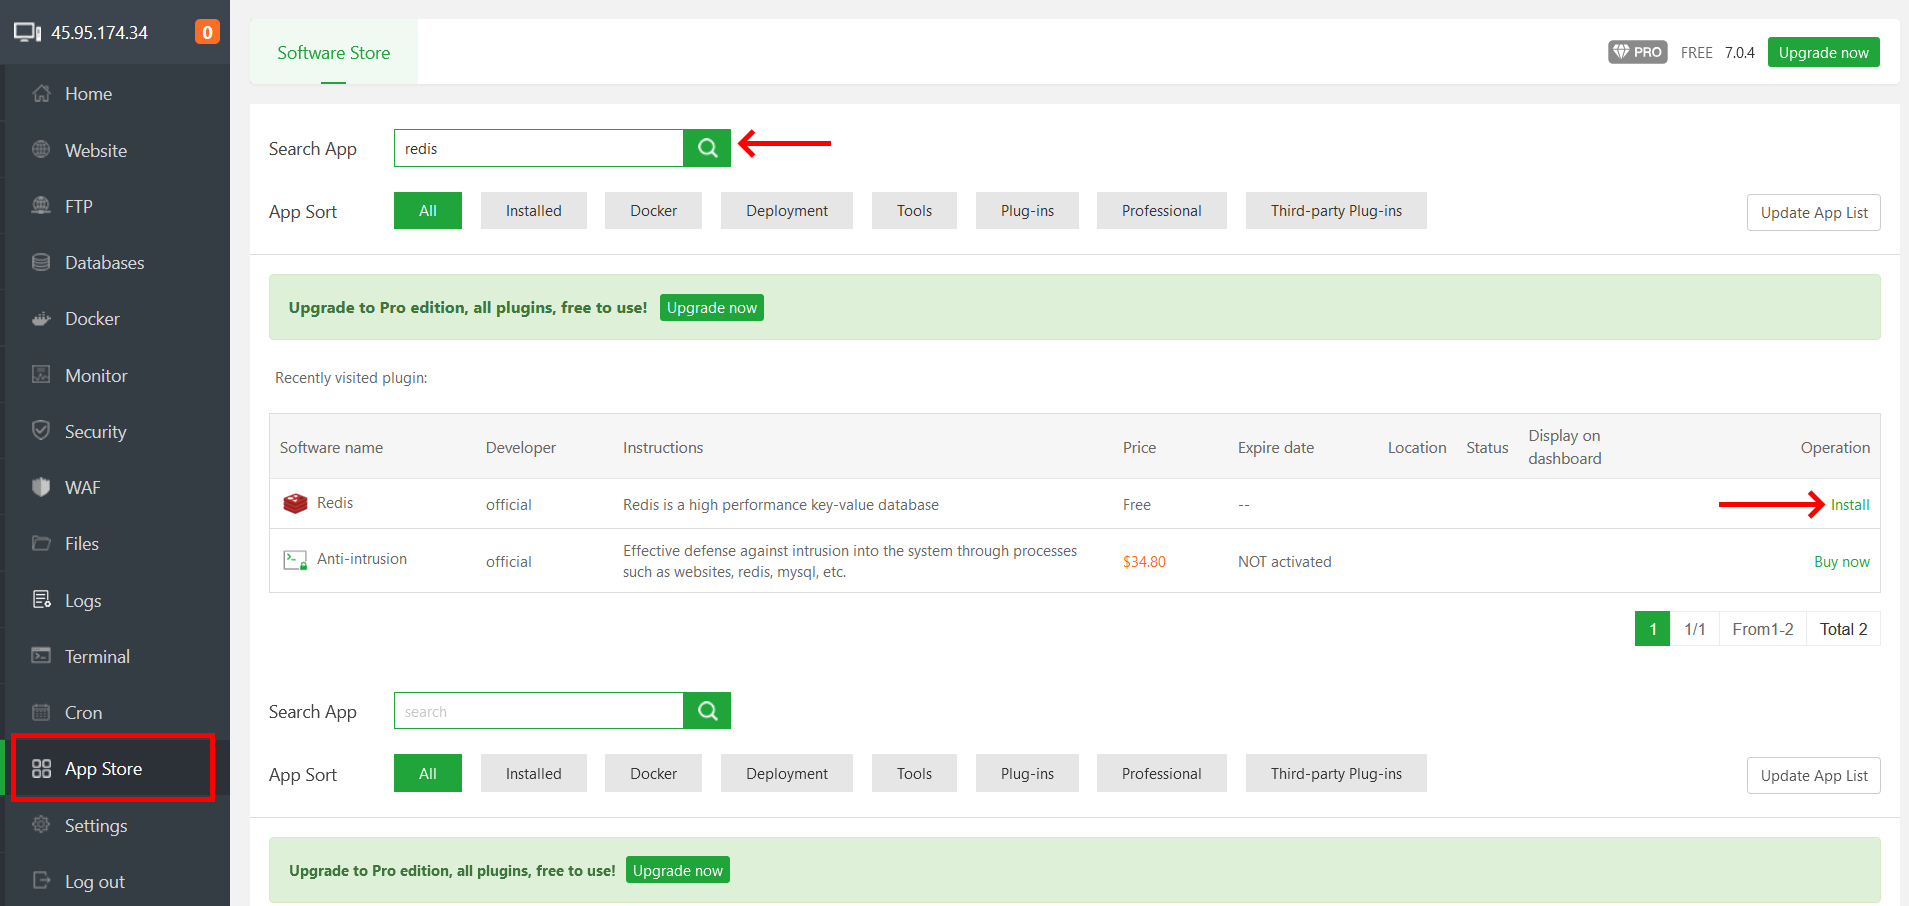
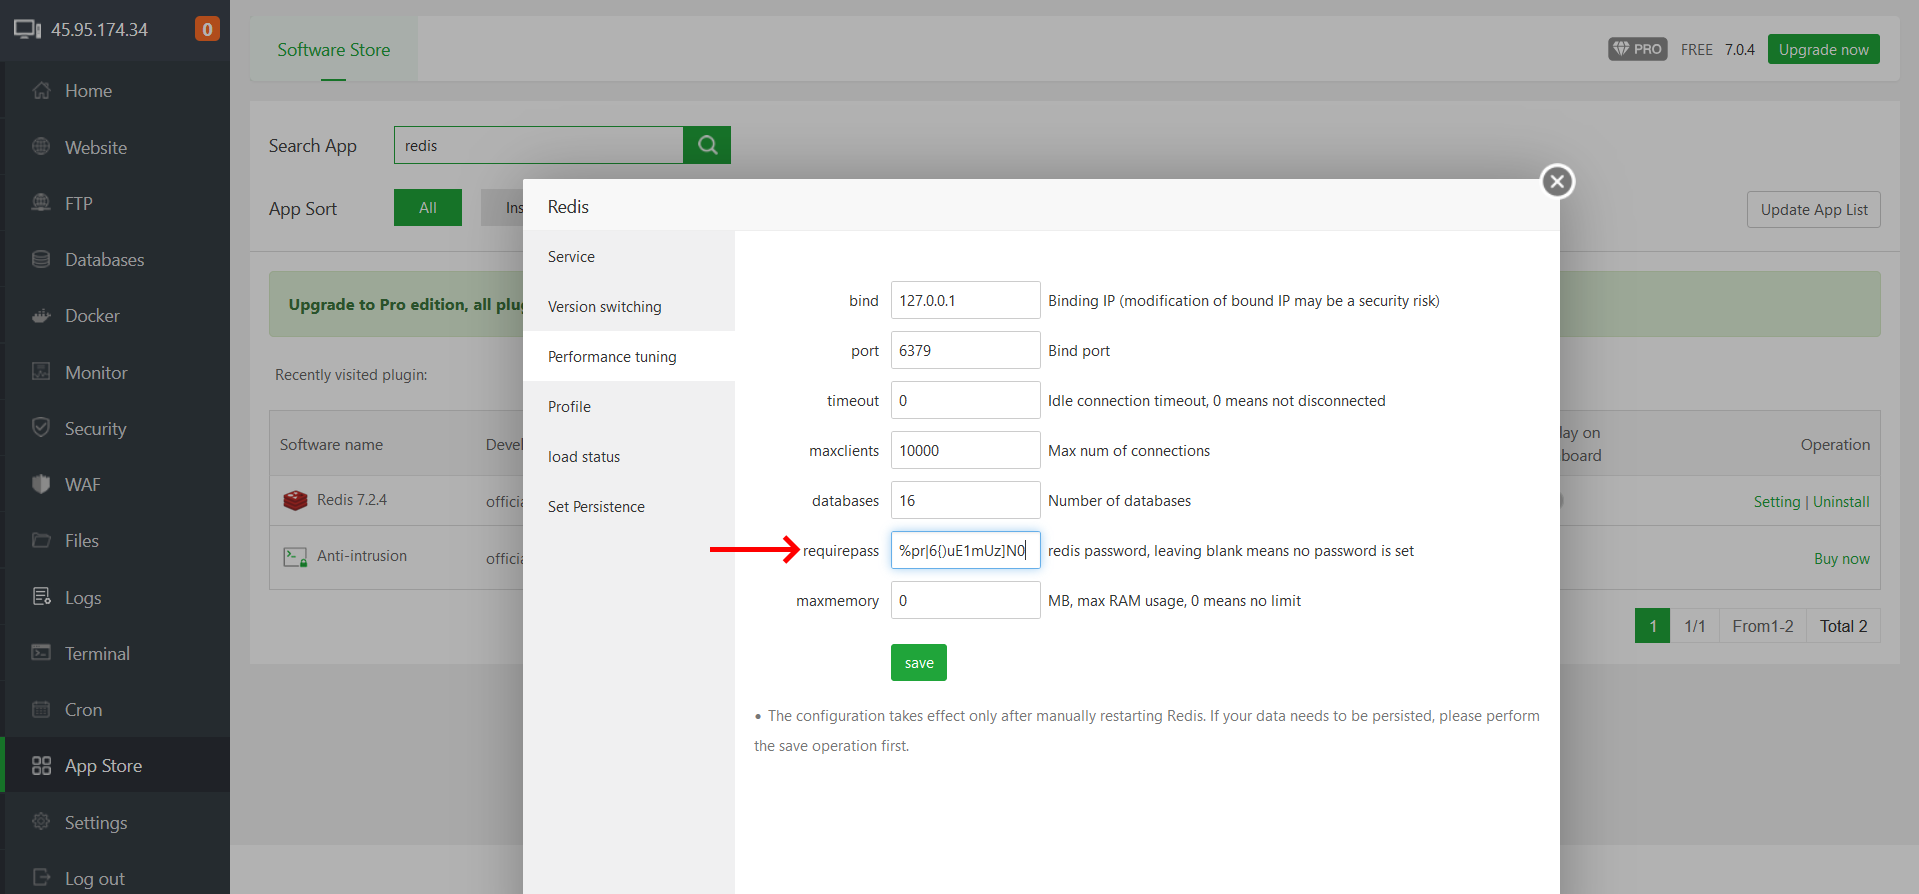
Before we install anything else, we need to install Redis.
Go to App Store > Search Redis > Install.
After installing Redis, we will assign a password. Go to Setting > Performance tuning > requirepass and assign a secure passoword.
Now we will search Mail Server that we’ve installed on the App Store awhile ago.
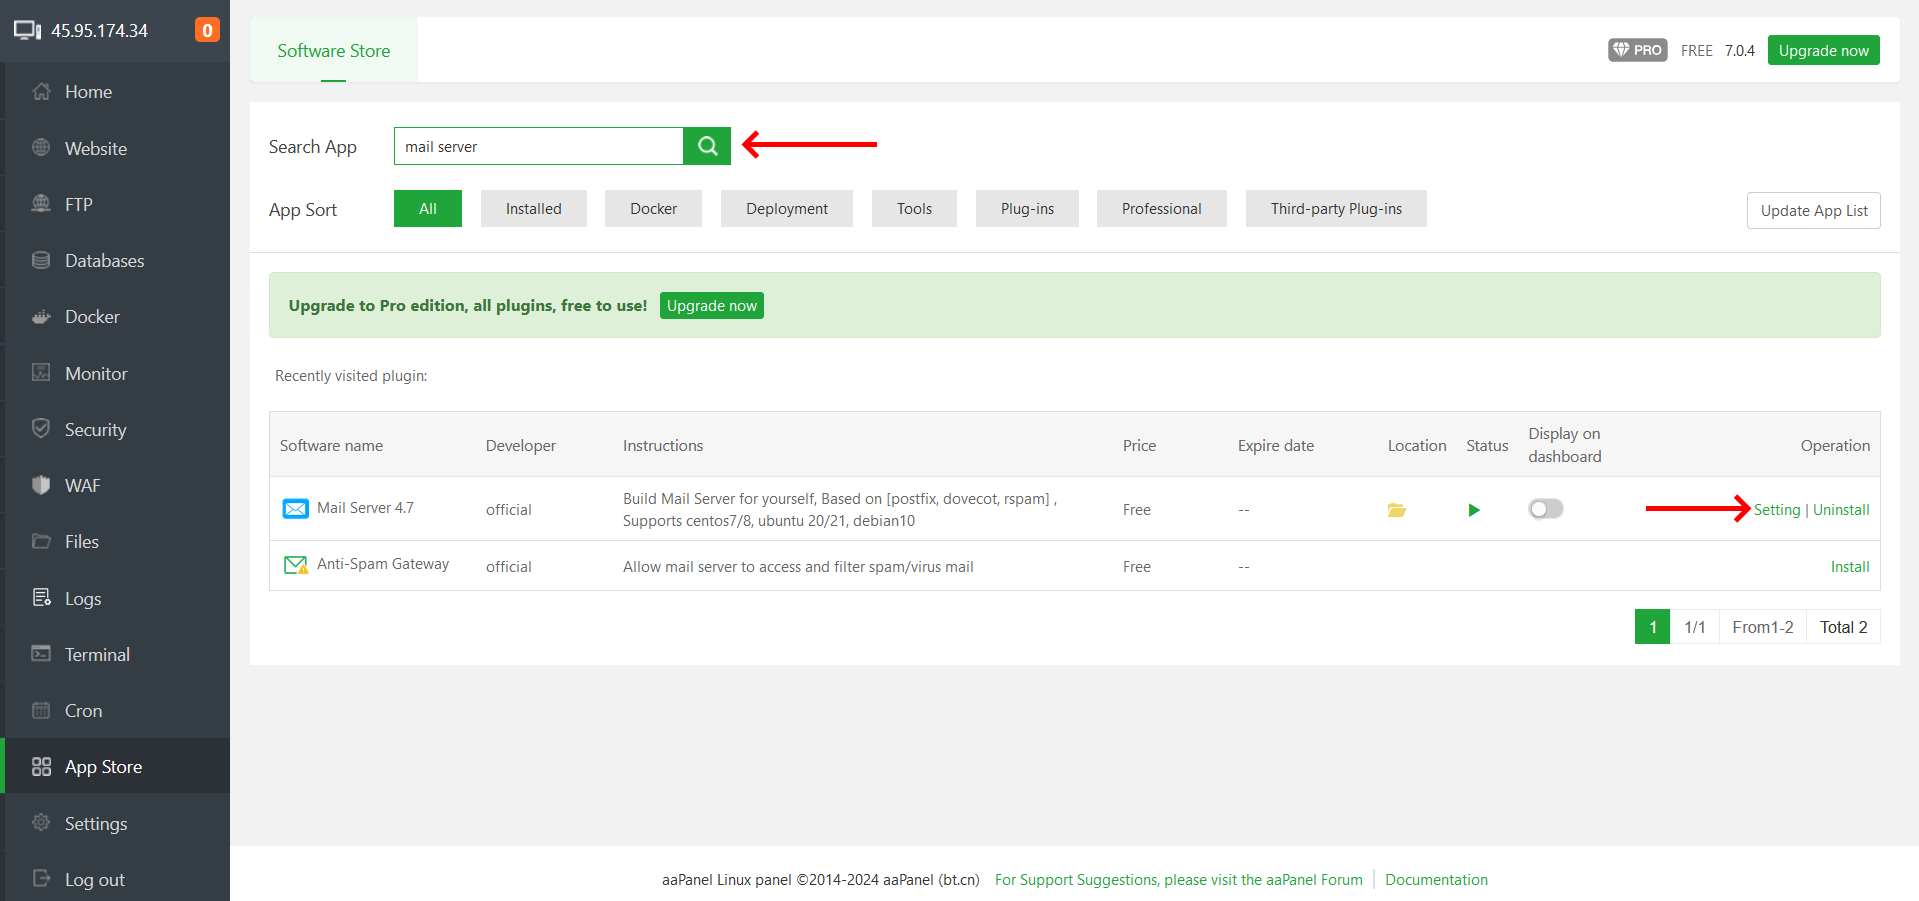
You will be asked, “Mail Server is not installed, is it installed?”. Just click Confirm.
You should be able to see Ready on all environments. Then click Submit.
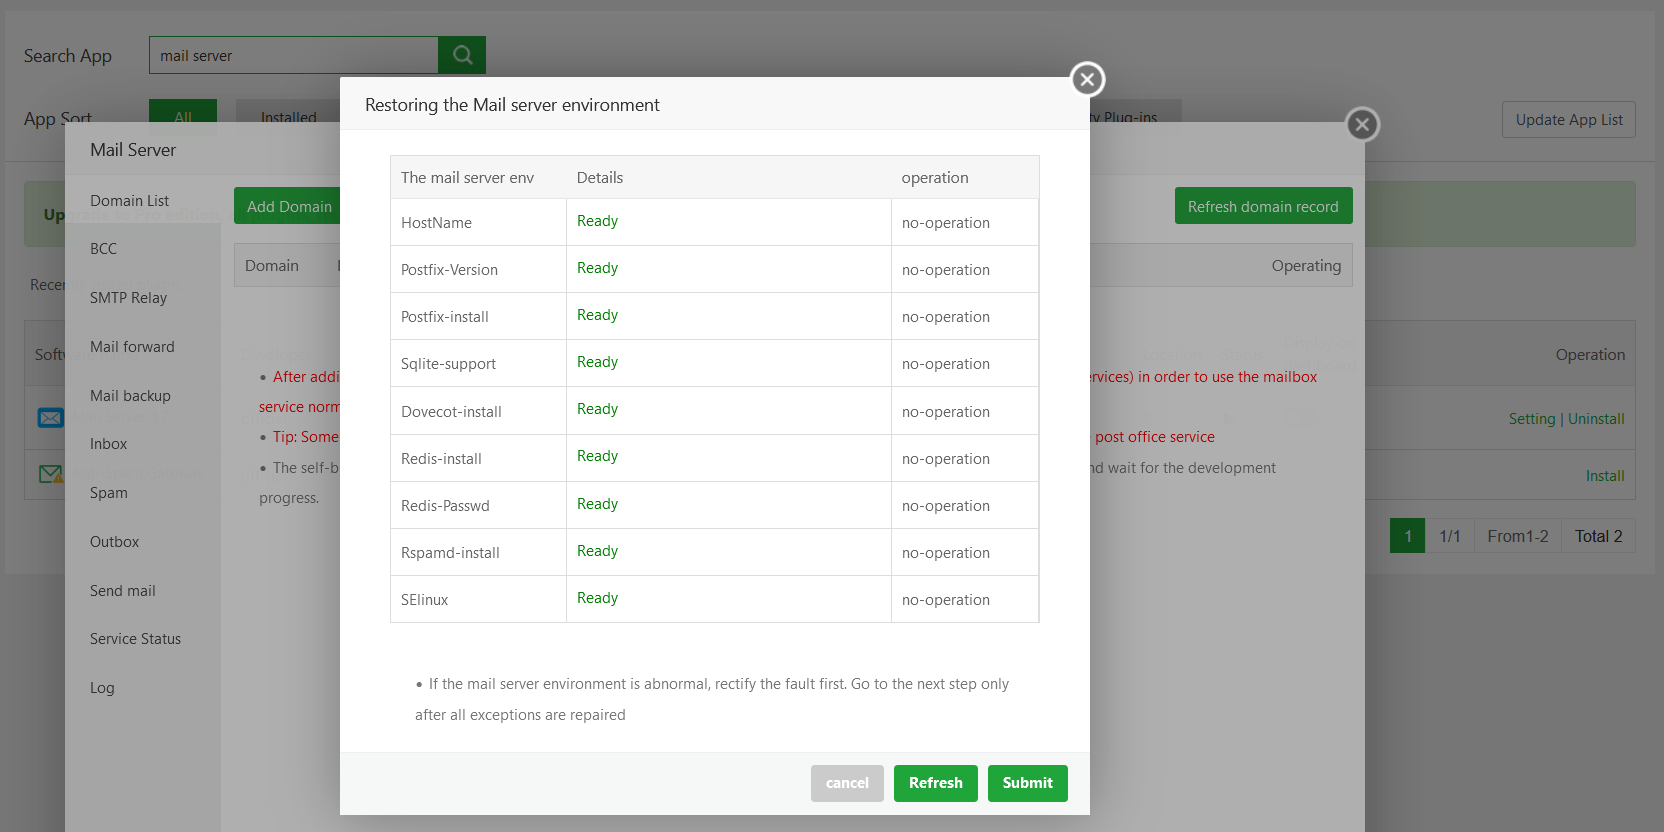
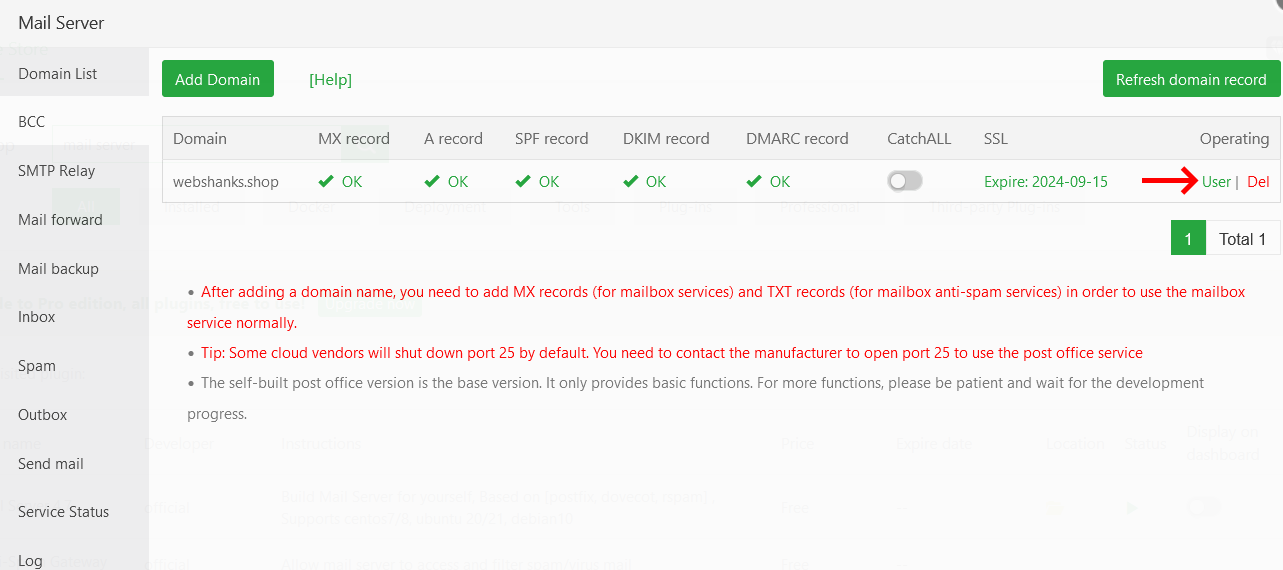
Once the initialization is completed, we’ll add a domain.
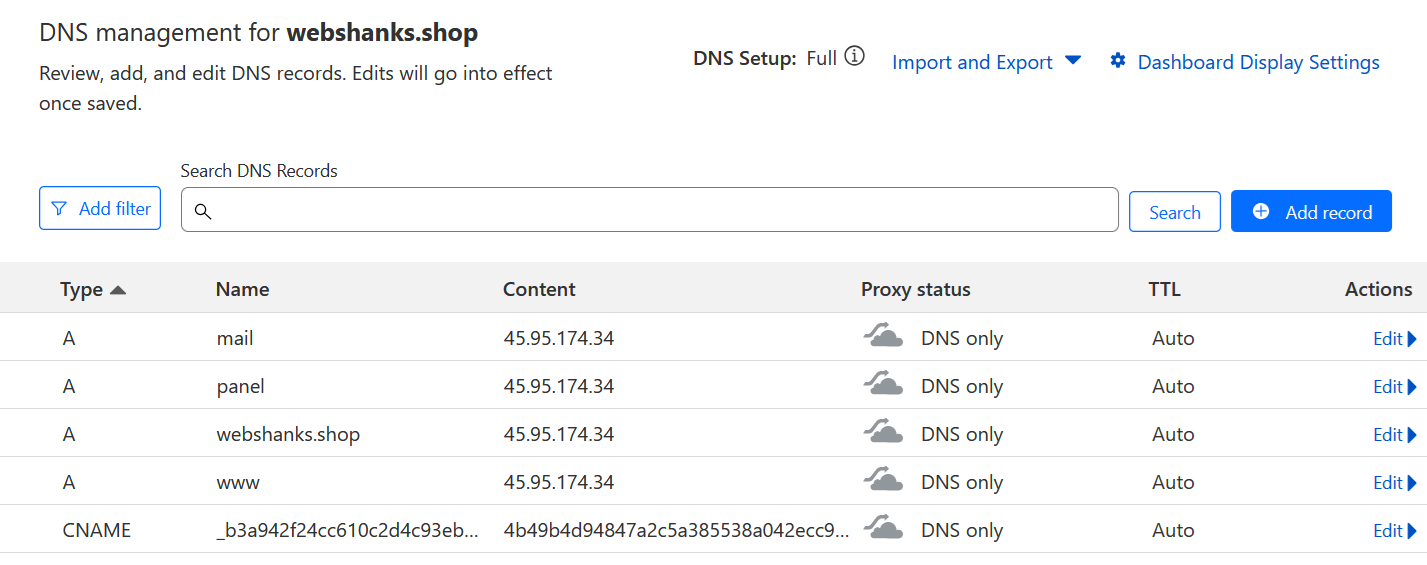
But first, we will add initial A records on Cloudflare.
You should have the A records like in the example below.
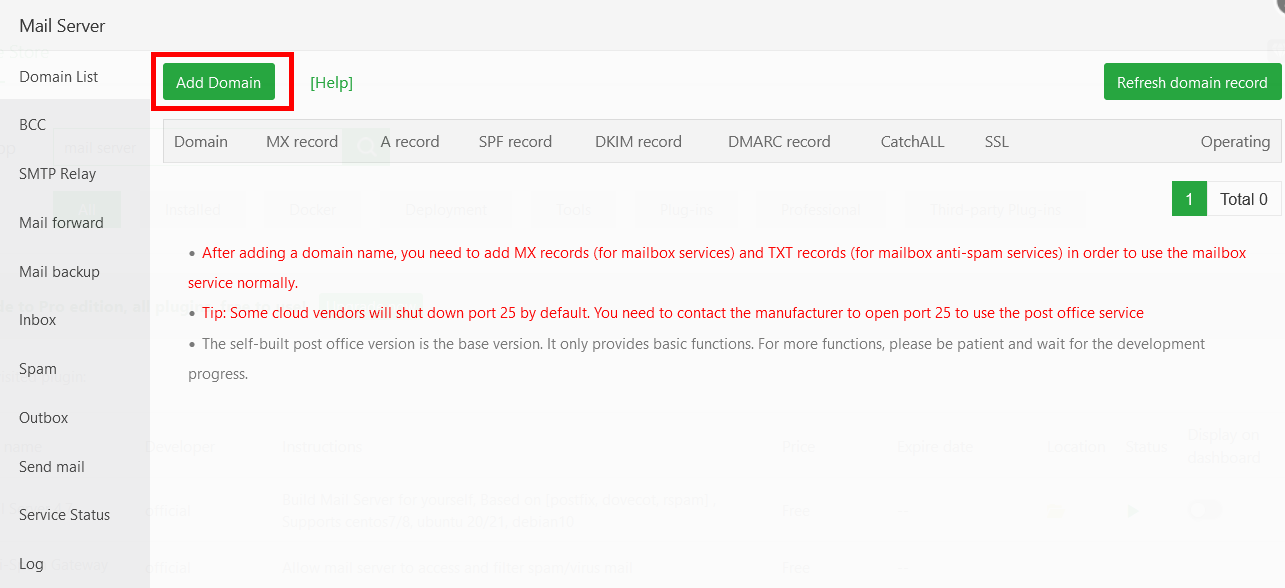
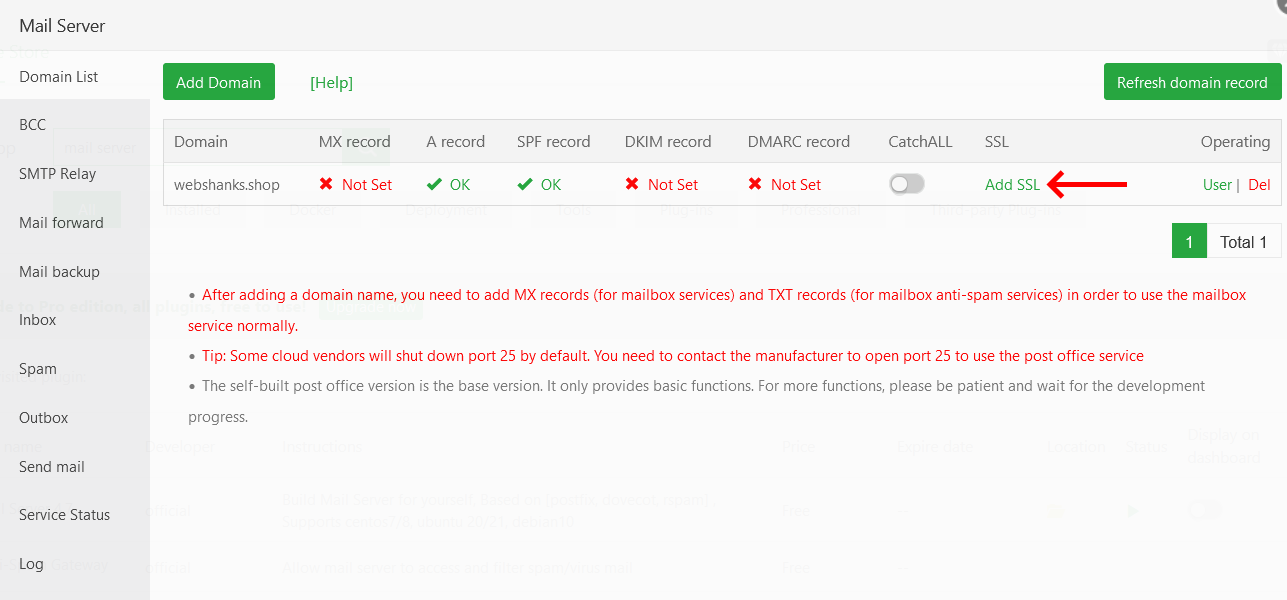
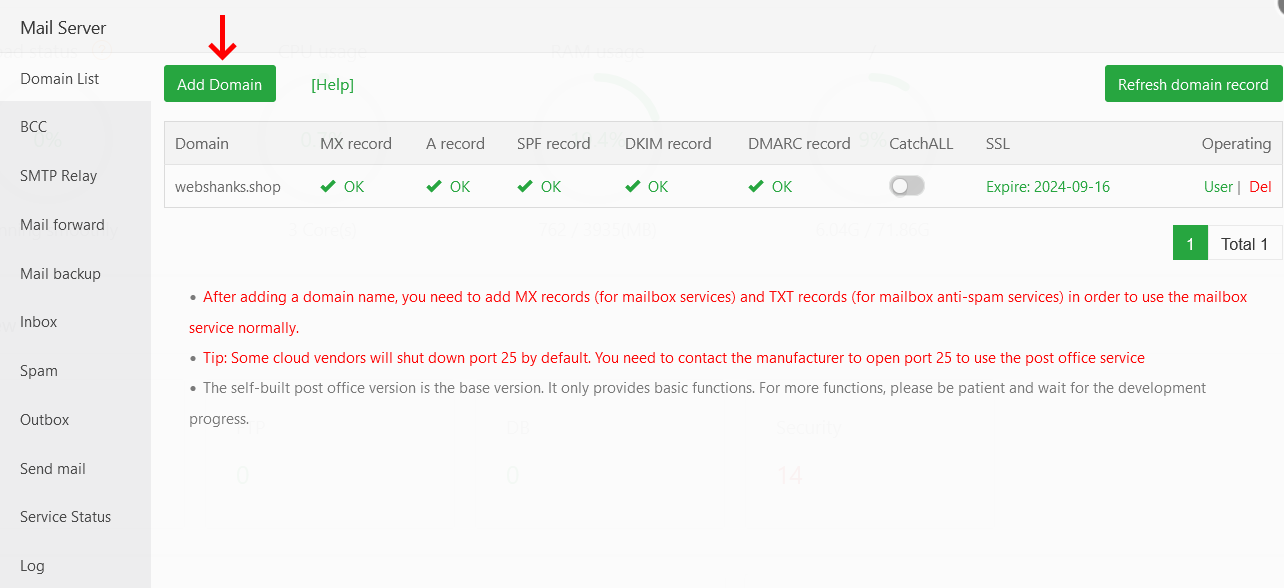
Now go back to your aaPanel and add a domain. Just click Add Domain.
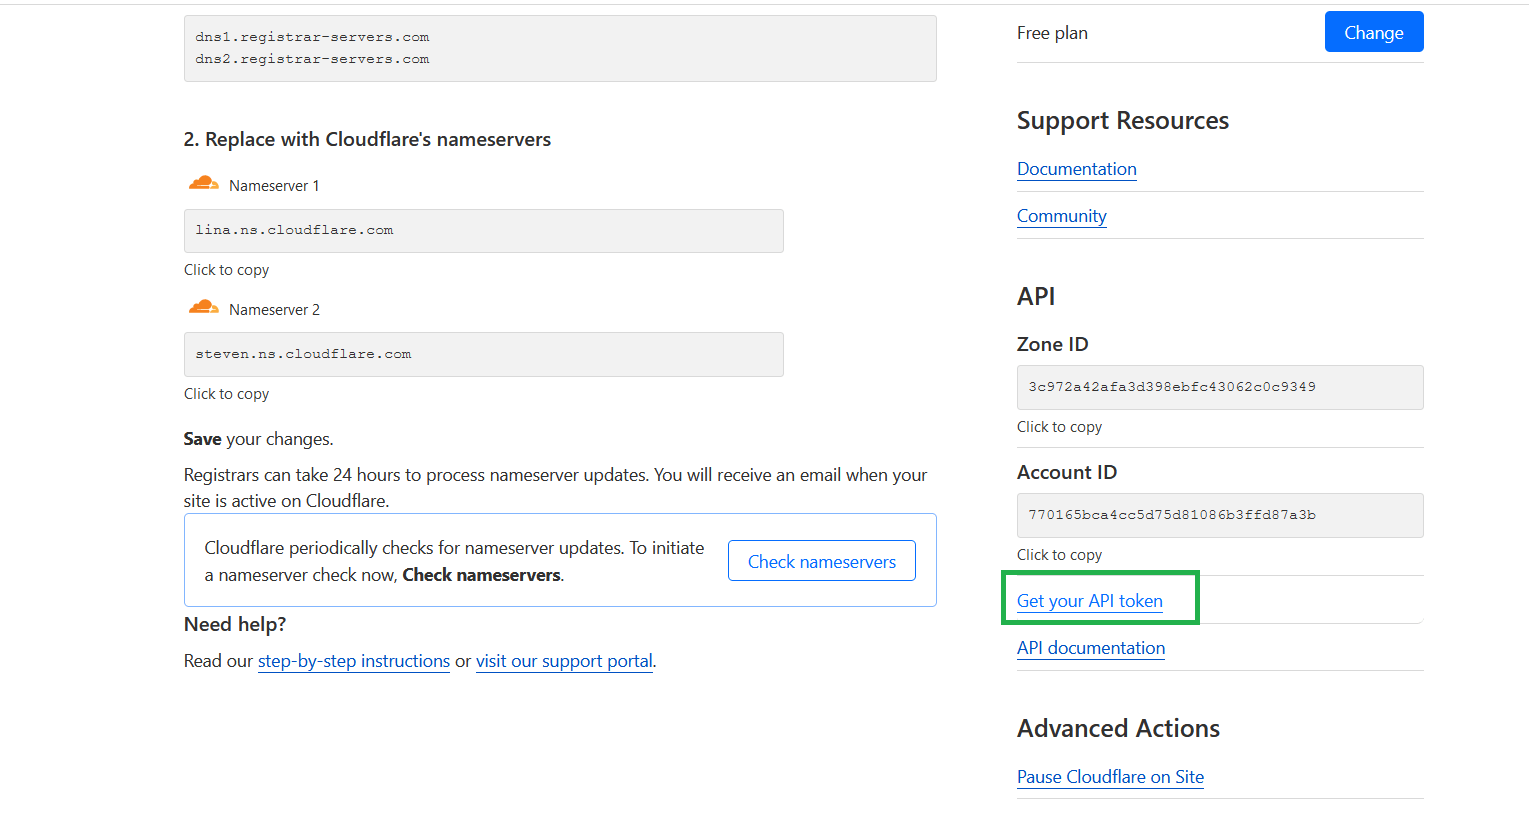
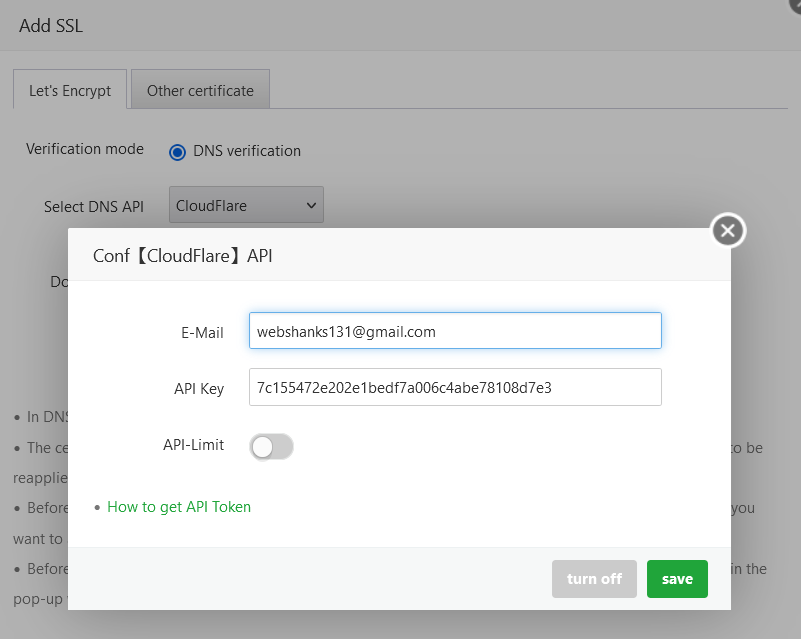
We need to add SSL for the domain. I’ll be using Cloudflare. We’ll getting our API key.
Go back to aaPanel and click Add SSL.
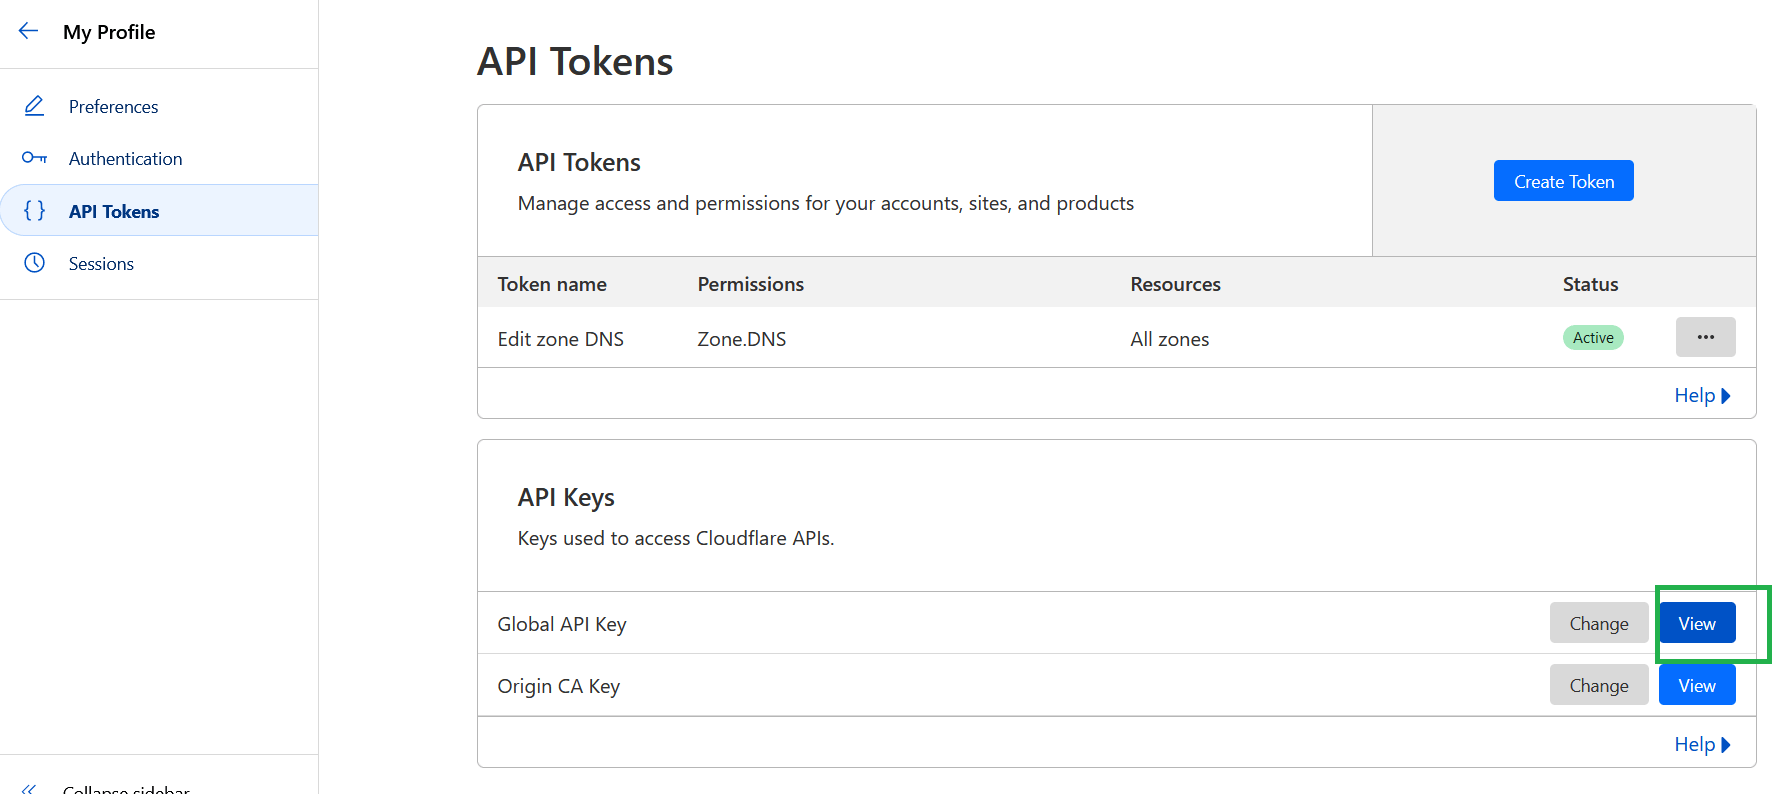
Choose Cloudflare from Select DNS API drop down.
Paste your Global API Key along with your Cloudflare email. Click Save.
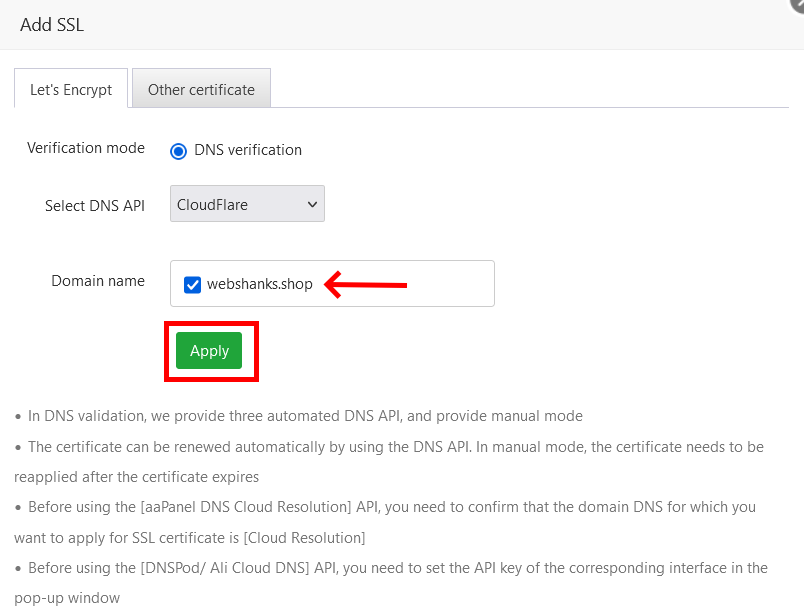
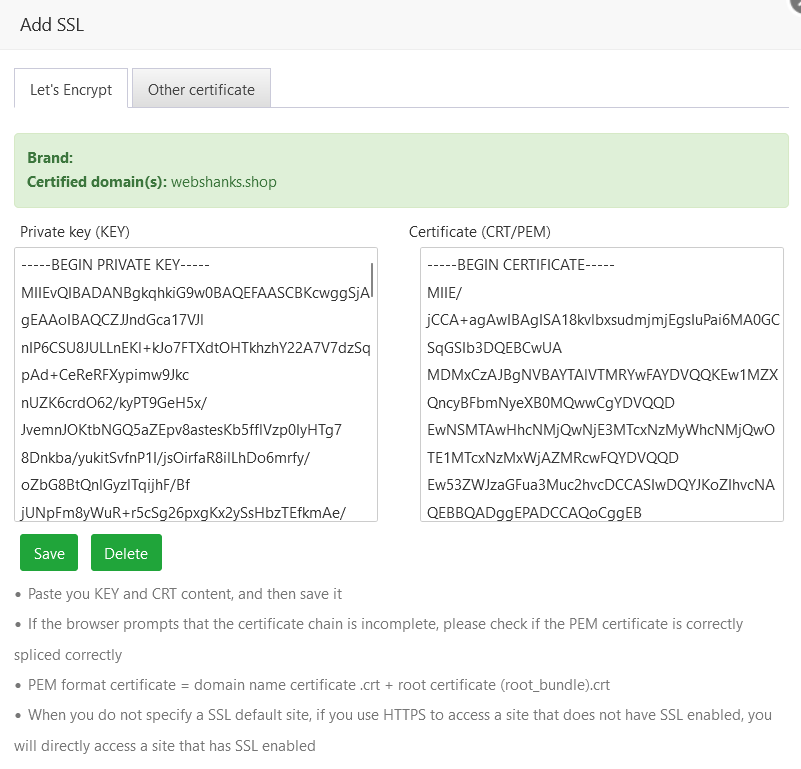
Select the domain you want to add SSL and click Apply.
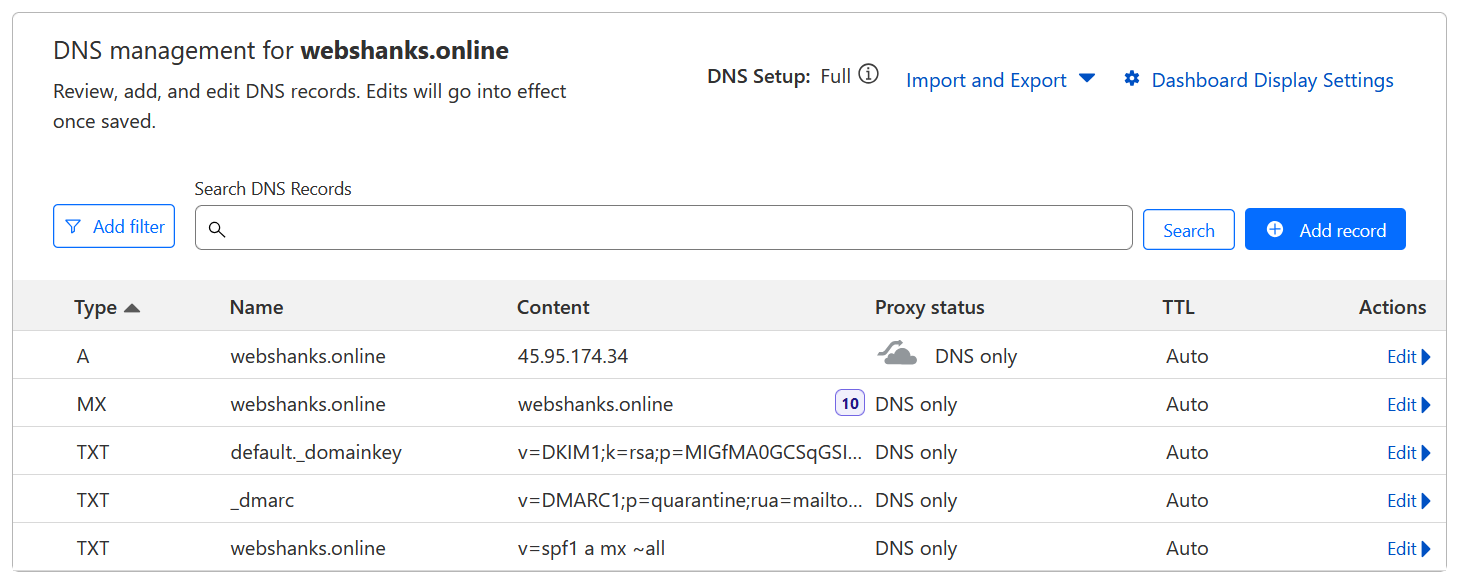
Step 7: Add MX, DKIM, DMARC and SPF Records
Now we will add MX, DKIM, DMARC and SPF records to Cloudflare.
Just click your domain and it will pop up a set of records.
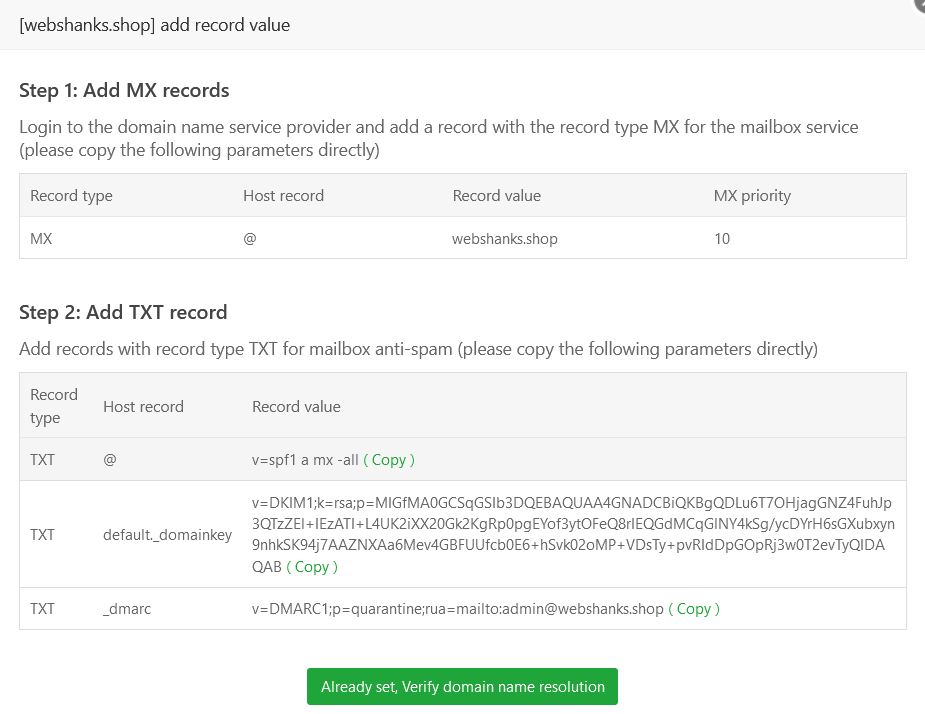
Copy and paste these values to Cloudflare.
For SPF, I will add my IPv4 and IPv6.
The default value is v=spf1 a mx -all. It will become v=spf1 a mx ip4:45.95.174.34 ip6:2a01:7a7:2:3343::3da9:4dc1 -all.
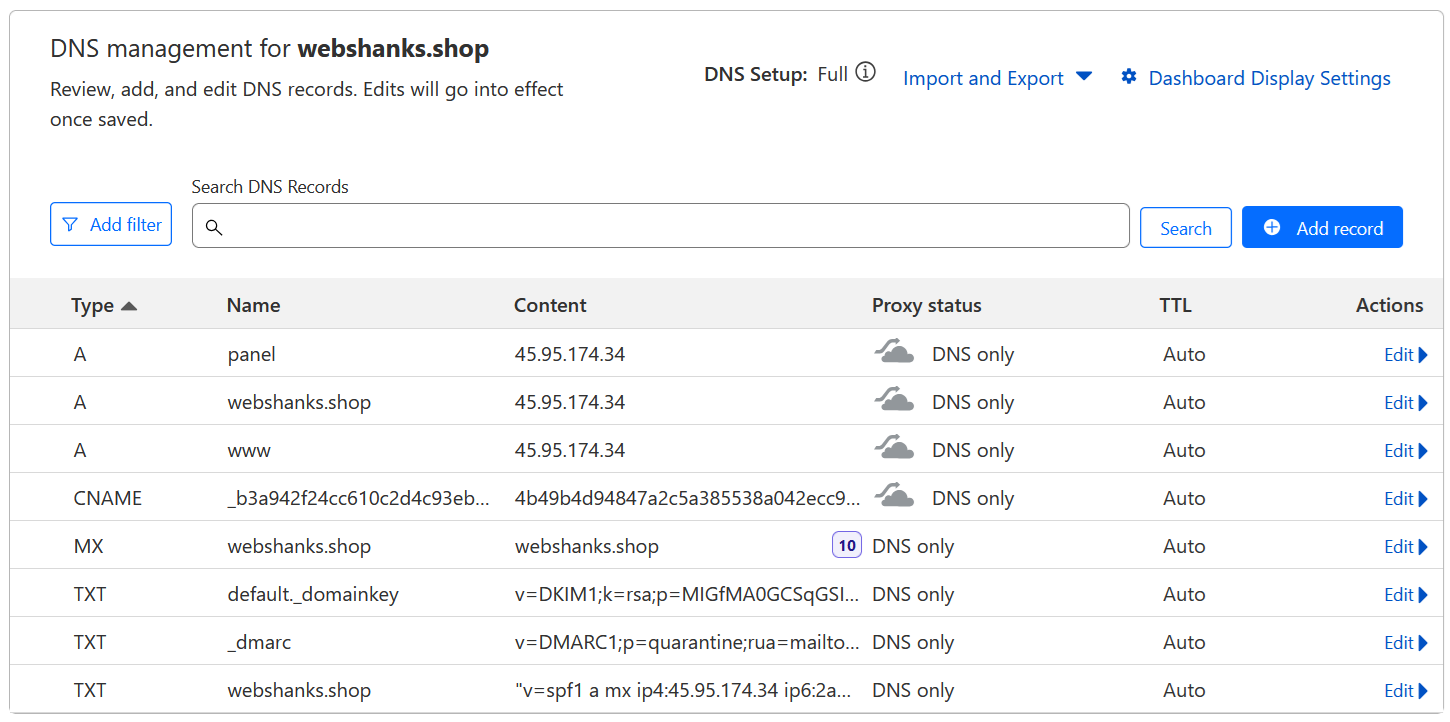
This should be your final DNS records look like.
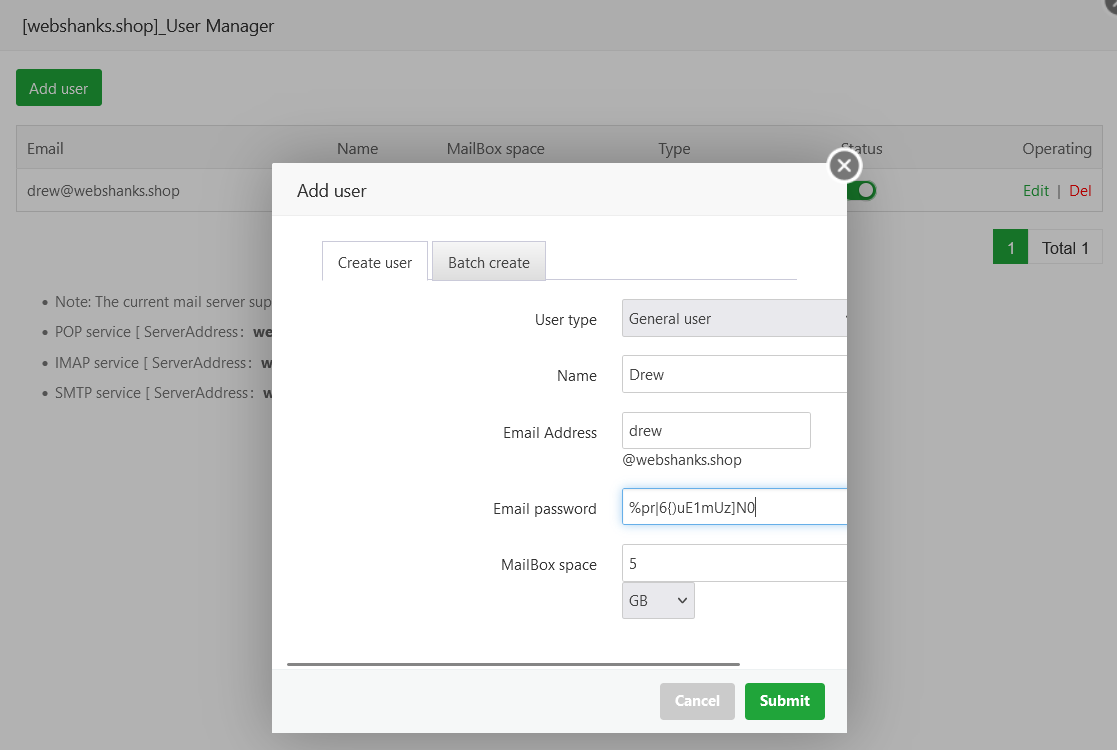
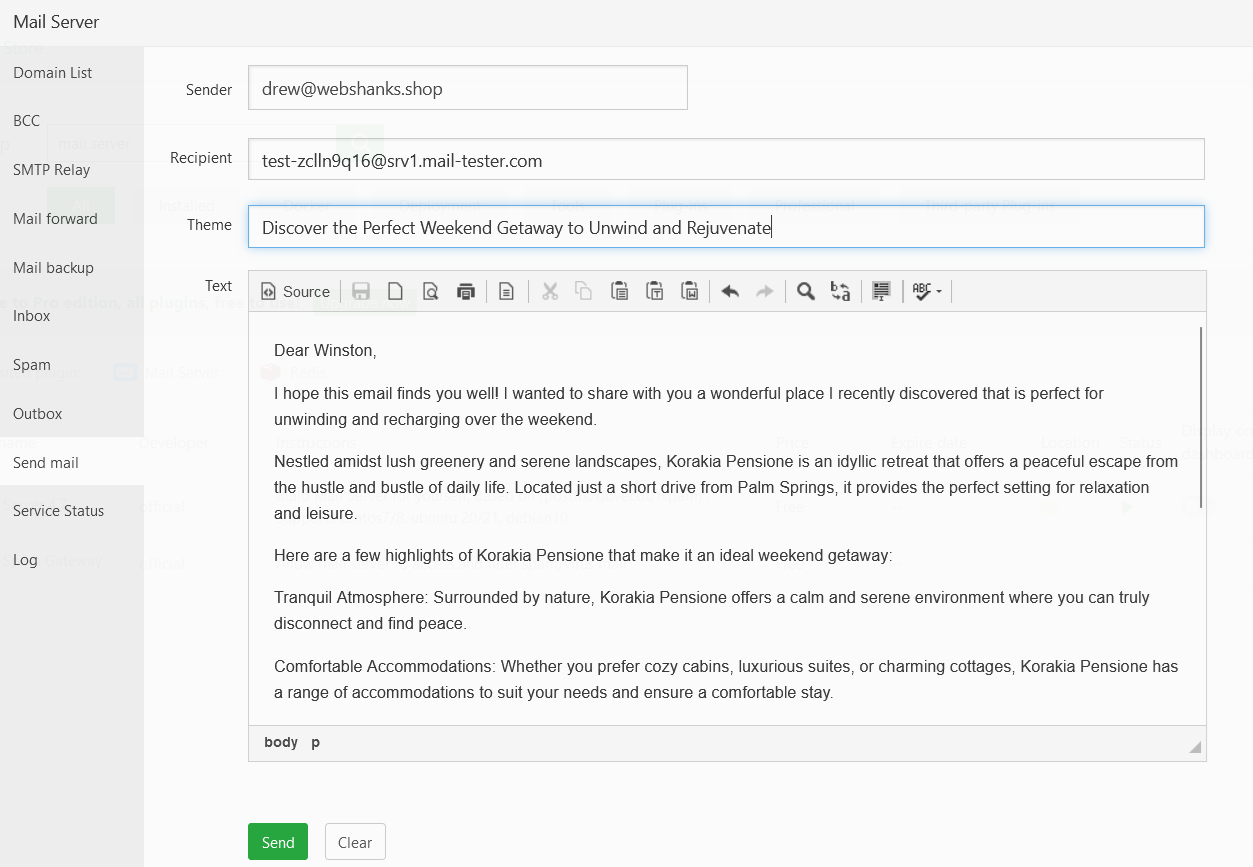
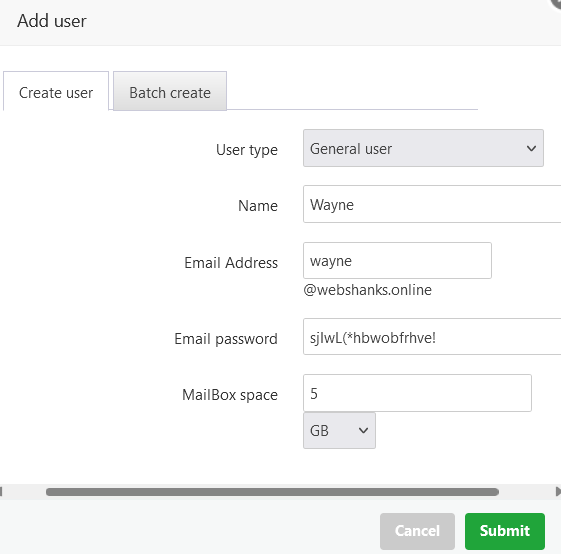
We will add a user to send emails.
Fill in the necessary details for your email. Be sure that you use a strong password.

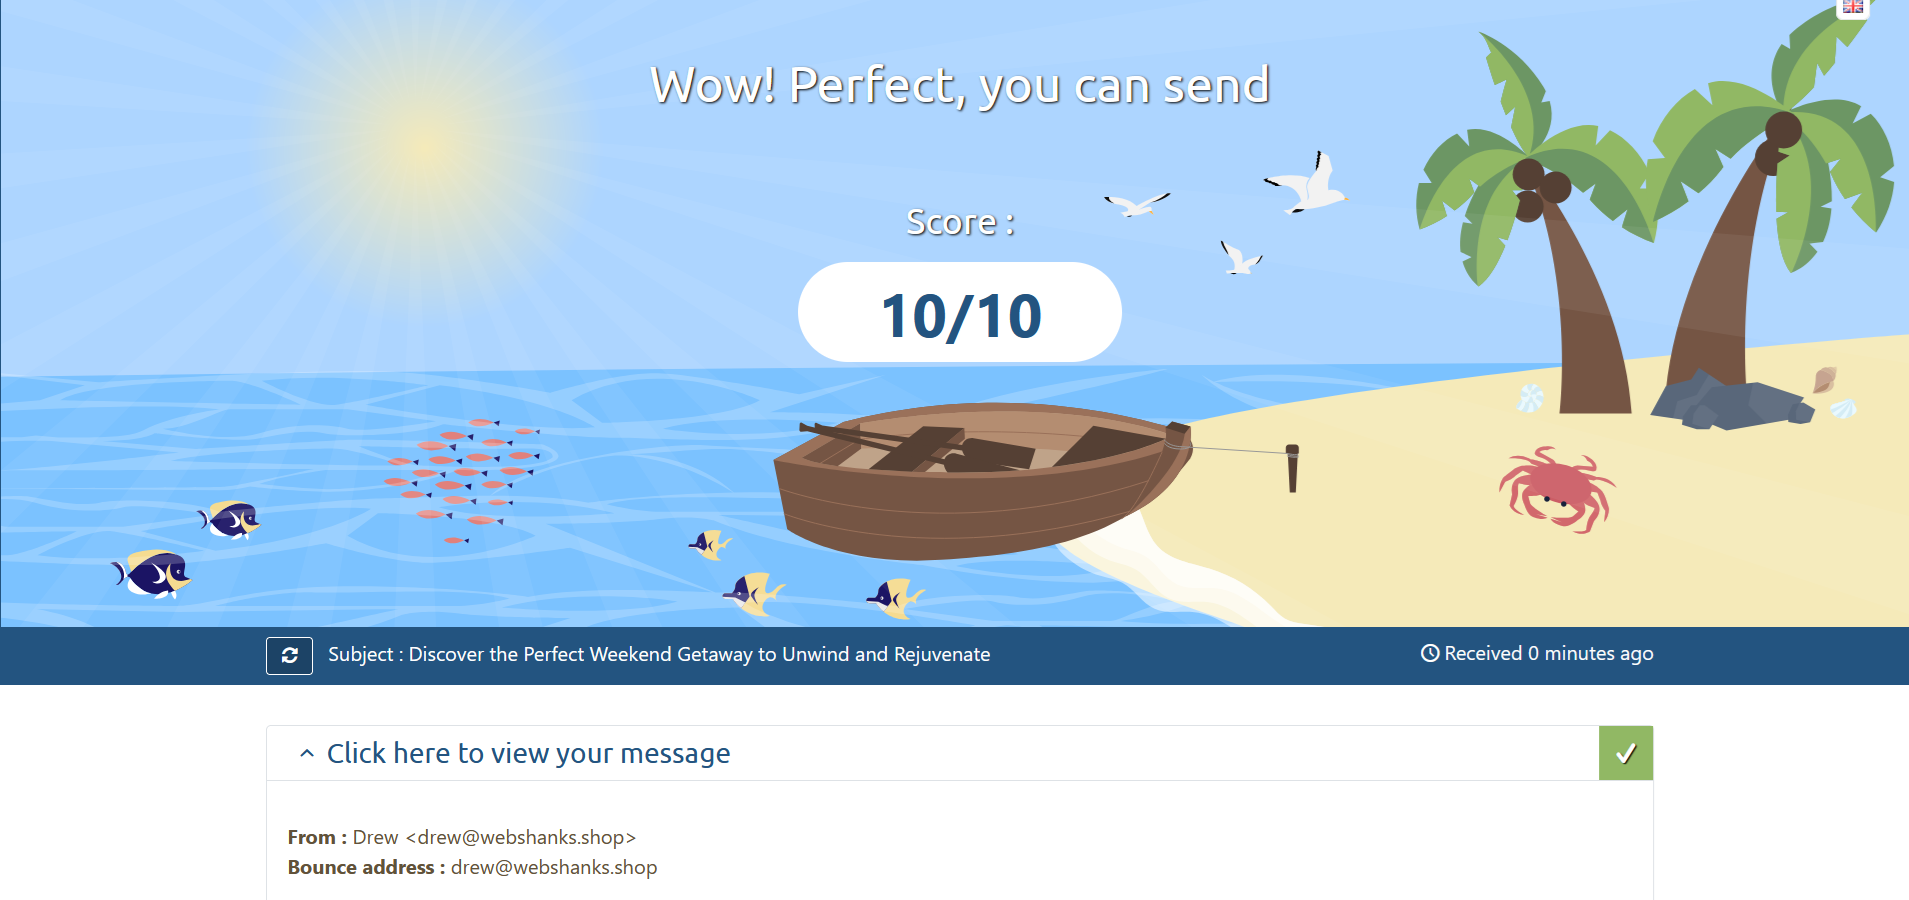
Step 8: Test Email Deliverability
Finally, the best part is the excitement of having a functional email server.
Now let’s test its deliverability using Mail-Tester.
We got a 10/10!
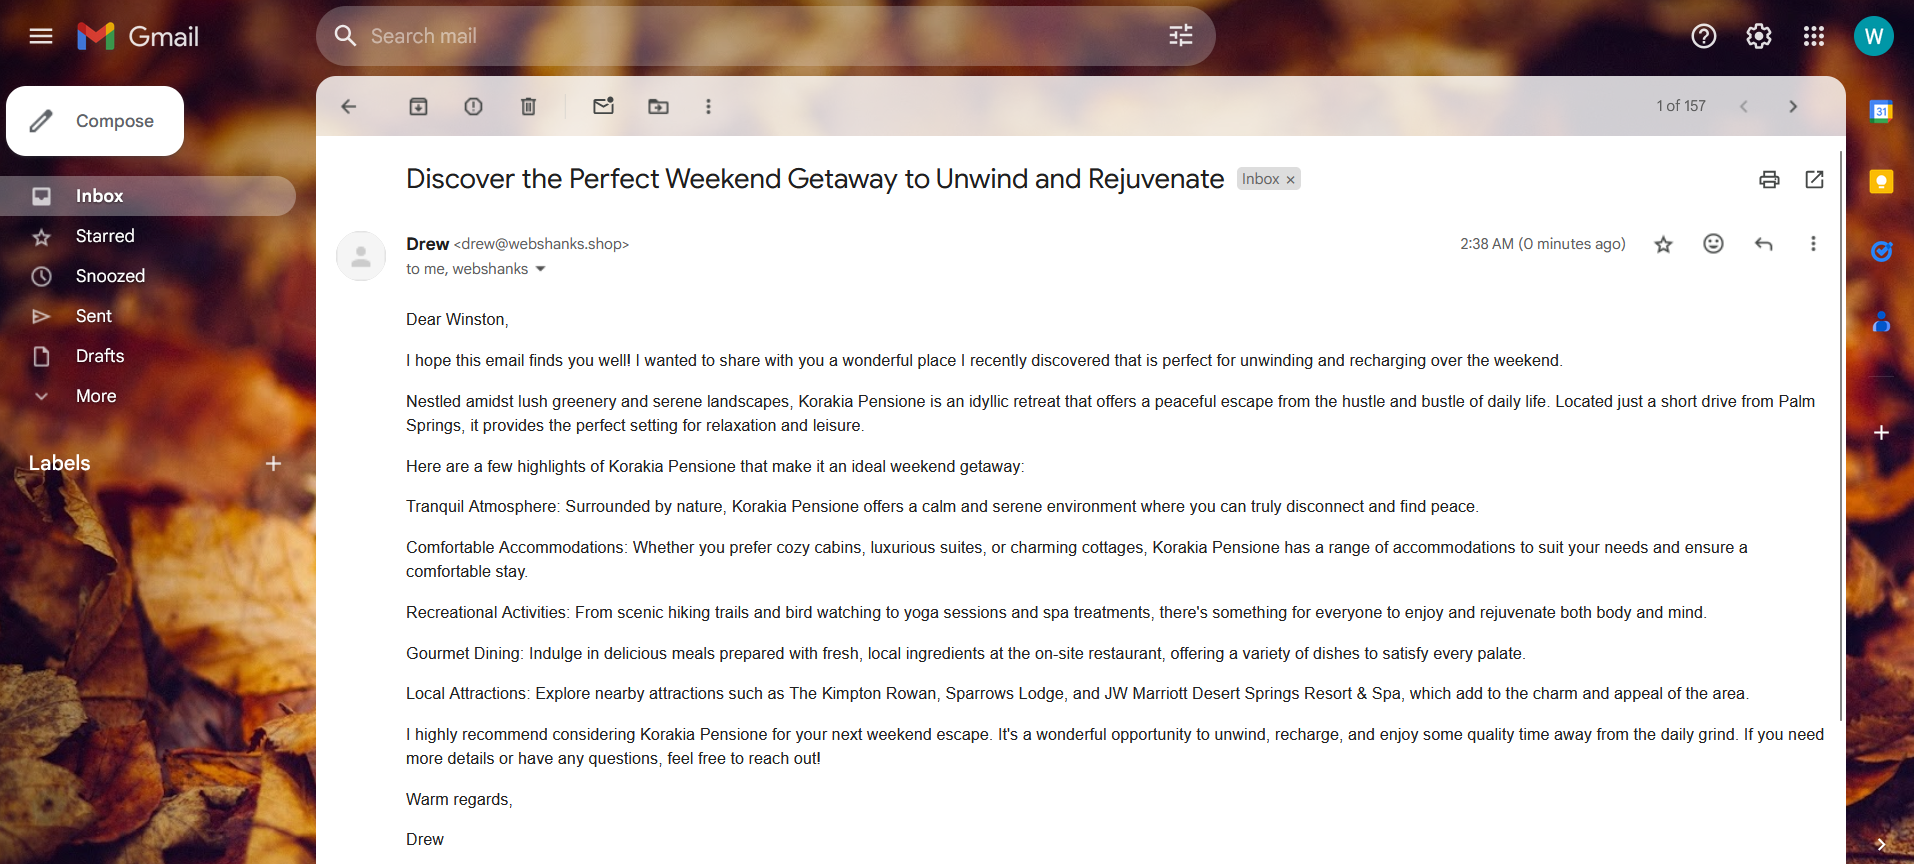
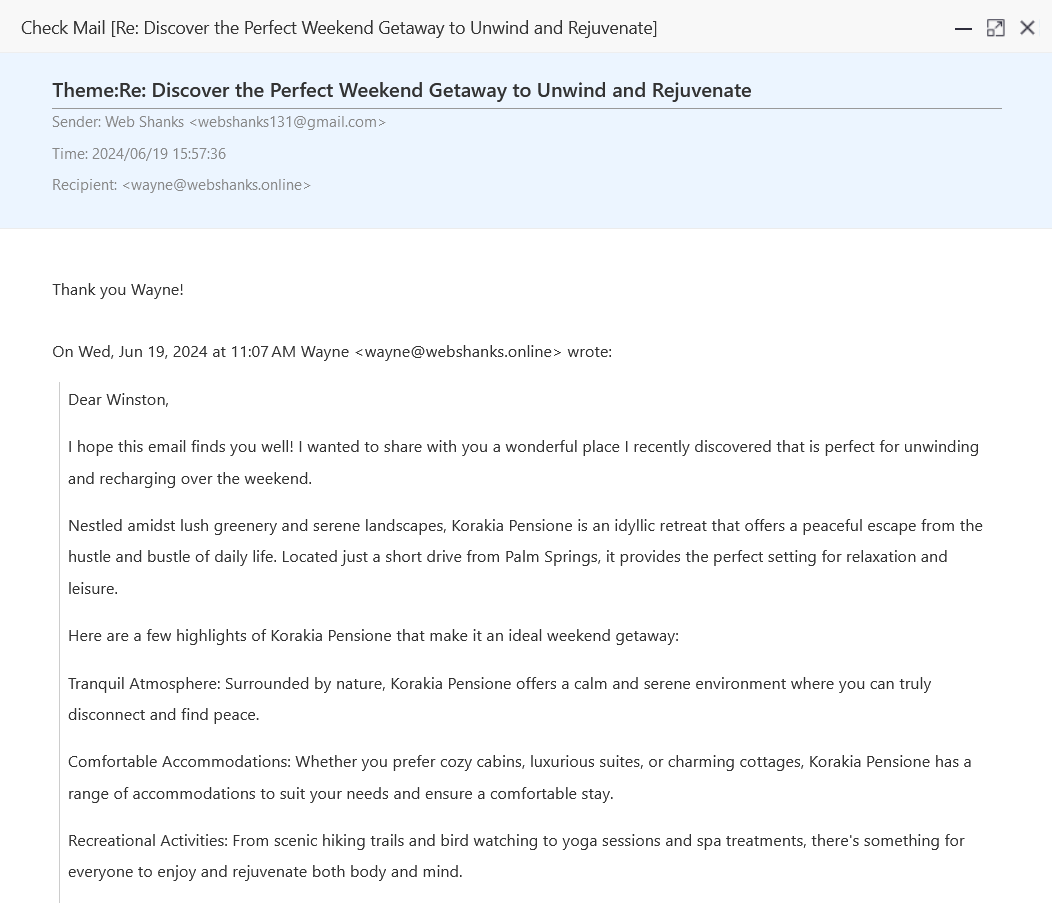
What about for Gmail and Proton Mail?
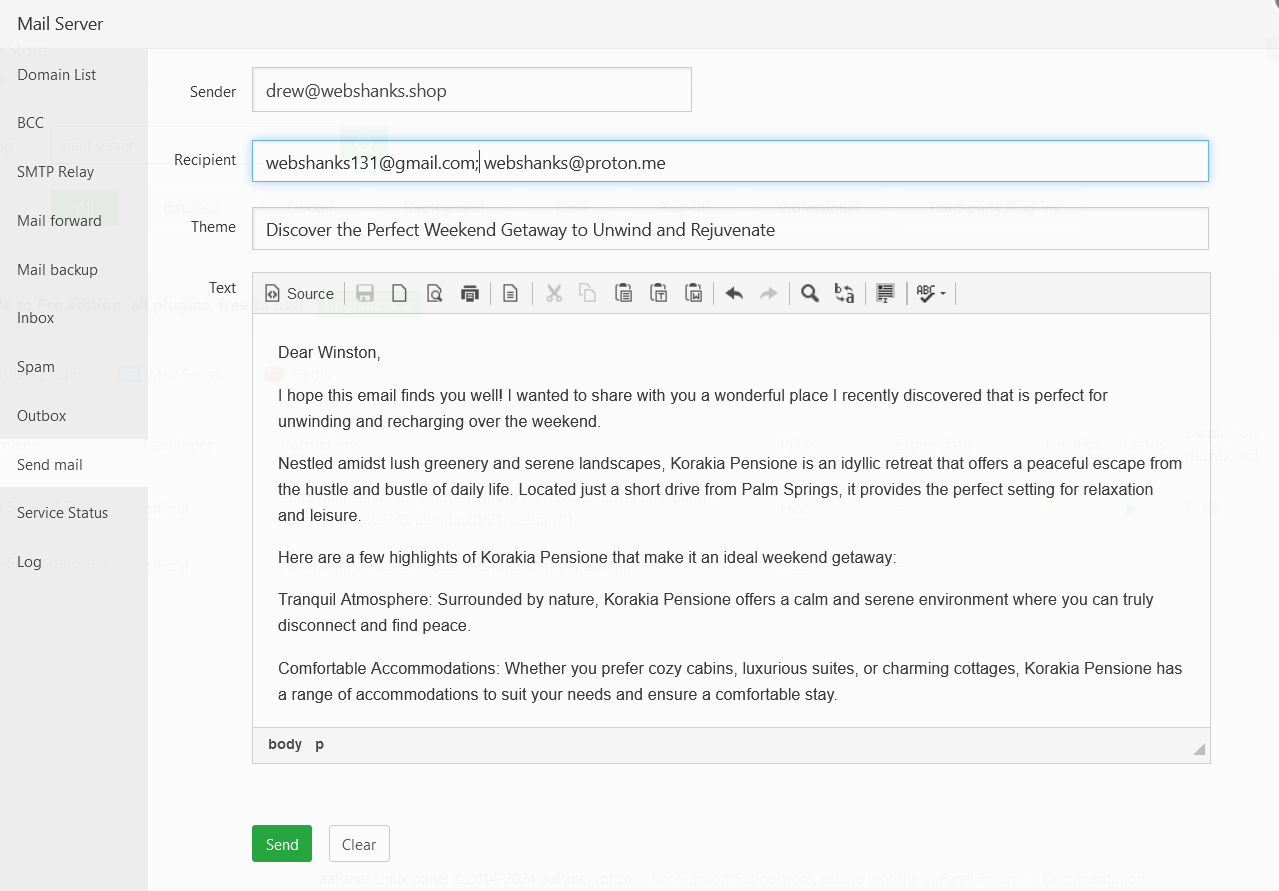
We received it in our inbox directly!
Also to Proton Mail!
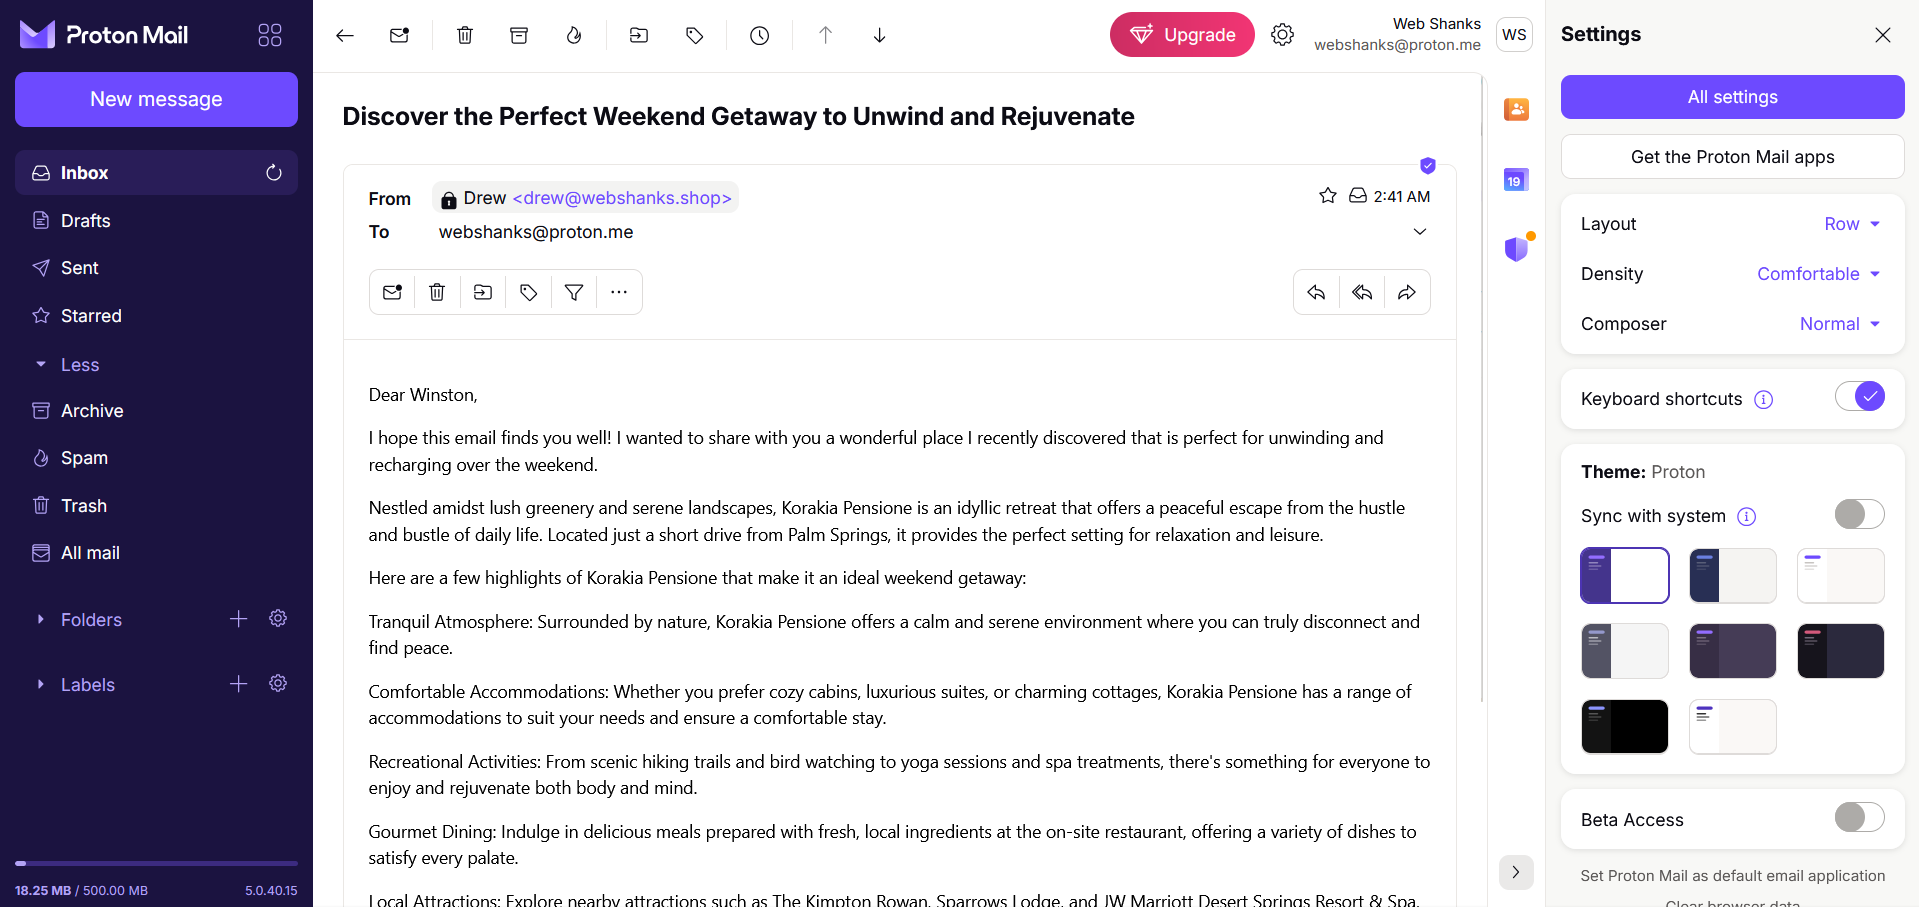
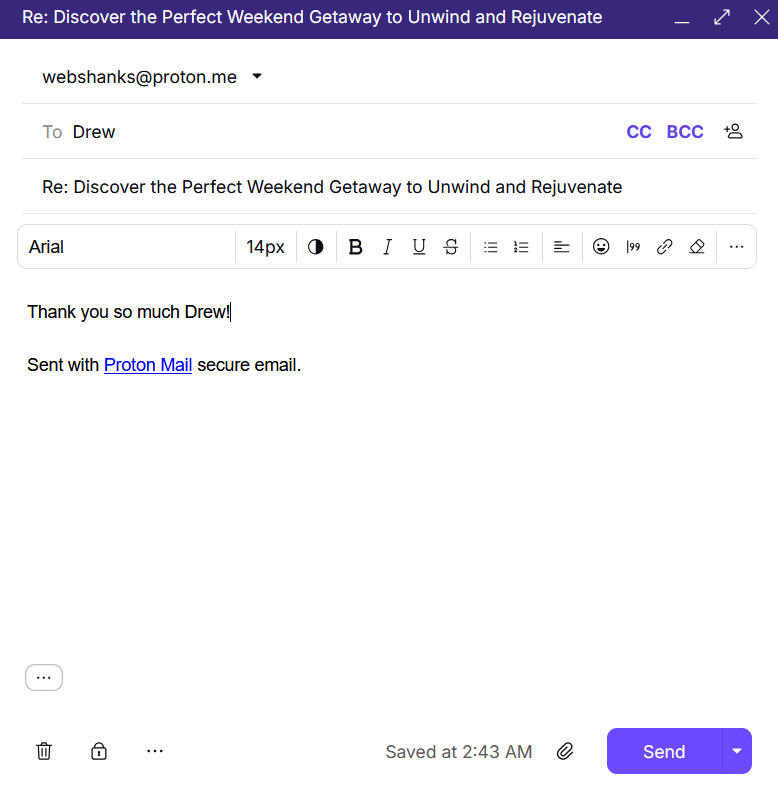
Then let’s reply with a thank you.
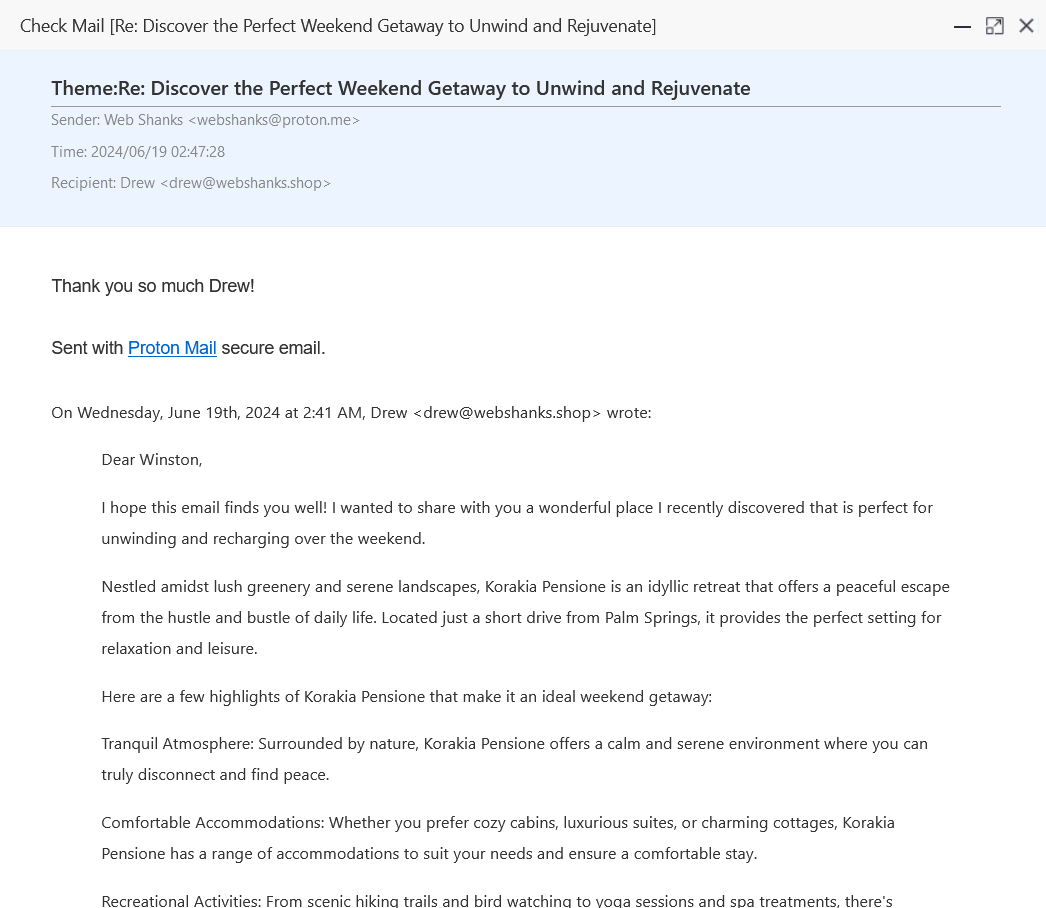
We receive it! We can now send and receive email messages with our aaPanel!
Step 9: Add More Domains and Email
Open the Mail Server application.
Go to Domain List > Add Domain.
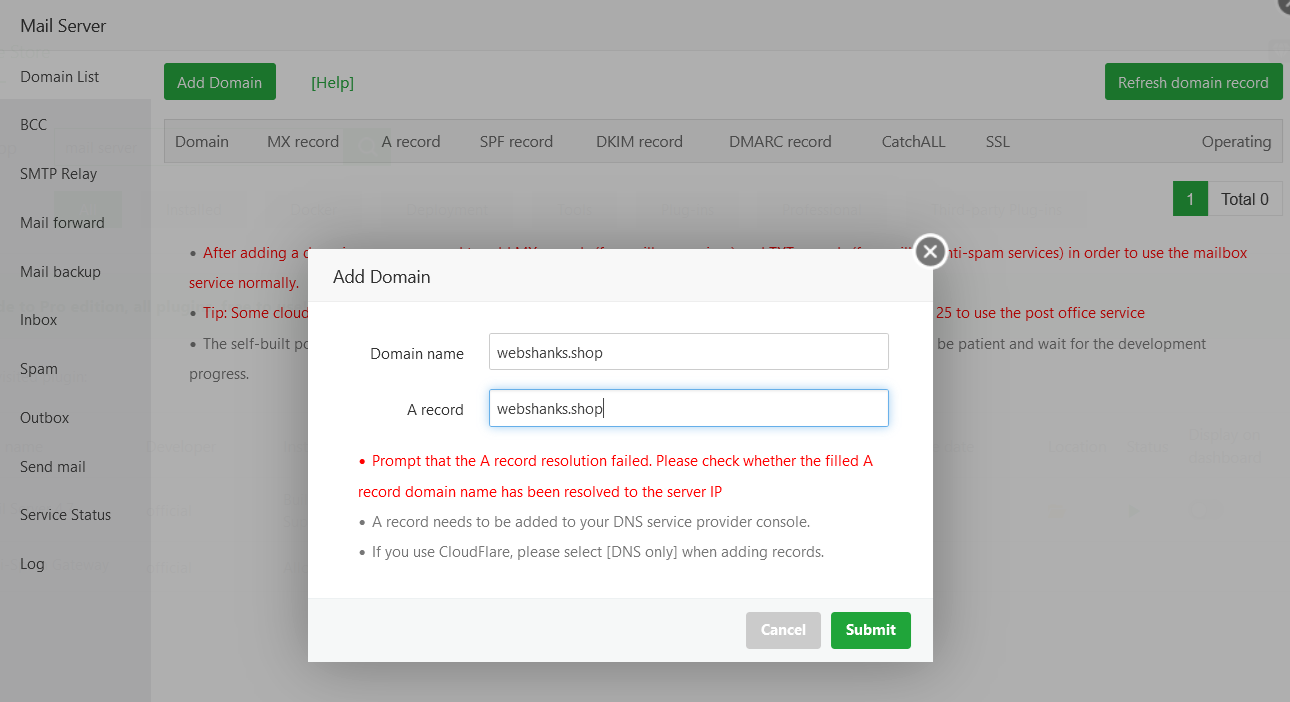
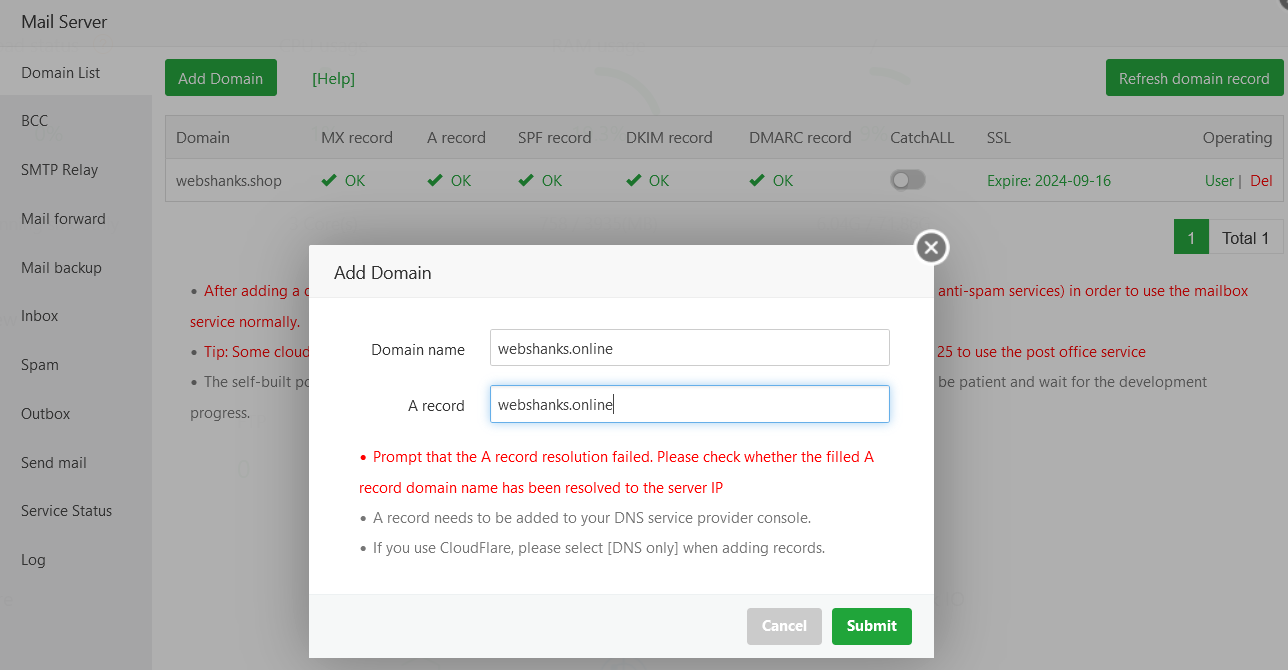
Ensure you have an A record on your DNS provider.
Then enter your domain name and its A record value.
Then we need to add SSL for our newly added domain.
As usual, we’ll use Cloudflare for the SSL.
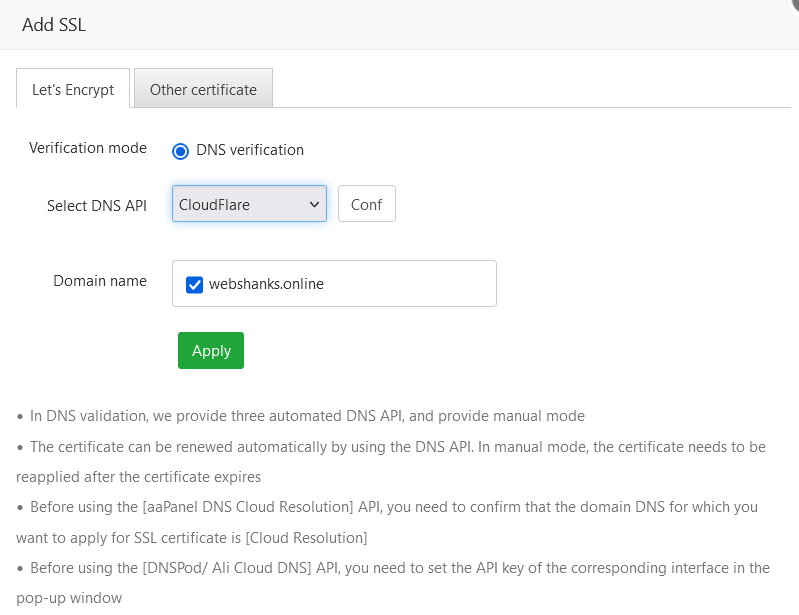
Once the SSL is issued, we will add our DNS records. Click the newly added domain to show the DNS records to be added.
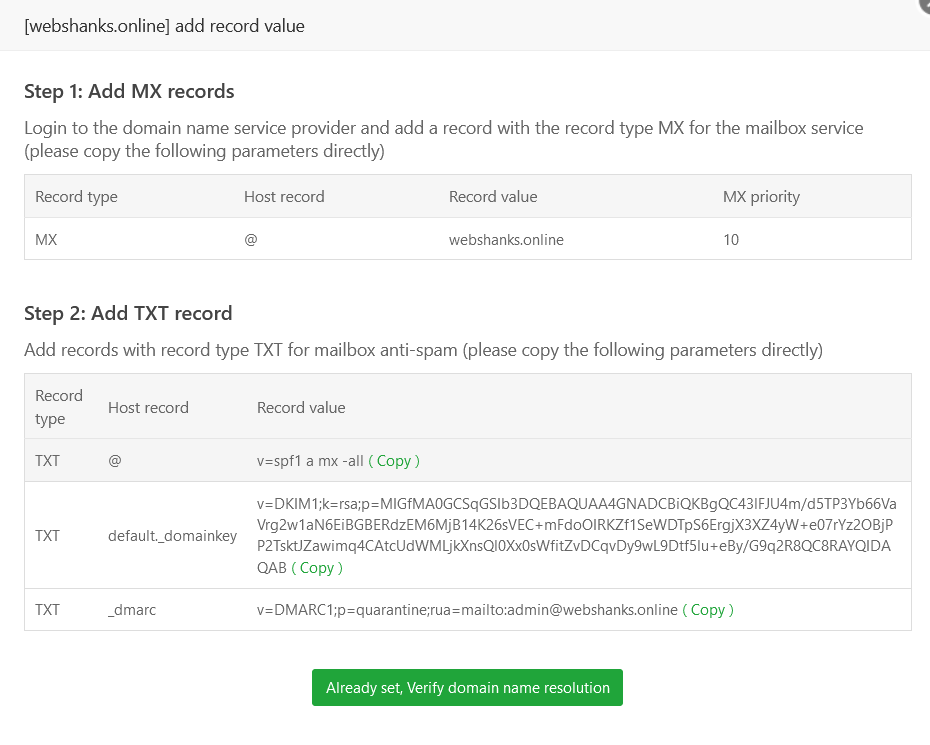
Ensure the new domain’s DNS records (MX record, SPF, DKIM, and DMARC) are correctly configured to point to your server’s IP address.
This is what your DNS records look like.
In case you cannot receive emails, use softfails authentication ~all instead of -all in SPF.
 Next, we will add a user so that we can send an email.
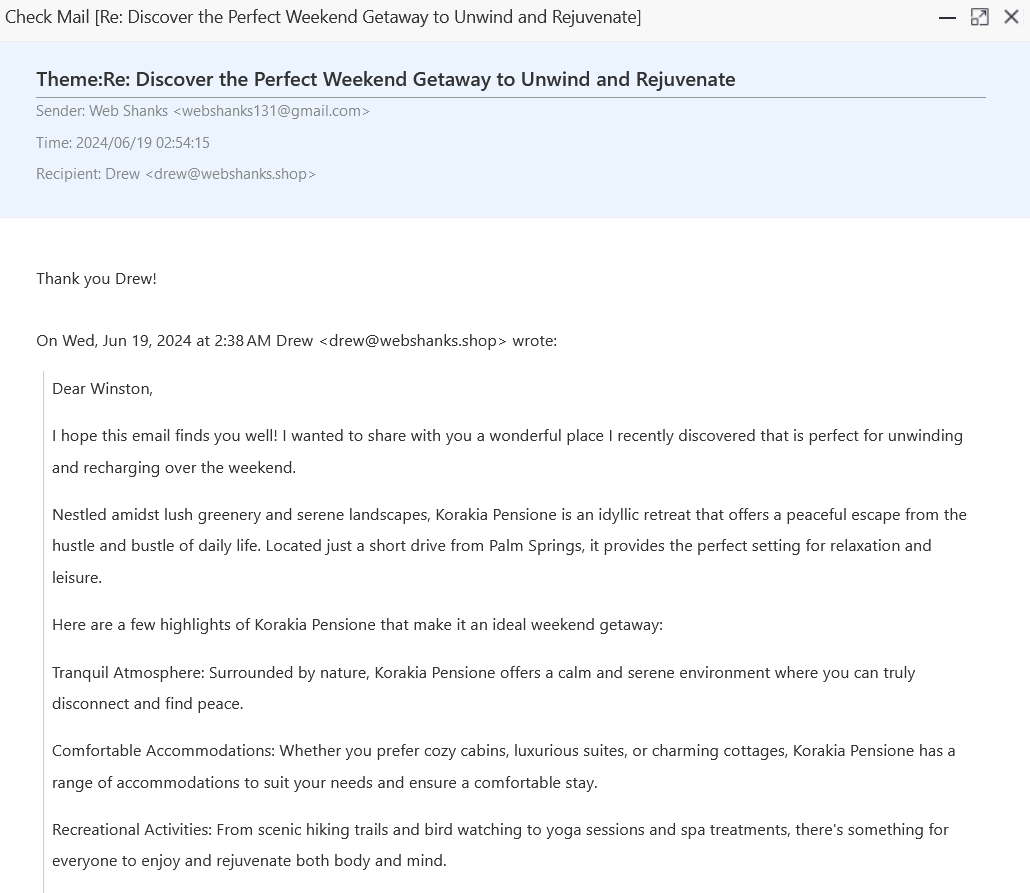
Now let’s test our email.

It went directly to our Gmail inbox.
Let’s reply with a thank you.
If you want to add more domains, just rinse and repeat this process.
Now we have a fully functional multi-domain email server using aaPanel!
Troubleshooting
Emails Not Sending/Receiving.
Verify DNS settings and ensure MX records are correctly configured.
Software package installation lags.
Close the installation box and restart the panel.
Panel SSL doesn’t issue SSL.
Use ZeroSSL instead of aaPanel Let’s Encrypt SSL
FAQs
Can I host unlimited domains and email accounts?
Yes, you can host multiple domains and email accounts as long as your server resources (CPU, RAM, storage) can handle the load.
How can I ensure email deliverability?
Implement SPF, DKIM, and DMARC records for each domain. Regularly monitor email server logs and ensure your server’s IP address is not blacklisted.
How can I use aaPanel SMTP relay?
Open the Mail Server app and go to Domain List. From there on, click the user and it will show you the SMTP and IMAP settings. You can use it on your email clients as well as on smartphones.
Final Thoughts
Managing multiple domains and email accounts on aaPanel is a powerful way to consolidate your web and email hosting on a single server.
So, I’ve managed to show you how to host an email server with multiple domains using aaPanel, RackNerd, and Cloudflare.
If you are facing roadblocks, comment them down, I’m here to help.
Is it possible to host my websites somewhere else but use this as the mail server of the said domain name. In other words, is the a record necessary or can it work without the a record like zoho mail
You need an A record for the domain to get an SSL as well as rDNS. You can’t host separate websites if you’re using your domain for this email server.